Adobe Prelude
Adobe Prelude is a video ingest and logging software. It is a part of the Adobe Creative Cloud Suite. Prelude also helps us to tag and transcode raw footage from cameras. As an open platform, it supports customized integration with third-party technologies.
In simple words, it is video management software. Professionals use it for the post-production purposes of film creation. It is a great tool for managing and organizing various kinds of videos. It also converts the videos in a default file format for further use.
Table of Contents
What is the Use of Adobe Prelude?
We can perform many functions with the Adobe Prelude. It allows us to create video projects and edit the raw clip. We can also manage and organize a large number of videos and media files.
We can create rough cuts and markers in the basic editing sequence Using Prelude. Then we can export them into other video editing software. The special Logging feature helps us to create subdivisions of the clip. We can also add temporary markers with this feature. This feature allows us to import and export data files. We can upload them in the Creative Cloud later. For managing videos for our post-production works, it is the best.
What are the Advantages of Adobe Prelude?
Adobe Prelude is highly compatible with Adobe Premiere Pro,. We can transfer videos to this best video editing software without any complexity. It also saves time. Prelude also has a great user-friendly interface that is more efficient and easier to use. It allows creating hyperlinks and converting media files into various formats.
Editing and organizing video files in the same software take much time and effort. But the user can save time and give less effort if they use Adobe Prelude. Isn’t it a great advantage to review and manage video files in such great software? With this excellent video management software, you can speed up your post-production process.
Let’s see the workflows of Adobe Prelude and other features to learn how it works.
Adobe Prelude Workflows
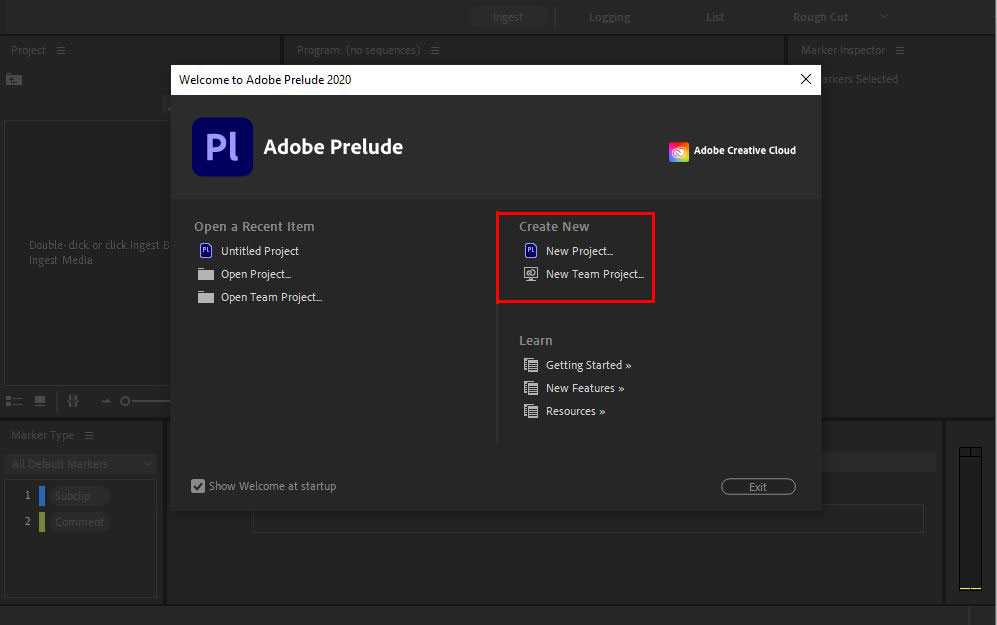
You can create a project (.plproj) file in Adobe Prelude. The project file contains references to your media. A project file stores only reference to the source files. Remember, Prelude cannot locate moved files. When you open Adobe Prelude, you can see the option for creating a project.
- Ingesting and Raw Footage
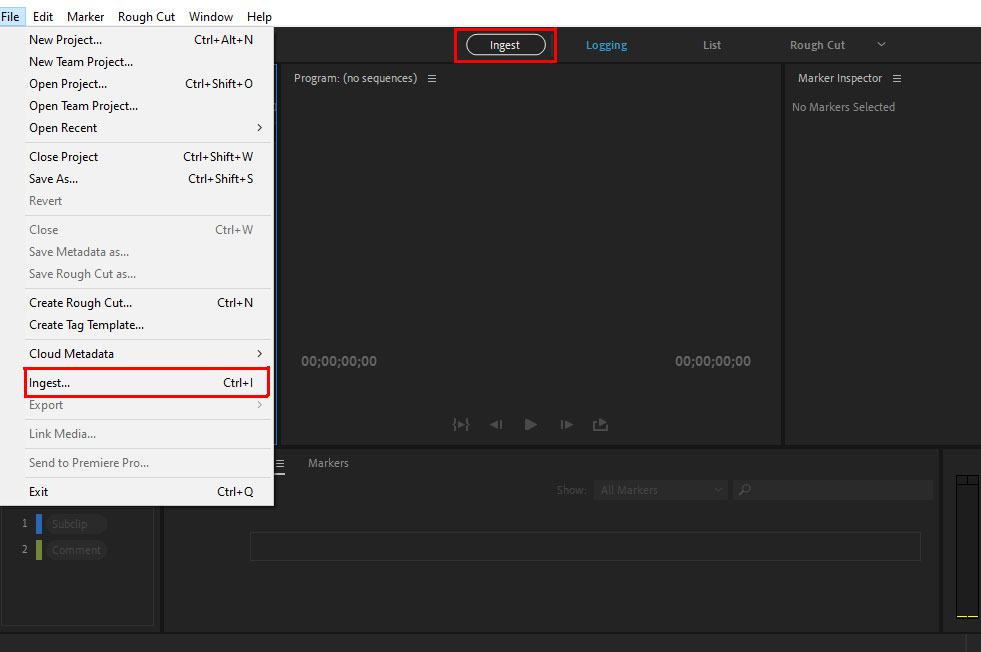
You can ingest full movie clips or only a part of a clip in Prelude. File size and byte-level ensure you identify if the File is ingested or not.
You can find the Ingest option on the top bar or choose it from the file menu. You can also use shortcut Ctrl+I for ingesting files.
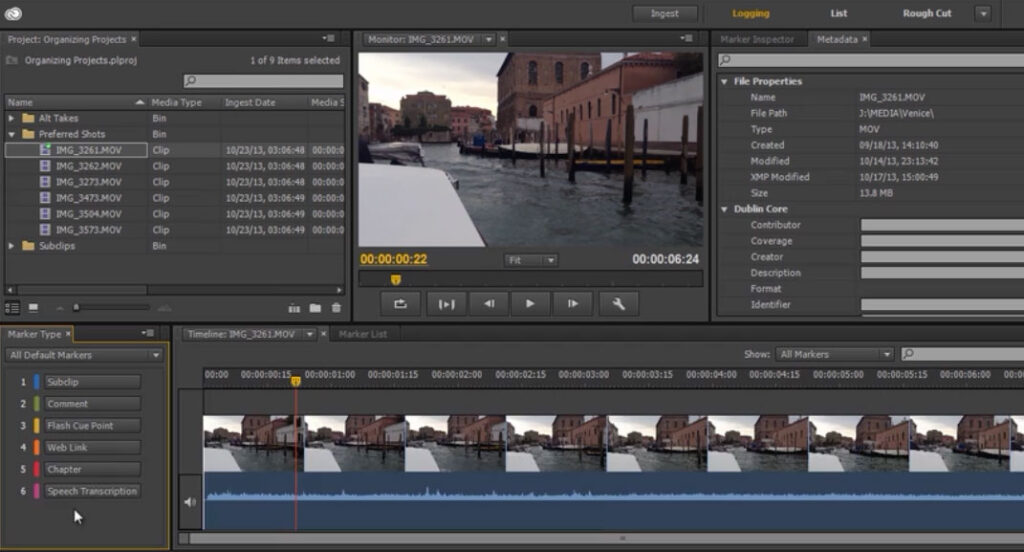
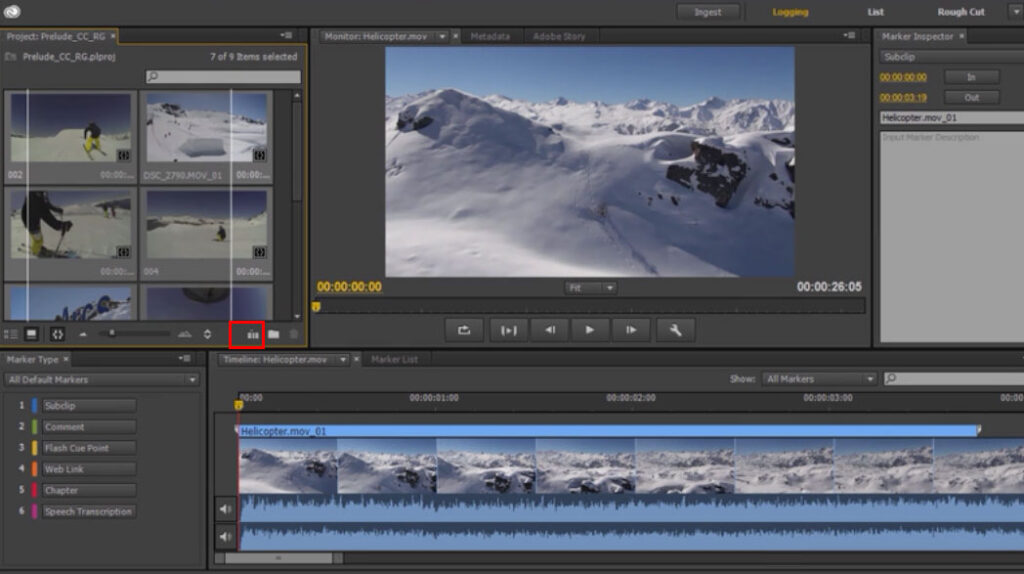
You can use the logging option from the interface. Also, use keyboard shortcuts to add temporal metadata to the clips. The markers and other metadata will help you organize and find the clips. You can use the metadata information when you export to other software.
A rough-cut used for a basic editing process. It is a timeline-based sequence of video and audio clips. This editing process includes trimming, clips selection, and sorting various clips. You have to create rough cuts from clips before sending them to other software.
To create a rough cut, you have to choose the rough-cut option by selecting the File in the source monitor. After saving the rough cut, you can open it in the Timeline by double-clicking on it. You can also create a copy of the rough cut by selecting the File>Save Rough Cut As option.
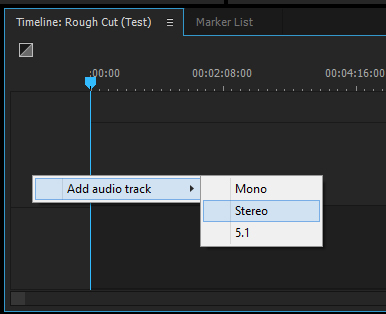
You can also add markers and voice-overs to the rough cuts. To record voice-overs for a rough cut, select Rough-cut, then Create A Rough-cut and open it on Timeline. In the Timeline, right-click to add an audio track. You can choose various audio formats such as Mono, Stereo, etc.
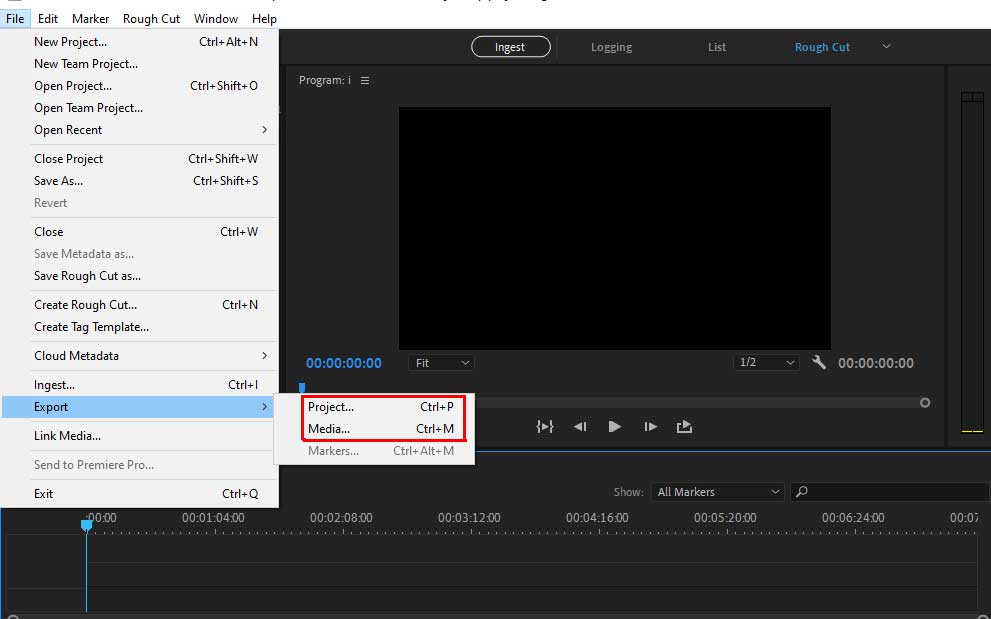
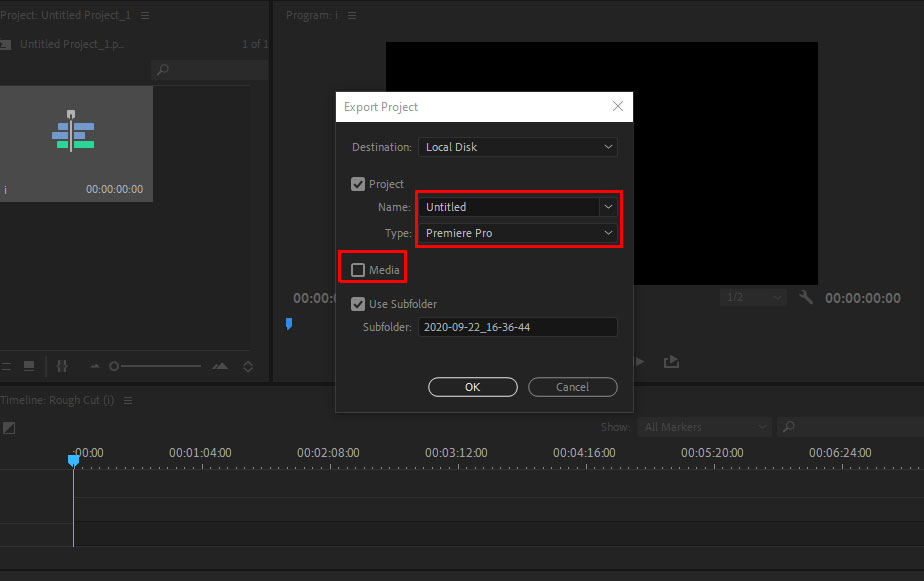
- Exporting in Adobe Premiere Pro
You can export a rough cut in other software such as Adobe Premiere Pro. You will find the metadata information even after exporting in other software. Select the rough cut and other clips from the project panel that you want to export. Then select File > Export > Project. To save the exported project on your computer, select Local Disk. After that, enter a name for the exported project.
System Requirements for Adobe Prelude
If you are a Windows user, then you must have the following technical specifications.
Windows:
- Intel 6th Gen or newer Processor
- Windows version 10 (64-bit) or later
- 16 GB of RAM. Our recommendation is 32GB.
- 4 GB of GPU
- SSD Hard Drive
- Display Resolution must be 1920 x 1080 or greater.
If you are a macOS user, the specifications are almost the same. You will need a macOS X v10.12 or a later version operating system to run Adobe Prelude.
Skills for Using Adobe Prelude
Adobe Prelude is easy for beginners. It doesn’t need any specific skills. If you have a basic understanding of video editing and file formats, you can use it. Knowing about metadata is an advantage to learning Adobe Prelude.
How to download Adobe Prelude?
You can download Prelude for a 7-day free trial version from the Adobe website. To download, you have to sign in with your email first. Follow the link to download
For purchasing this software, you must have an Adobe Creative Cloud account. Adobe offers you to get the latest features in Prelude and Premiere Pro for just $20.99 per month.
Conclusion
Adobe Prelude is the most useful software with an extensive toolset and functions. Users mainly use it for managing raw video clips. Also, helps and makes our work easier and more fun.
Adobe released a new version of Prelude, which is Adobe Prelude 2020 (version 9.0.1). The latest version offers an update of the product icon and a host of general stability. Adobe also fixed the security bugs.
You can manage your video post-production process with this excellent tool. But if you need any Photography post-production service as well, don’t hesitate to contact us.
What is the Adobe cloud?
Adobe Creative Cloud is a set of software from Adobe Inc. All are great for graphic designing, video editing, web development, and photography.
What is Adobe Media Encoder?
Adobe Media Encoder is also a product of Adobe Creative Cloud. With Media Encoder, you can export video files to any video sharing platform.
What does Raw Footage mean?
Raw footage is another name for source footage. Raw footage is the unprocessed camera output file.
Узнайте, как работать с видеоклипами в Adobe Prelude
Программное обеспечение Adobe Prelude представляет собой инструмент для вставки видео и ведения журнала событий видео, с помощью которого можно быстро назначить теги и перекодировать видеоряд RAW с камер, использующих файловую систему. Это открытая платформа, которая поддерживает настраиваемую интеграцию сторонних технологий и систем управления.
Знакомство с Adobe Prelude
Специалист по решениям Adobe Джейсон Левин показывает, как можно вставлять видео, вести журнал событий и выполнять черновой монтаж с помощью Prelude CS6.
Джейсон Левин
Рабочий процесс
1. Создайте проект или откройте существующий
Adobe Prelude создает отдельный файл проекта (PLPROJ) для каждого проекта, созданного в Prelude. Файл проекта содержит ссылки на медиаданные, добавленный в проект.
В файле проекта сохраняются только ссылки на вставленные исходные файлы. По этой причине файлы проекта имеют относительно небольшой размер. Поскольку сохраняются только ссылки на исходные файлы, не нужно беспокоиться о перемещении, переименовании или удалении исходных файлов. Если файлы мультимедиа перемещены или переименованы, можно повторно подключить такие медиаданные к своему проекту с помощью команды Связать заново в меню Файл .
2. Вставьте видеоряд RAW
Вставьте клипы фильмов целиком или частично(частичная вставка). Выберите кодек, который оптимально соответствует задачам редактирования.
Проверка размера файлов и проверка на уровне байтов позволяет сразу определить, насколько успешно вставлен видеоряд.
3. Настройте вставленный видеоряд
Можно переупорядочить последовательность клипов, переместив их в представление проекта. Используйте подборки для организации содержимого проекта практически так же, как и с помощью папок для организации файлов. Подборки могут содержать клипы, фрагменты клипов и черновой монтаж.
4. Создайте журнал событий видеоклипов
Для добавления метаданных в клипы и создания фрагментов клипов используются параметры интерфейса или сочетания клавиш. Маркеры и другие временные метаданные позволяют быстро организовать и выполнять поиск по клипам. Максимально эффективное использование метаданных достигается путем экспорта в другие программы (например, в Adobe Premiere Pro).
5. Выполните черновой монтаж
Выполните черновой монтаж клипов и фрагментов клипов перед тем, как отправить их в другие программы (например, Adobe Premiere Pro) для окончательного редактирования.
6. Выполните экспорт в Adobe Premiere Pro/Final Cut Pro
Можно экспортировать черновые монтажи, клипы, фрагменты клипов и подборки в Adobe Premiere Pro или в XML-файл FCP. Кроме того, можно отправить черновой монтаж непосредственно в Adobe Premiere Pro для редактирования.
Сведения об организации и метаданных передаются из Prelude в Adobe Premiere Pro. Представленный рабочий процесс позволяет сократить время и усилия на последующую обработку при создании финального монтажа фильма.
Расширение Prelude
Технические партнеры Adobe могут использовать пакет инструментов разработчика Prelude для индивидуальной настройки Prelude.
- Воспользуйтесь возможностями открытой платформы Adobe Prelude на базе XMP для интеграции сторонних технологий и систем управления ресурсами.
- Создавайте настраиваемые маркеры с возможностью поиска на базе временных данных с помощью панелей ActionScript ® , которые содержат данные для проекта или организации.
- Импортируйте метаданные событий из других источников, связанных с определенным рабочим процессом. Затем добавьте его в свой видеоряд в Prelude, выполнив импорт как XMP-потока или файла.
При подготовке материала использовались источники:
https://clippingpanda.com/adobe-prelude/
https://helpx.adobe.com/ru/prelude/using/getting-started-prelude.html