Fast Boot on ASUS: Here’s How to Configure
Like most motherboards, ASUS also includes the ‘Fast Boot’ feature that helps accelerate the bootup time. It works by initializing all hardware components simultaneously during the startup but this does come with certain trade-offs.
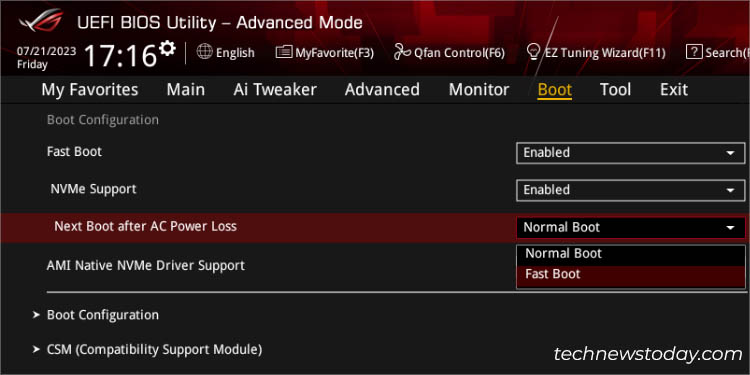
Depending on your requirement, navigate to Boot > Boot Configuration in ASUS BIOS to enable/disable Fast Boot. Along with that, some models even let you tweak additional settings, such as NVMe Support and Next Boot after AC Power Loss.
Since this feature can make it a little difficult to access the BIOS interface, I like to keep it disabled on my high-end ASUS systems. However, if your computer takes too long to start and you wish to save some time, enabling Fast Boot should be a good idea.
Table of Contents
Enter UEFI/Legacy BIOS Utility
While you can configure ‘Fast Startup’ from Windows, the ‘Fast Boot’ feature on BIOS is a completely different concept.
The former puts your computer in a hibernation state, and the feature is enabled by default on the latest Windows versions (from 8 onwards).
On the other side, BIOS Fast Boot operates on the hardware level and can significantly improve the bootup speed even when you’re using an older Windows version.
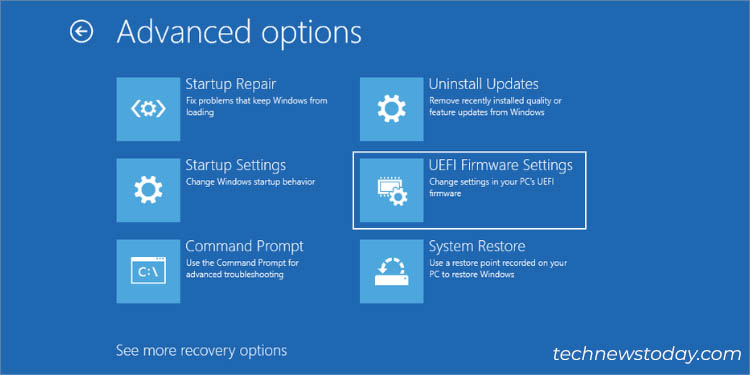
In order to access this feature, you need to enter the BIOS screen first. Typically, Fast Boot is available on UEFI systems. However, upon my extensive testing, some Legacy ASUS boards also support it.

-
The easiest way to get to the UEFI/Legacy screen is by pressing the Del or F2 key when the PC is POSTing.
Navigate to the Boot Configuration Section
After accessing the BIOS screen, you need to now move to the dedicated Boot Configuration page. While the Fast Boot option is present directly under Boot in Legacy systems, there are a few more steps you need to take on the UEFI utility:
-
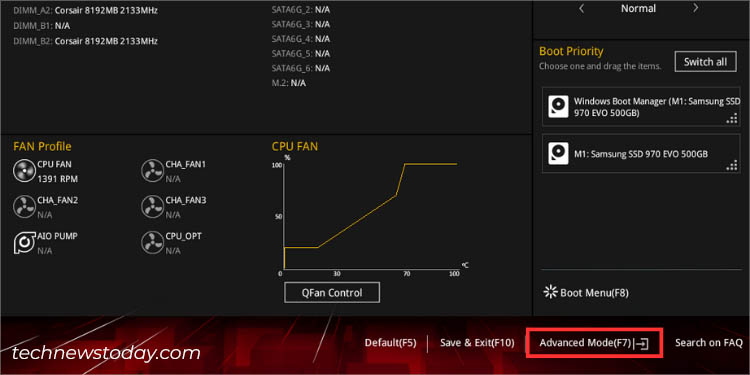
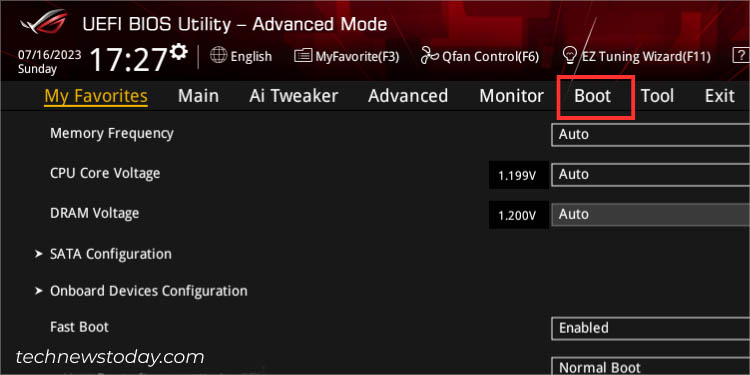
Since you can’t configure Fast Boot in the EZ mode, ensure you’re in the Advanced mode first. Just like me, you may quickly switch between them using F7.
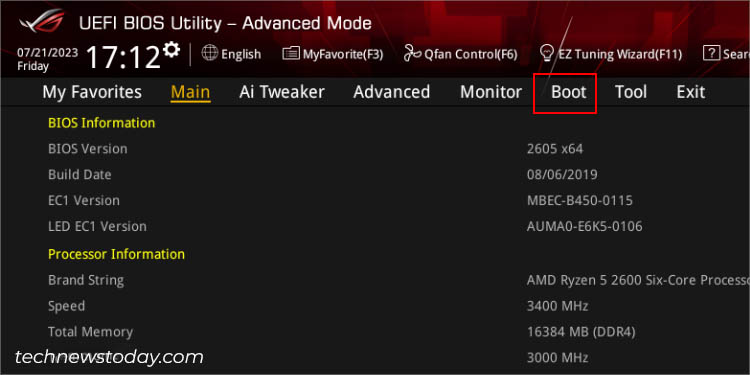
Now, navigate to the Boot tab.
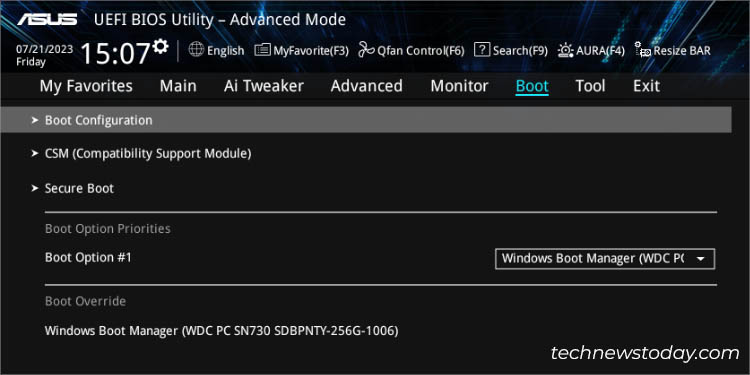
In some ASUS series, you’ll find the Boot Configuration section here. Take a look at the UEFI screen of my ROG STRIX B450-F GAMING below:
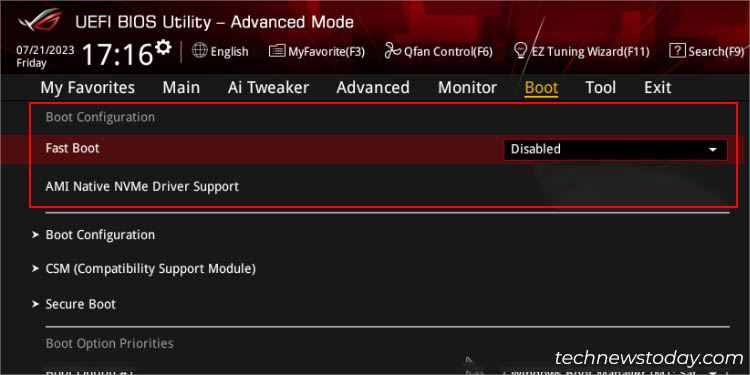
But for other boards, you need to enter the dedicated section first. Here’s a demonstration of it on my Prime B450 Plus BIOS:
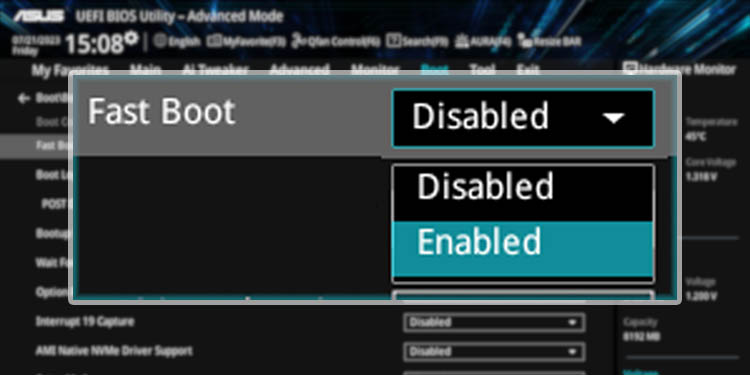
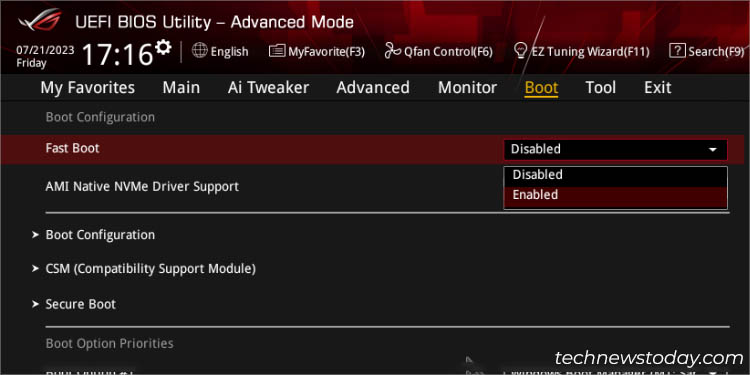
Enable/Disable Fast Boot
Now comes the main step. To tweak the current configuration, all you have to do is expand the Fast Boot option and set it to either Enabled or Disabled.
While some other motherboards, like Gigabyte and ASRock, offer an additional Ultra Fast Boot option, I couldn’t find such a feature on my ASUS laptops and motherboards.
However, I have come across ‘MRC Fast Boot’ in some Intel 700 series ASUS motherboards. This option speeds up the memory initialization process during startup, significantly improving the bootup time.
Since the BIOS options are usually different on every series (can even vary based on models), you may test whether there’s a similar one on yours.
Quick Method:
To save time, you can use F9 to open the Search dialogue box. Input the correct keyword (in this case, ‘fast boot’) and hit Enter.
The related setting should appear and you can configure its setting without having to move to different sections in the BIOS screen.
Configure Additional Fast Boot Options
To circle back to what I said earlier, enabling Fast Boot comes with certain trade-offs. It will disable different functionalities, like making it hard to enter BIOS, Wake on LAN, boot from removable devices/optical/network, etc.
This is because enabling Fast Boot starts your computer with a minimal set of devices and skips the testing of most hardware components during POST. For that reason, many users might be experiencing compatibility problems.
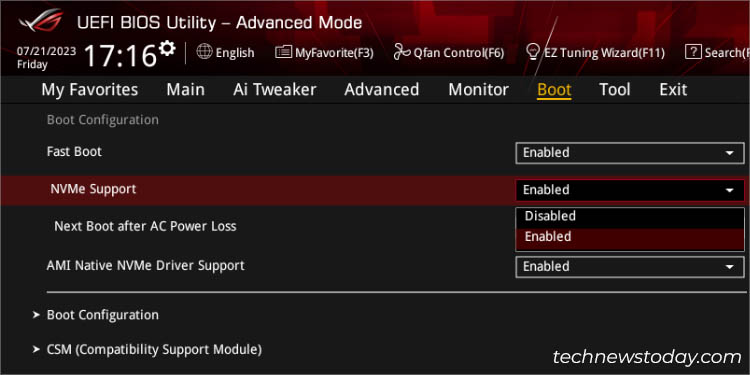
However, some ASUS models provide some additional options once you enable this feature. For instance, I can manage the following settings on my ROG STRIX B450-F GAMING motherboard:
-
NVMe Support: Enabling this option will check the NVMe devices during POST.
-
Next Boot after AC Power Loss: Set either normal or fast boot in case an AC power loss occurs.
- Start or restart your computer.
- Wait until you see an ASUS logo on the startup screen, like the one shown below (this is different for every motherboard series).
- In the UEFI screen, switch to the Advanced tab using the F7 key (if you’re in EZ mode).
- Then, get to the Boot tab.
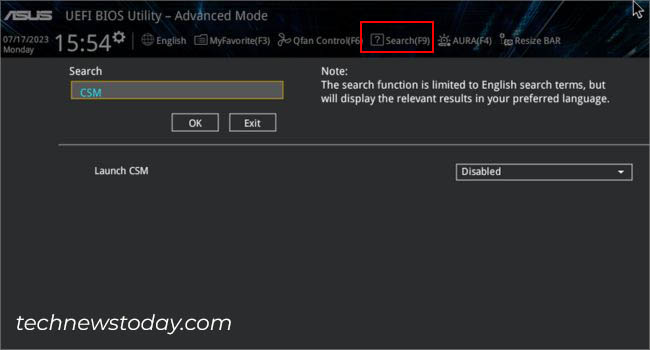
- Click on the Search button from the top (next to the status bar). Otherwise, directly press F9 on your keyboard.
- Once the Search dialogue box pops up, type CSM and hit Ok.
- Enter the Advanced Mode by pressing F7.
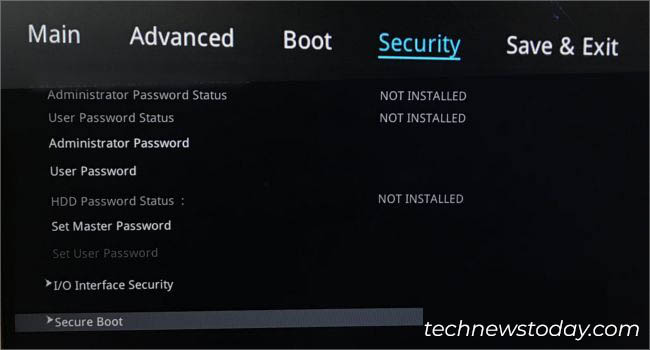
- Get to the Security section.
- Here, select Secure Boot.
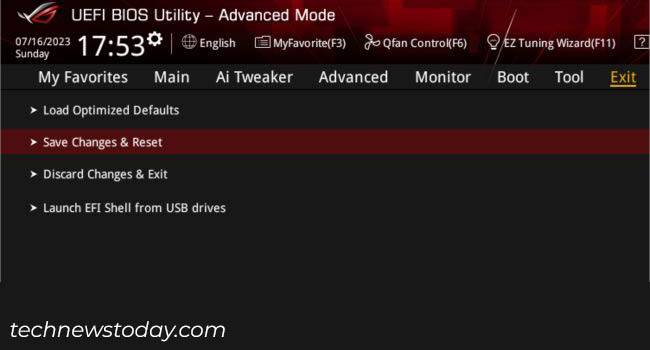
- Navigate to the Exit tab.
- Then, select Save Changes & Reset.
Save and Exit From BIOS
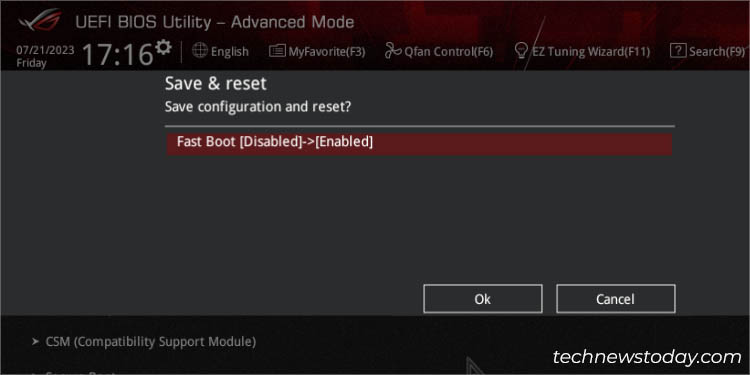
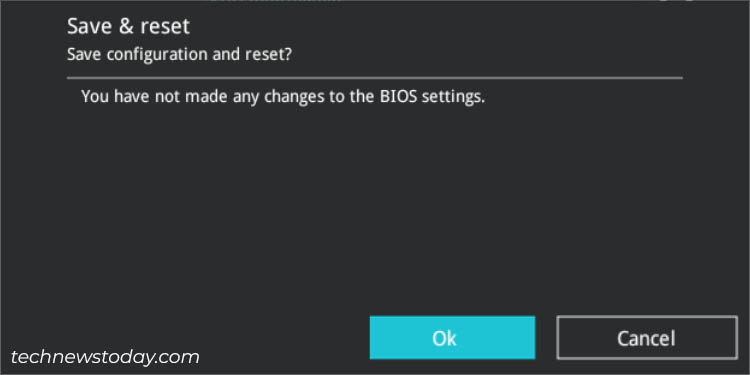
Once you have configured Fast Boot and its related settings, don’t forget to save the changes before exiting the BIOS screen.
You may move to Exit > Save Changes and Reset or simply hit the F10 key. Either way, a confirmation prompt appears (as demonstrated above). Press Ok and you should notice the changes as soon as your ASUS computer restarts.
Since Fast Boot completely depends on the system, I suggest monitoring the performance when the option is both enabled and disabled. Ensure opting for the right setting that best suits you.
Bhishu Acharya is a technical content writer at TechNewsToday. He specializes in monitors, laptops, storage devices, and other peripherals. Apart from computer hardware, you can also find his how-to and troubleshooting articles on Windows, internet, security, and networking. Ever since getting his hands on a personal computer, Bhishu started exploring its internal components at just 10. His growing curiosity led him to undertake the Computer Science & Information Technology degree and is just a year away from graduation. While balancing his study and work life for over four years, he has harnessed different sets of technical skills. With his expertise, he is now dedicated to helping netizens looking for hardware and software-related fixes. Today, Bhishu’s proficiency extends beyond computer hardware. In his spare time, he enjoys coding and learning new programming languages. You can contact him at bhishu@technewstoday.com
Changing Boot Order on ASUS BIOS: A Step-by-Step Guide
While specifying boot priority is not required when using a single bootable device, it is essential for users who prefer multi-booting. Since your ASUS system selects the drive listed at the top of the boot order, you need to arrange them in a proper sequence.
To manage your bootable devices on ASUS BIOS, get to Boot Priority in the EZ mode or Boot Option Priorities in the Advanced mode. Now, drag and drop the drives in desired positions or set them accordingly in the respective boot options.
For instance, I have installed Ubuntu on my primary drive and Windows on the secondary. By default, Ubuntu is booted every time I start the PC but what I prefer is Windows.
Even though it’s possible to select the latter from ASUS Boot Menu, doing so every single time on startup can be quite tedious. Instead, keeping the secondary drive first in the boot priority list will be the best solution here.
Table of Contents
Restart Your Computer to Access BIOS Interface
To access the Boot Order settings, you need to get to ASUS Legacy/UEFI screen first. If you haven’t accessed the interface before, the process isn’t as daunting as you might think.
Start/restart your PC and as soon as you see the ASUS/ROG/TUF screen, press the Del or F2 key.
The first screen is usually accompanied by “Please press Del or F2 to enter UEFI BIOS setting” or a similar message. Note that if you are late in pressing the dedicated key, another logo screen appears with a ‘loading’ icon and you won’t be able to access the ASUS BIOS.
To avoid this from happening, I suggest spamming the BIOS key as soon as your computer starts up. This even helps if the Fast Boot feature is enabled.
Note: The steps in this guide are emphasized on ASUS UEFI Utility. While the exact process slightly differs on Legacy BIOS, the idea remains the same. You just have to navigate to the dedicated Boot section and change the priority in a similar way that I have demonstrated below.
Manage Boot Priority in EZ Mode
In most ASUS models, the default BIOS menu screen is EZ mode. It offers a simple user interface that is easy to follow along, especially for beginners.
In EZ mode, you can manage all the basic system settings, including the boot device priority. My basic instructions below should help just that:
-
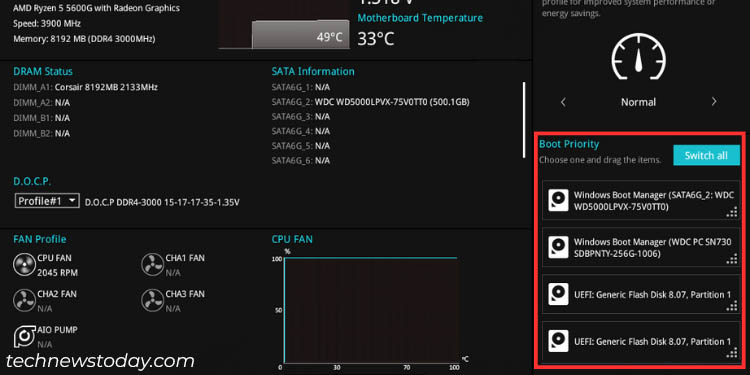
Locate the Boot Prioritysection, which should be at the bottom-right part of the EZ mode screen.
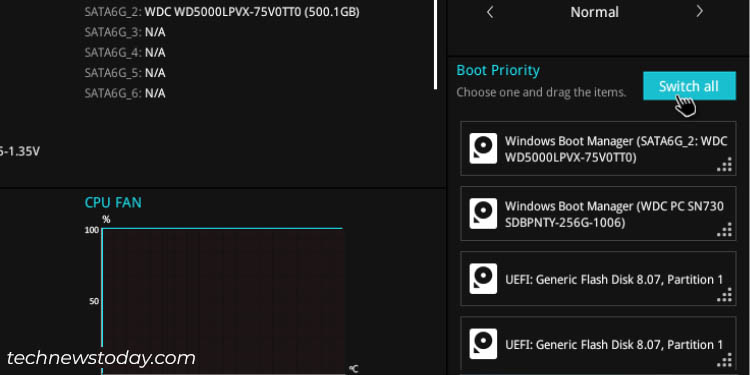
If you have more than four devices and want to manage all, press the Switch all button.
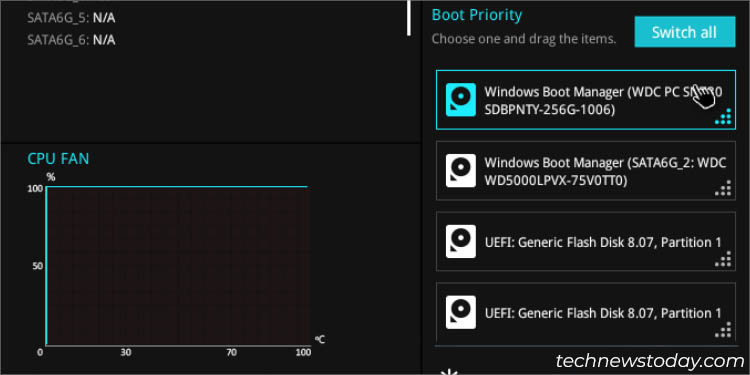
Click and drag the device (that you prioritize the most) to the first position in the list.
Since I want to use Windows, I have kept the dedicated hard drive in the top slot as shown above (for Windows, it should show Windows Boot Manager).
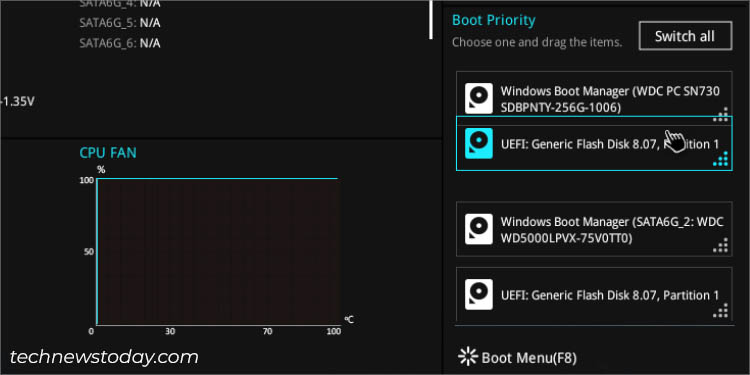
Then, place the next prioritized drive in the second position.
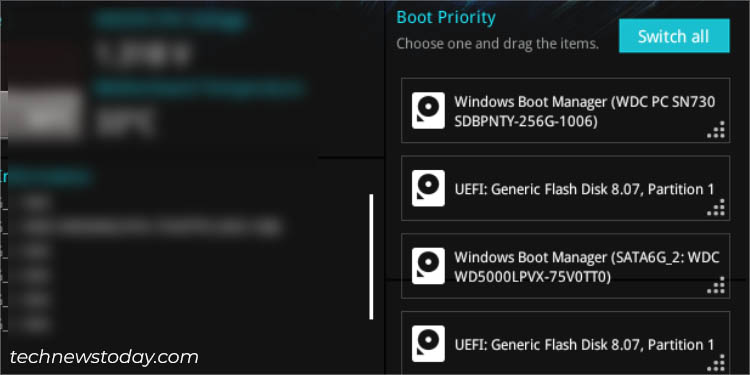
Repeat the above steps for your other bootable devices. In my case, I have connected four drives and this is how my final boot order will be:
Additional Tip: To quickly switch between EZ and Advanced modes in ASUS BIOS, use the F7 key.
Change Boot Priority in Advanced Mode
If your ASUS Setup mode is set to Advanced, you’ll directly be navigated to the Advanced mode. While you can quickly switch to EZ, it’s not at all necessary as there’s a dedicated Boot Option Priorities section in this mode as well (don’t confuse it with Boot Override).

-
First of all, navigate to the Boot tab.
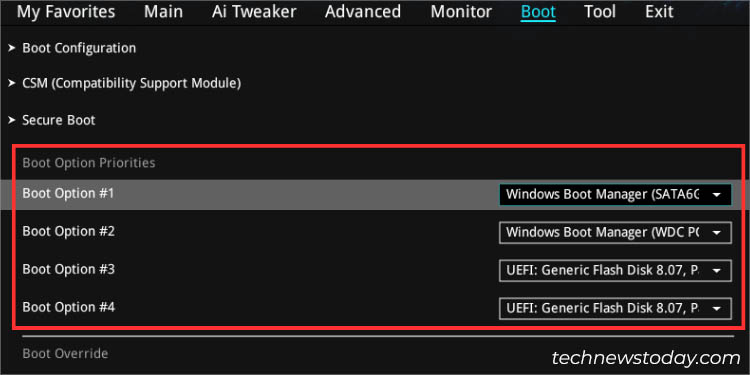
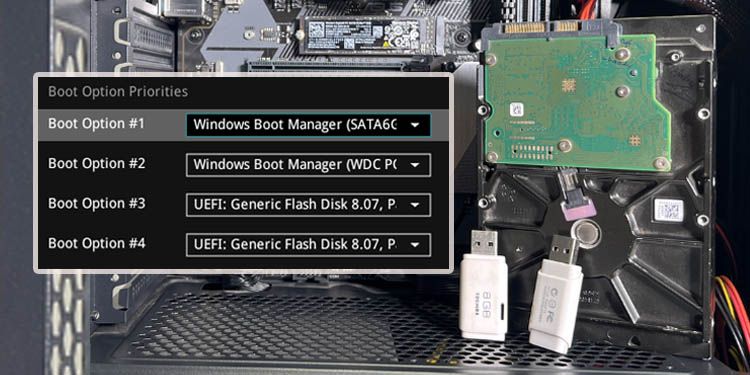
Locate the Boot Option Priorities section. Here, the number of boot options will change based on the number of connected devices.
For instance, I have four drives connected, and hence four options are available to me.
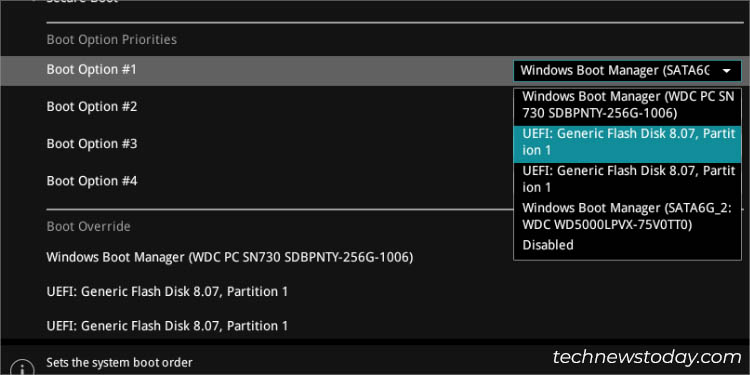
Start with the first boot option. Expand the drop-down and select the storage device that you wish to boot from.
In my case, I am picking the USB flash drive as I want to install Windows 10.
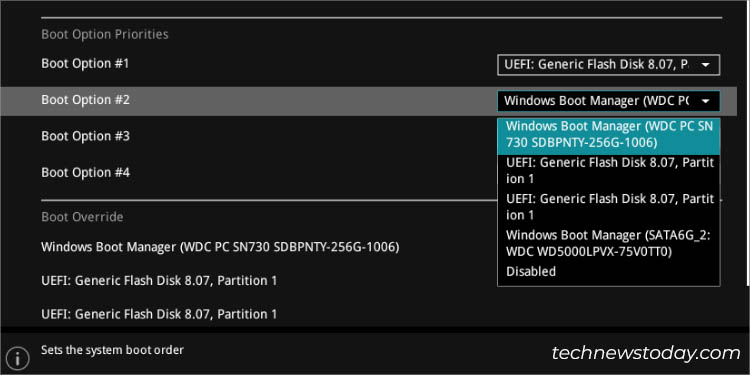
Now, expand the second boot option’s drop-down and select the device you wish to keep as a second priority.
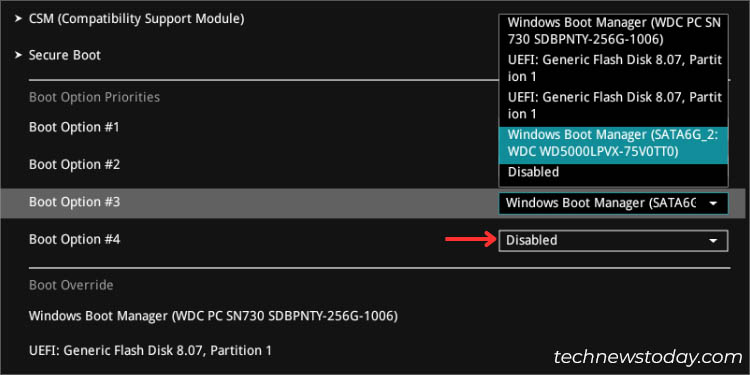
Repeat the same steps for the remaining boot options. As you can see below, you even get to disable the boot option.
Save Changes and Reboot
Once everything is configured, make sure you save this setting before exiting from the ASUS BIOS Utility. Press F10 followed by Ok and this should do the job.
Since managing bootable devices is just a minor change, it won’t be shown in the dialogue box (as demonstrated in the above figure).
Quick Troubleshooting: If you’re trying to access an MBR-partitioned bootable drive on a UEFI system, it will likely not get detected in the Boot Priority section. A simple solution is to enable CSM, which should add legacy compatibility. So, you don’t require converting this drive to GPT.
Bhishu Acharya is a technical content writer at TechNewsToday. He specializes in monitors, laptops, storage devices, and other peripherals. Apart from computer hardware, you can also find his how-to and troubleshooting articles on Windows, internet, security, and networking. Ever since getting his hands on a personal computer, Bhishu started exploring its internal components at just 10. His growing curiosity led him to undertake the Computer Science & Information Technology degree and is just a year away from graduation. While balancing his study and work life for over four years, he has harnessed different sets of technical skills. With his expertise, he is now dedicated to helping netizens looking for hardware and software-related fixes. Today, Bhishu’s proficiency extends beyond computer hardware. In his spare time, he enjoys coding and learning new programming languages. You can contact him at bhishu@technewstoday.com
How to Enable or Disable CSM on ASUS?
The CSM feature on ASUS motherboards and laptops enables legacy BIOS comptability. It allows your ASUS system to boot and install older operating systems that do not natively support UEFI.
However, there’s a certain trade-off as launching it may deactivate certain UEFI-based security features.
While the process seems easy, the setting was unconfigurable on my NX580VD laptop. If something like that happens to you, I advise disabling the Secure Boot option first, which is exactly how I was able to solve my problem. Let me guide you through the step-by-step process.
Table of Contents
Access UEFI BIOS Utility
CSM, a feature within the UEFI settings can add backward compatibility to certain legacy components.
But don’t get confused–it will not completely change your BIOS to Legacy mode. Instead, it’s just going to create an emulation of the Legacy environment.
Having said that, the first step towards tweaking CSM settings in ASUS (or any other motherboard) is reaching the UEFI interface:

Tweak CSM Settings
Now that you’re on the UEFI screen, the next step is to find the dedicated CSM settings page and configure your desired changes.
If you enable CSM, most modern ASUS motherboards let you manage additional boot options. These include managing storage/network/PCI-E expansion devices and setting boot priority.
Note that disabling CSM might lead to booting issues if your PCIe-based storage devices do not contain a Microsoft-signed UEFI driver. You’ll even get a related notice if you’re using a recent AMI BIOS version.
In short, enable CSM if you’re seeking legacy compatibility and leave it disabled for full support of UEFI security features.
Also, you may opt for Auto, which automatically detects the legacy/UEFI state of your devices and sets the CSM support accordingly.
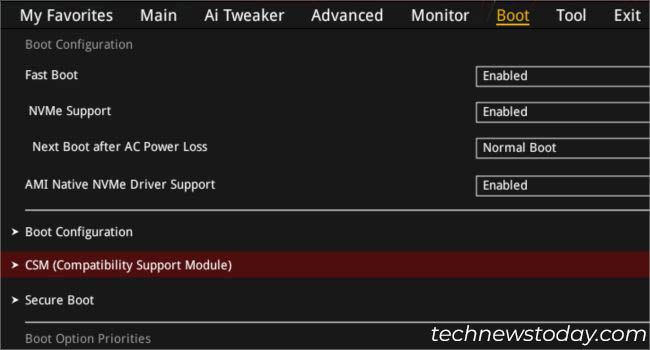
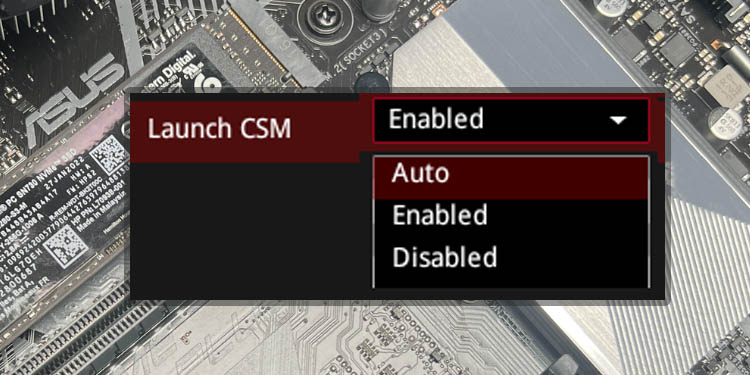
Select CSM (Compatibility Support Module).
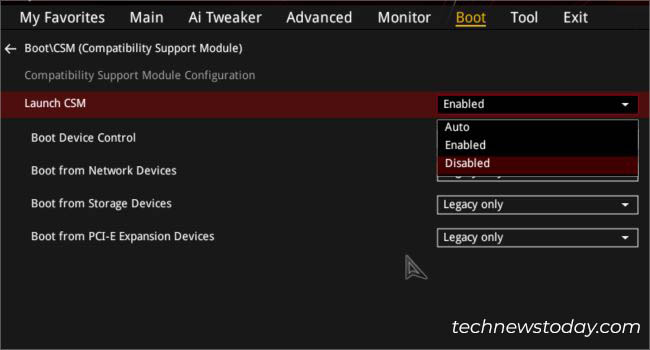
Now, choose Enabled, Disabled, or Auto from the Launch CSM drop-down.
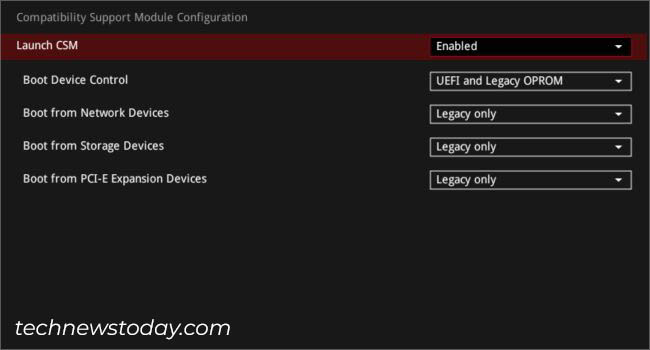
If you have enabled CSM, you may now configure these additional options as well–Boot Device Control, Boot from network devices, Boot from storage devices, and Boot from PCI-E Expansion Devices.
Additional Tip: Turning on ReSize Bar Support utilizes the full capability of your GPU memory. If you want to do this, get to the dedication option in the status menu bar (near the Search button).
However, this feature will automatically disable CSM. Also, the option is not available on every ASUS model.
A much quicker way to configure CSM settings is by using the Search functionality. You can execute the following instructions even on the EZ Mode:
Disable Secure Boot [Optional]
Note: Skip this step if your CSM option is not greyed out.
If the CSM option is non-configurable (greyed-out), it can indicate two things–either your motherboard/laptop doesn’t support it or you need to make modifications at the hardware or firmware level.
In most ASUS laptops, you can fix this by disabling the Secure Boot option. Since it is one of the advanced security functionalities, your UEFI firmware is likely restricting you to configure the CSM option.
Warning: Disabling Secure Boot will prevent your operating system’s digital signature to be checked. So, you might be vulnerable to malware and unauthorized access to the device.
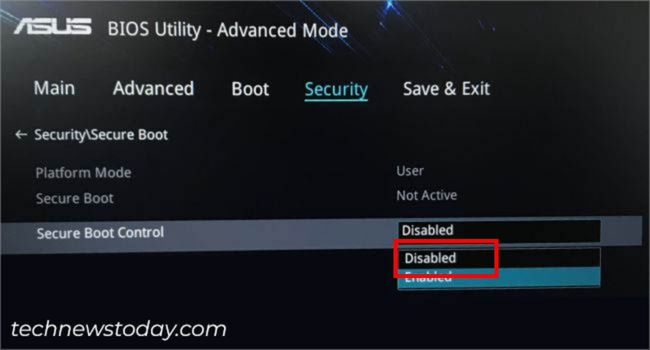
Next, expand Secure Boot Control drop-down and pick Disabled.
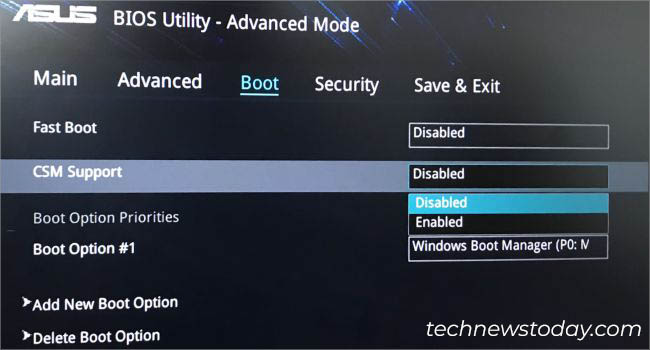
Now, get back to the Boot tab and you’ll notice that the CSM Support becomes available. Expand the drop-down and pick Enabled.
However, this isn’t always the case. I was able to enable the Secure Boot option even when my BIOS mode was set to CSM. With most modern ASUS motherboards, this might be possible.
In case the above instructions didn’t help, I recommend examining your motherboard’s user manual. Identify whether the CSM can be configured with the integrated graphics card. If not, you need to use an add-on graphics card that supports UEFI VBIOS.
Save Changes and Verify
After configuring CSM mode to Enabled/Disabled/Auto, don’t forget to save the changes before you exit from BIOS. As a final step, make sure you verify the changes as discussed below:
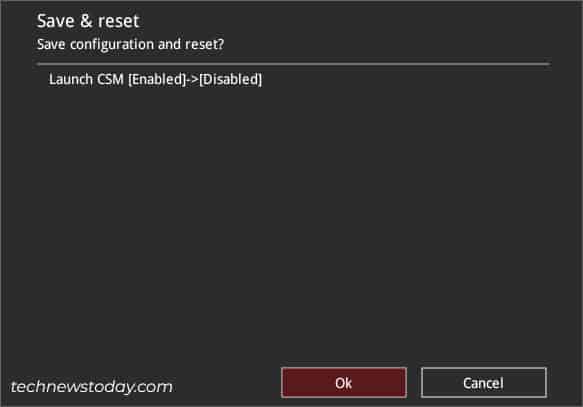
In the ‘Save & reset’ prompt, hit Ok.
Bhishu Acharya is a technical content writer at TechNewsToday. He specializes in monitors, laptops, storage devices, and other peripherals. Apart from computer hardware, you can also find his how-to and troubleshooting articles on Windows, internet, security, and networking. Ever since getting his hands on a personal computer, Bhishu started exploring its internal components at just 10. His growing curiosity led him to undertake the Computer Science & Information Technology degree and is just a year away from graduation. While balancing his study and work life for over four years, he has harnessed different sets of technical skills. With his expertise, he is now dedicated to helping netizens looking for hardware and software-related fixes. Today, Bhishu’s proficiency extends beyond computer hardware. In his spare time, he enjoys coding and learning new programming languages. You can contact him at bhishu@technewstoday.com
При подготовке материала использовались источники:
https://www.technewstoday.com/fast-boot-asus/
https://www.technewstoday.com/boot-order-asus/
https://www.technewstoday.com/csm-asus/