Google Chrome Content Settings A Full Guide
Then there are sites that create cookies to store and track your personal information. Of course, you can disable cookies entirely, but that makes it difficult to use web services like email or e-commerce. Wouldn’t it be great if you could customize these options site-by-site? Turns out, in Google Chrome, you can. Here’s how.
What Is Content Settings and Why Is It Important?#
Content settings – or site settings as it is now called – allow users to modify site permissions for several activities. This includes cookies, pop-ups, Javascript, and background sync, along with things like location, camera, and microphone access. The advantage of using this method instead of disabling cookies and JavaScript entirely on the web browser is that you can be selective about it. You can choose to restrict only the problematic web pages, leaving the rest of your browsing experience untouched. The best part is how accessible these settings are. Not long ago, you needed to jump through a bunch of hoops to find something similar. Now Chrome allows you to modify every aspect of your browsing with a few clicks.
Accessing Content Settings in Google Chrome#
Accessing content settings is easy. In the earlier version of Chrome, you had to navigate to chrome://settings/content, which was hard to remember. Now you can find it in your regular Google Chrome Settings. 8 Additional Permissions And that’s all there is to it. You can customize site permissions for any of the settings outlined in the list, from all sites to customized settings for individual sites. The changes will be saved to your Google account, letting you access the same profile on any PC you log into.
Change Content Settings From the Omnibar#
You don’t have to head to Google Chrome’s settings every time you want to change the content settings. The omnibar – basically the bar containing the address field – allows you to modify these settings much more conveniently.
To begin, click on the little lock icon by the webpage’s address on the omnibar. Select Site Settings from the drop-down menu that appears.
This brings up the same Content Settings interface as earlier, but specific to the current website. You can now adjust the permissions for any of the fields easily.
Keep in mind that this method works on a site-by-site basis, so if you are looking to make wide, sweeping changes across the board, using Google Chrome’s settings is your best bet. But if you want to restrict permissions for an annoying site (or make an exception for them) this is the way to go.
Which Content Settings Are Worth Modifying?#
The problem with content settings is that there are too many of them. For a casual user, it can be tricky figuring out which options to fiddle with and which to leave at their default. Here is a short overview of some settings worth modifying.
Pop-ups#
It is rare to come across pop-ups these days, but they are not yet extinct. Some websites, especially those infested with ads, will always try to interrupt your browsing with pop-up advertisements. By default, Google Chrome will ask you for permission before displaying pop-ups. Since there aren’t many use cases where you would want to see one, you might as well disable them entirely. You can temporarily enable pop-ups for special situations on some trusted sites.
Sound#
Usually, you want sites to be able to play audio. But when you are browsing the web for information, it can be irritating to have some sound suddenly blasting out of your speakers, especially if you are at your workplace. This is why it is often a good idea to disable sound permissions from Content Settings. Though if you forget what you did, you might end up thinking sound is not working on Google Chrome. To get around this, you can add exceptions for useful websites like YouTube.
Ads#
When it comes to ads, you will be disappointed to know that Chrome does not let you shut down advertisements entirely. After all, ads are the way most Google services are monetized, so they are not going to let you disable them entirely. What you can do is block intrusive or misleading ads, which works on less reputed websites. If you want to block ads wholesale, you are better off using an adblocker instead.
Background Sync#
Not many users know this, but just like apps can run in the background of your computer, some sites keep running in the background of your browser. This is designed to give you a more responsive internet experience. For example, social media sites can notify you as soon as you receive a new message, by syncing with the web server at all times. While not harmful on its own, it can lead to excessive resource utilization, even draining battery life on laptops. You may also have privacy concerns regarding a process constantly syncing in the background. Thus it is often advised to turn off background sync from Content Settings. You can always enable it again if you wish.
Should You Modify Google Chrome Content Settings?#
For the most part, the default settings are good enough. Most of these permissions are set to permit only when asked, letting you confirm things like background sync, automatic downloads, etc. The rest are essential features too inconvenient to shut down, like JavaScript and cookies. For these, it is more efficient to create exceptions for the websites you are concerned with, letting other web pages load normally. And if you are concerned about your privacy, this is also where you will find all the site-specific permissions for your browser. For example, you can restrict access to potential data collection vectors like your microphone or motion sensor, only enabling them for the web apps you need and use.
Как настроить и активировать Flash Player в Гугл Хром
Google Chrome считается самым стабильным браузером, который отличается надежной и быстрой работой. В основу любого браузера заложен ряд процессов и плагинов для полноценного выполнения всех функций. Если еще вчера вы исправно работали в интернете, а сегодня не загружаются некоторые видео и прочий мультимедийный контент, то, возможно, проблема лежит в блокировке Flash Player. Никакой серьезности подобная проблема не представляет, и за пару минут вы сможете включить Флеш Плеер. Ознакомьтесь с подробной инструкцией, как это правильно сделать.
Для чего нужен Flash Player в Гугл Хром
Некоторые пользователи длительное время используют браузер Google Chrome и не знают, что такое Adobe Flash Player. Поэтому перед тем как активировать плагин с подобным названием, сначала необходимо разобраться, что он из себя представляет. Итак, Flash Player – это специальное расширение, которое носит кроссплатформеный характер и выполняет функцию отображения мультимедийного контента. Если у вас перестали воспроизводиться видео или запускаться игры, то проблема, скорее всего, кроется в неработоспособности Флеш Плеера. На его «плечи» также ложится забота об открытии интерактивных презентаций, анимаций и роликов.
Особенностью браузера Гугл Хром является то, что он использует современный Флеш Плеер нового поколения под названием Pepper, который для некоторых веб-обозревателей остается предметом мечтания.
Как активировать плагин
Активировать Adobe Flash Player в Google Chrome очень просто, и с подобной задачей справится даже неопытный пользователь. Включить утилиту для полноценной работы браузера можно несколькими способами: через настройки, через командную строку и с сайта разработчика. Ознакомьтесь с каждым способом и выберите для себя оптимальный.
Через настройки браузера
Любые изменения в браузере можно произвести при помощи стандартного набора встроенных инструментов, которые находятся в разделе настроек, в том числе, и включить Flash Плеер. Выполните следующий ряд действий:
- Запустите Гугл Хром.
- Нажмите на кнопку меню – в правом верхнем углу три вертикальные точки.
- В появившемся списке выбираете строчку с названием «Настройки».
- Переходите на страницу с настройками, опускаетесь в самый низ и нажимаете «Дополнительные».
- В разделе «Конфиденциальность и безопасность», выбираете пункт «Настройки сайта».
- Перед вами загрузятся доступные опции, которые можно включать или выключать при работе сайтов. Нужно выбрать «Flash».
- Напротив функции «Всегда спрашивать», активируйте ползунок. Это означает, что вы включили Флеш Плеер.
- Настройки применяются ко всем сайтам.
Через адресную строку
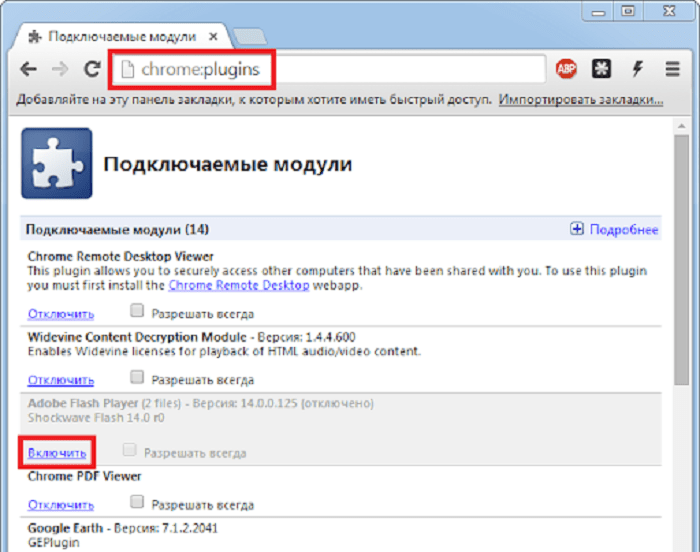
То же самое можно сделать и через адресную строку, перейдя по ссылке сразу в настройки плагина. Такой способ является еще более быстрым и простым. Что вам нужно сделать? Вы должны в адресную строку браузера вставить следующий адрес: chrome://settings/content/flash и перейти по нему. Вас перенесет на страницу с настройкой Flash, где останется только перетянуть ползунок вправо для активации.
Если функция Флеш Плеера активна в настройках Хрома, тогда, возможно, он требует обновления. Обновить Flash можно через раздел «Расширения», который находится в настройках, в пункте «Дополнительные инструменты».
После перехода на сайт
Запустить Флеш Плеер можно прямо со страницы, на которую перешли, если в ней содержатся элементы, требующие поддержки плагина. Здесь все понятно – переходите на любой сайт, в окне с видео будет следующее предупреждение «Нажмите, чтобы включить Flash». Нажимаете, и все работает. В случае если подобное уведомление отсутствует, воспользуйтесь другим альтернативным способом для включения плагина прямо с сайта:
- Переходите на интересующий вас сайт.
- Если мультимедийный контент не работает, то нужно проверить, включен ли Adobe Flash Player.
- В адресной строке с левой стороны нажмите на кнопку – восклицательный знак в кружочке.
- Браузер сразу перенесет вас к настройкам конкретного сайта, и вы нажмете в пункте «Flash» — разрешить.
Настройка плеера
В разделе настроек «Конфиденциальность и безопасность», «Настройки сайта», «Flash» вы можете произвести управление работой плагина. Если при первичном включении вы обратили внимание, что кроме пункта «Всегда спрашивать», в окне с настройками также доступны две функции ниже: «Разрешить» и «Блокировать». Это означает, что кроме активации Плеера для всех сайтов, вы можете произвести индивидуальную настройку. К примеру, отключить Flash Player для отдельных сайтов через кнопку «Блокировать», где нужно нажать «Добавить» и ввести адрес сайта, для которого применить ограничение. То же самое можно проделать и через функцию «Разрешить», если плагин отключен, а разрешение предоставляется отдельным страницам.
Порядок отключения плагина
Отключить Флеш Плеер можно таким же простым способом, как и включить. Процедура является обратной. Заходите в меню браузера, выбираете «Настройки», далее «Дополнительные» и в разделе «Конфиденциальность и безопасность» переходите в «Настройки сайта». Далее вам останется отыскать пункт «Flash» и перетянуть ползунок в неактивное положение. Изменения сразу вступают в силу, дополнительная перезагрузка Гугл Хрома не требуется.