Что за программа cellmapper
CellMapper is a crowd-sourced cellular tower and coverage mapping service. By contributing data to the website, you can help map actual coverage of cellular networks based on real life conditions.
Once the data is uploaded to the site, it will be used to extract details of individual antennas on each cell phone tower along with the position and technical details of that tower. Likewise, the coverage and signal strength of the network in areas that have been mapped.
How do I view Coverage maps?
To view the maps, click Coverage Map above or click here.
How do I Contribute?
To contribute, simply download the app and enable live upload (Settings -> Enable Instant Upload). After you do this, leave CellMapper running in the background during the course of the day. Once data is received, it is almost instantly processed and you can see the results within the app within minutes.
Alternatively, you can use the «Upload Later» (Menu -> Upload and Statistics) option to upload later if you have no coverage or do not want to use data.
Another option is to support the site by providing a financial contribution. You can contribute via PayPal.
What Platforms are supported?
CellMapper runs on Android 2.3 and later, Windows Mobile 6, and BlackBerry OS 7.1 and earlier.
What data is collected?
In general, we only collect network information and some very basic information about your phone. See the privacy page at the bottom of the page for more details.
© CellMapper Serviced Limited | Terms | Privacy
First Time Startup
CellMapper is useful app for locating 2G/3G/4G/4G+ base stations. The application measures the signal strength and other network data collected by the end users and use the data collected to locate network base stations and their coverage. The application is currently supported on Android and Windows 10 Mobile devices.
CellMapper servers calculate the data that users have sent and creates graphical representation of it in the map delivered by Google Maps, witch can be browsed directly from the Android App or CellMapper webpage. The model can not account for certain variables though, so in order to get reliable data one should keep the measuring phone in as clear and unobstructed area as possible. An ideal measuring setting is as unobstructed as possible, such as large fields of prairie, but for instance in cities obstacles are unavoidable. When measuring one should move in 1/2-3/4 circles at different distances around the presumed base station in order to get the most accurate results.
The application supports real time transfer, so the data collected is sent to Cellmapper’s servers as you measure. You can also manually send the data after measuring or resend already collected data. After the files have been sent to the server, they are processed within minutes if there is not much load on the servers at the time. If the servers are under heavy load then processing data can take up to hours or even a full day. The delay of processing speed is a known issue, and will be addressed in the future.
While using cellmapper, pay attention to:
- Battery consumption rise (looks for GPS signals and checks network quality)
- Screen won’t turn off while application is running (More battery consumption!). If you have a phone with an Amoled -screen you can turn it off for the duration of the measuring from the applications settings.
- Base station location in urban areas is best determined by doing round trips of city blocks. At more rural locations you should do larger sweeps to save time. You will get the best result on flat ground.
- Ensure that you have a sufficiently good connection to the base station as well as a GPS connection.
- Using the application requires that you have a subscription with the operator whose 2G/3G/4G network you are trying to measure. You can only measure stations in the network you are actively connected to, so for instance you can’t locate a 4G base station if you are in a 3G network. Usually 2G/3G/4G/4G+ cells can all be in the same base station, and even be sent from the same panel antenna.
- The application can show that a base station can cover areas up to a hundred kilometers. These errors can be created if the network data collected by the application has great resemblance with some other base station or if the phone has calculated incorrect GPS-data. At this moment these «orphan cells» can’t be removed by the user and they are left on the map.
Usage
1. Download App to Android from Google Play or to Windows 10 Mobile here.
2. Enable GPS (on Android no Google locations service).
(on Android you can enable Settings -> Location and Select Mode: High Accuracy or Device Only.
3. Start Application. Ensure you are connected to the 2G/3G/4G/4G+ base station that you wish measure. You do not need data plan but need access to network. Some phone can record without SIM card also.
On Android you see here information what on your device. It depends your phone support what you see on screen. This is taken on Sony XZ Phone with Android 7.0. Since Android 7+ mostly phones support band recording also. All Windows 10 Mobile also support band recording.
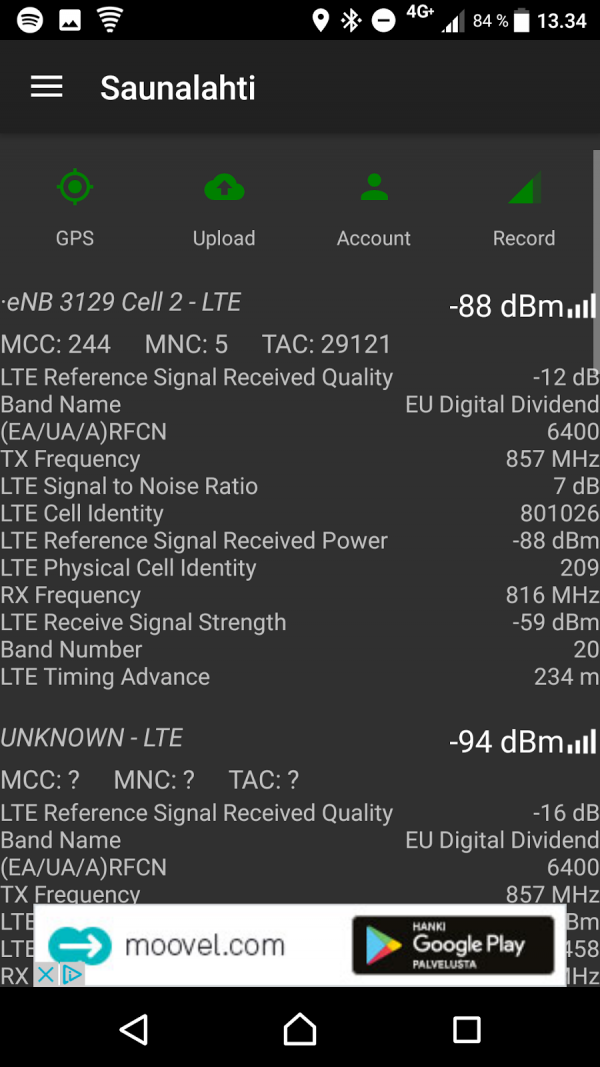
GPS: Green = GPS fix OK, Yellow = Initializing, Red = No GPS Fix, try go to outside to get GPS Fix.
Upload: Green = Upload enabled and ok, Red = Upload Error or disabled.
Account: Green = Login OK, Red = Not logged in or login error.
Record: Green = Record On, Red = Record Off
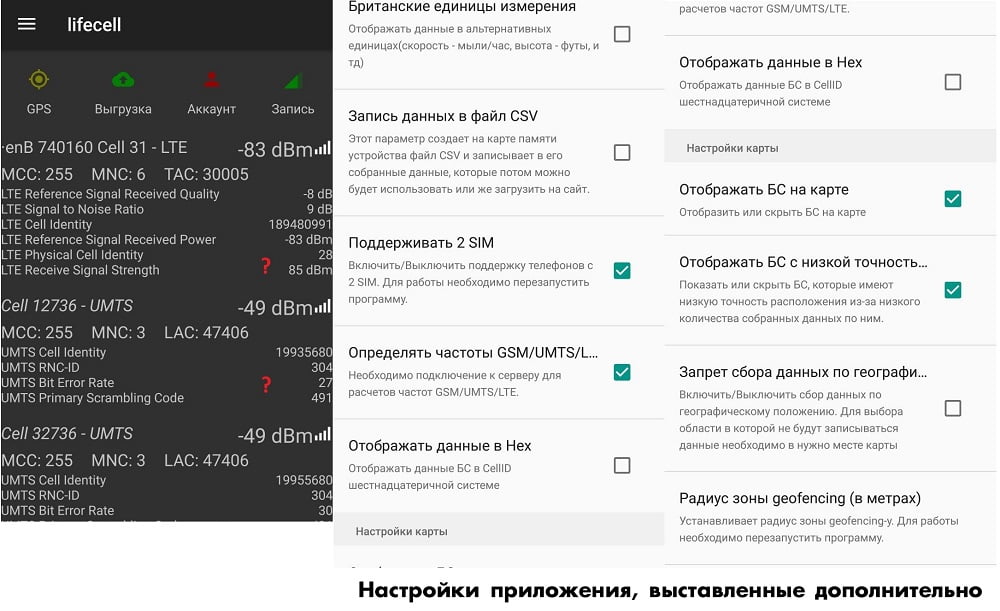
| Abbreviation | Explanation |
|---|---|
| Cell | Cell ID, this is used to differentiate cells from each other |
| Sector | The sector number of a cell |
| MCC (Mobile Country Code) | The mobile network country-specific code |
| MNC (Mobile Network Code) | Operator-specific mobile network code |
| LTE Cell Global Identify (CGI ) | Base station ID, used to differentiate base stations from each other |
| LTE Reference Signal Received Quality (RSRQ ) | Quality of received signal |
| LTE Signal to Noise Ratio (SINR — Signal-to-interference-plus-noise ratio) | The scale of the SINR measurements are between -20 and +30dB, the bigger the better. Signal strength is though of as «OK» when it is 15dB or over that, the maximum speed is then 50Mbps. You will need roughly 25dB if you wish to reach speeds around 100Mbps. All speed estimations are made using the 20Mhz bandwidth. |
| LTE Reference Signal Recieved Power (RSRP ) | Interprets the quality of the incoming reference signal. -50dBm is the best, -90dBm is good and -110dBm is weak. When the signal is better than -90dBm we can follow the SINR value alone. |
| LTE Received Signal Strength Indicator (RSSI) | Interprets the strength of the incoming radio signal. |
| UMTS RNC-ID | |
| TAC (Tracking Area Code) | Tells the area code consisting of multiple base stations. |
| LAC (Local Area Code) | Tells the area code consisting of multiple base stations. |
Map
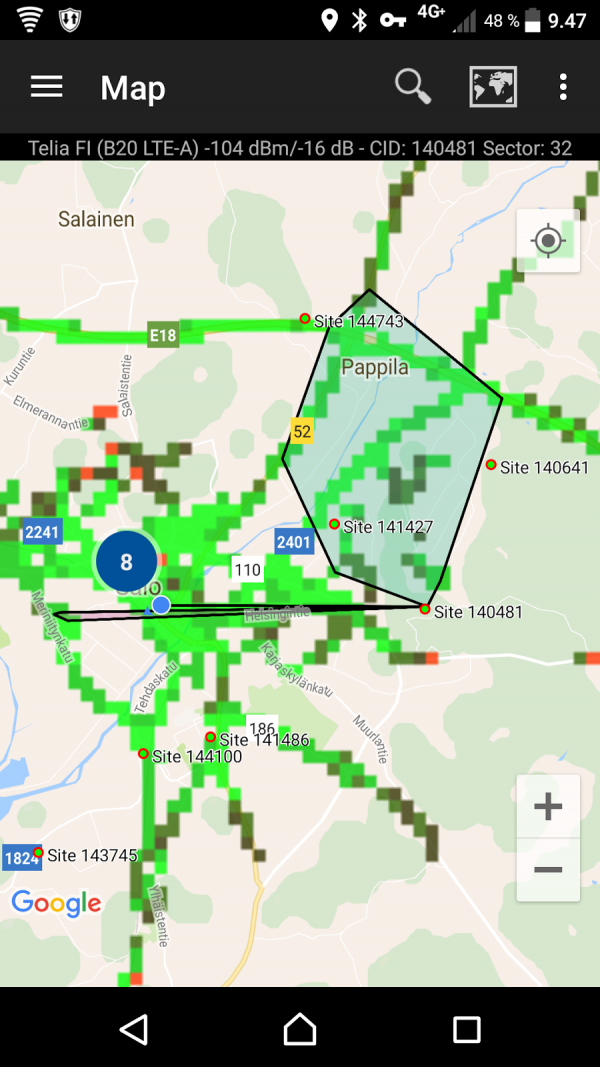
The map opens from left side main menu.
In the maps tab you can see the location of already mapped base stations. The application will automatically only show the base stations of the current network being used (LTE in the picture). The location of base stations can also be viewed from the Cellmapper webmap.
The base station is marked on the map as a red pin in mobile and a red arrow in a browser. A blue pin refers to your own location and the black line tells you which station you are connected to. By clicking on the base station you can see it’s range as a black zone. Light green indicates best signal quality, dark green good quality, black average quality and red the weakest signal quality.
On green pin’s (on mobile app map have red circle) is some user’s located tower. You can locate tower on web map when you have reached over 2 000 points (need account).
By pressing Select Provider (Search Icon) on header you can switch the operator and network so you can inspect base stations of other networks.
Send data to server
Open left side menu and open Upload and Statistics. You should always upload your newly measured base station so that somebody else won’t have to go and redo it, and they can instead view it from the map. The cellmapper map is updated nearly instantaneously .
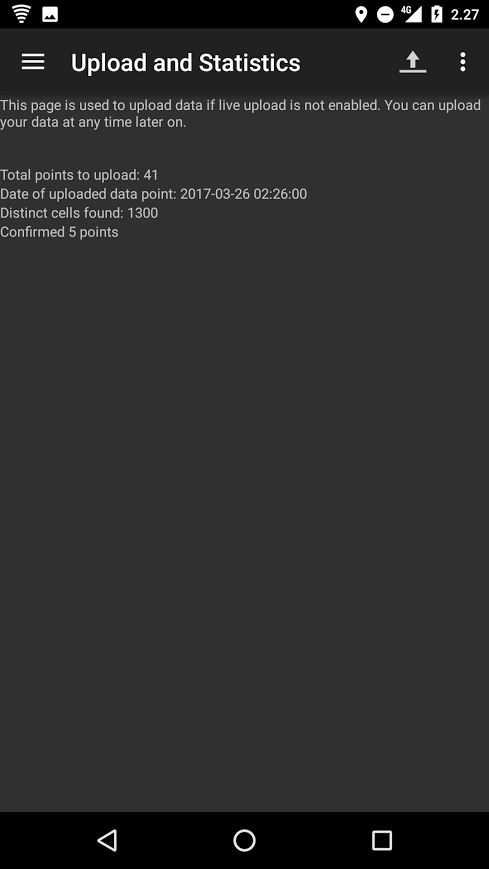
Press on the Upload icon after this and the data will be sent to the server. We recommend that you also turn on the Enable instant upload feature from the settings, so you don’t have to press the button every time.
Account
With Cellmapper account you can track how much tower you have recorded, locate tower on web map etc.
You can register Cellmapper account here.
Need help?
Ask on our community help. We and our great community will help you here: Facebook, Twitter and Google Plus.
Check our Support/FAQ page if there is solution for your question: here
Приложение CellMapper для Android поможет быстро узнать частоту вашего оператора
Перед покупкой GSM-репитера возникает вполне логичный вопрос: «А на какой частоте работает оператор в моей местности?» В этой статье рассмотрено приложение, которое позволяет быстро выяснить данную информацию. Всё очень просто и понятно.
Сперва отметим, что понятие GSM-репитер – собирательное, то есть оно включает ретрансляторы GSM (2G), UMTS (3G) и LTE (4G). Каждая технология работает на конкретных частотах, которые и нужно выяснить перед покупкой оборудования. Все повторители мобильного сигнала могут передавать также голос (для 4G-репитеров имеется технология VoLTE, но в Украине она пока что не запущена, поэтому для голоса нужно брать репитеры GSM и UMTS).
Суть приложения
CellMapper было разработано специально для Android-устройств, чтобы упростить жизнь обычным пользователям, которые задались вопросом улучшения покрытия в своём доме или на объекте. Приложение позволяет совершить следующие действия:
- за считанные минуты узнать, в каком диапазоне частот работает ваш мобильный оператор;
- определить, где примерно находятся базовые станции;
- узнать расширенные данные каждой базовой станции (LTE: RSRP, RSRQ, SNR; LTE TDD-CDMA: ECIO, EVDO ECIO, SNR; UMTS: PSC; актуально для продвинутых пользователей).
Эта статья ориентирована на среднестатистических пользователей, перед которыми возникла задача приобрети ретранслятор мобильного сигнала.
Как пользоваться приложением
Итак, первым делом стоит установить CellMapper из Play Market и уставить в первый слот телефона симку нужного оператора.
Как заявляет производитель, приложение может работать на устройствах с процессорами Qualcomm, Mediatek и Exynos. Сразу отметим, что далеко не на всех смартфонах будет отображаться нужная информация. Перед использованием CellMapper не забудьте дать все необходимые разрешения (система сама их запросит).
Сперва мы взяли для теста Meizu Pro 7 Plus с процессором Mediatek X30. Какие бы настройки не вносились, частоту мобильного оператора lifecell определить не вышло (скриншоты ниже).
Затем был взят Meizu Pro 6 Plus с процессором Exynos, на нём уже получилось выяснить интересующие нас детали. Как видно ниже на скриншоте, сеть GSM развернута на частоте 900 МГц.
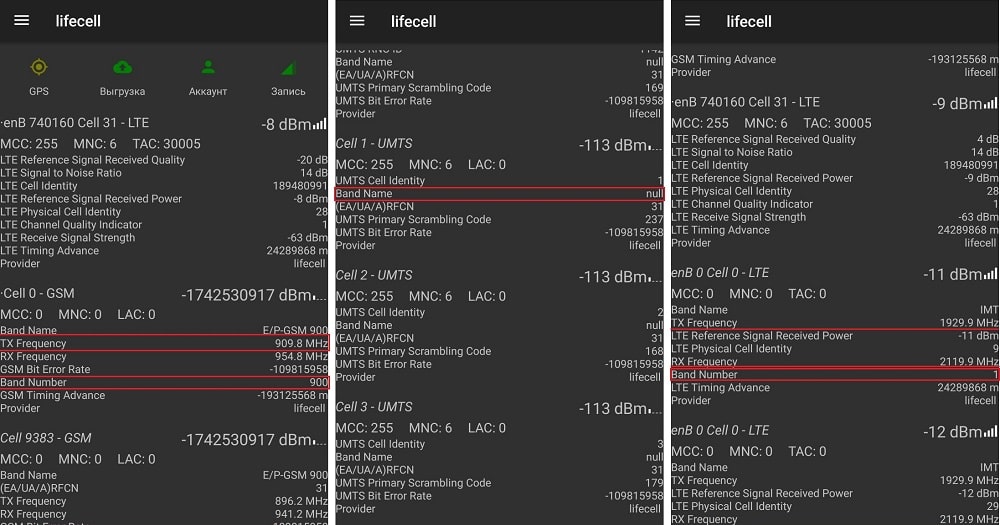
Второй нюанс: данные могут показываться не для каждой технологии. Например, в сточке частоты 3G высвечивается значение null, то есть приложение не смогло определить интересующую нас информацию.
С 4G ситуация была ещё интереснее. На скриншоте видно, что показывается частота 2100 МГц, тогда как сеть четвертого поколения развернута у нас на 1800 МГц и 2600 МГц. Чтобы вы ничего не перепутали, ниже мы привели частоты, которые используют операторы Украины.
- 2G: 900 МГц, 1800 МГц;
- 3G: 2100 МГц;
- 4G: 1800 МГц, 2600 МГц, 900 МГц (скоро, весной 2020 года).
Будьте готовы, что некоторые функции CellMapper могут не работать. Имеются более надежные методы определения частоты, они описаны в этой статье.
Как определить, где находится базовая станция
Если вы точно определили диапазон частот и уже приобрели подходящее оборудование, то возникает другой вопрос: куда же направить внешнюю антенну. Это важный нюанс, от которого будет зависеть работа GSM-ретранслятора.
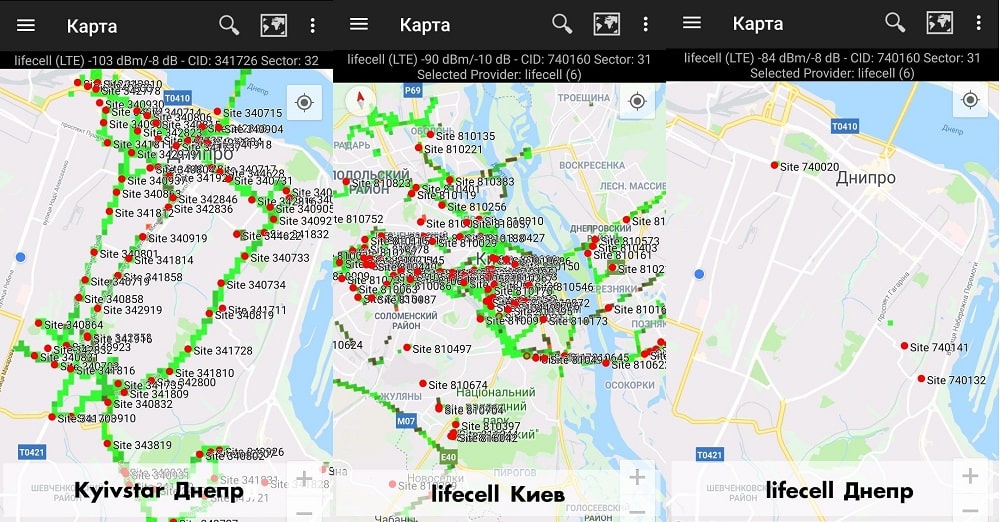
Нет ни одного ресурса, где можно посмотреть карту расположения вышек. CellMapper может в этом помочь, но данные часто либо не соответствуют действительности, либо неполные. Наглядный пример представлен на скриншотах. В первом случае выбран город Киев и оператор lifecell. Приложение показывает достаточно много базовых станций. При этом если переключиться на Днепр, то отображается всего лишь 3. Если же в Днепре выбрать оператора «Киевстар», то базовых станций появится довольно много, но только на определенной части города.
CellMapper позволяет выбрать мобильного оператора и технологию сети. Чтобы перейти к поиску вышек, достаточно нажать на значок лупы справа вверху.
Что из этого следует? Вывод на самом деле прост: полностью не нужно доверять подобного рода приложениям, хотя они на самом деле могут помочь. Если вы неправильно определите какой-то параметр, то купленное оборудование может вообще не работать или работать не на полную мощность. Таким образом вы можете создать себе множество проблем, включая финансовые.
Мы рекомендуем воспользоваться нашей услугой выезда инженера на объект, которая доступна для жителей Киева, Одессы, Львова и Харькова. Специалист изучит местность, определит технические параметры доступных сетей и расскажет, какое именно оборудование вам подходит. Так вы полностью оградите себя от стресса. Мы уверяем, что с нашими решениями для усиления мобильного сигнала вы будете каждый день радоваться стабильному покрытию и надежному интернет-соединению.
При подготовке материала использовались источники:
https://www.cellmapper.net/Index
https://docs.cellmapper.net/mw/First_Time_Startup/en
https://shop-gsm.ua/ru/blog/prilozhenie-cellmapper-dlya-android-pomozhet-bystro-uznat-chastotu-vashego-operatora/