Windows
The new Folding@home (FAH) software is configured, controlled, and monitored through a new simpler graphical interface named Web Control. This new web browser based application has incorporated many new features, including client monitoring and configuration of all FAH clients. Web Control is now the recommended interface for all FAH types (Single core CPU, Multi-core CPU, GPU), replacing both the Systray and the Console versions of FAH. The more advanced FAHControl application is also available.
New Terminology
The V7 software really changes the concept of how people interact with FAH. And with new concepts come new or updated terms to describe those concepts. Learning new references is part of the process for change and improvement.
- Web Control – This is the new simpler graphical interface (front-end). Web Control will configure and monitor one or more FAHClient slots through an easy to use web page. This is the default control program.
- FAHControl – This is an alternate new graphical interface (advanced front-end). FAHControl will configure and monitor one or more FAHClient (slots), on one or more computers. This more advanced interface is optional.
- FAHClient – This is the (back-end) client software managed by FAHControl and typically runs behind the scene. This is a truly unified client (slot) manager. FAHClient starts one or multiple instances of a Fahcore and manages the work assignments for each of these client “slots.”
- FAHSlot – aka “slot” – Each Fahcore and the data associated with it is called a slot. For example, one FAHSlot can be associated with a GPU and another slot associated with the CPU. Each folding slot can download, process, and upload results independently. The FAHClient manages each slot, and FAHControl monitors and displays their progress independently.
- FAHViewer – This is the new and fully functional work unit viewer. FAHViewer is modeled after the very popular PS3 viewer, and continues to offer the many rendering options, ball and stick, space fill, zoom, rotation, etc., and adds snapshot capture and cycling to show folding in action.
See also the Configuration guide document for more information about setup and customization options.
What is new in V7?
We are pleased to say that everything is new in this version, using completely new software coding from the ground up. Our goal is to include the best features from the previous clients, make improvements where possible, discard what was no longer needed, then add new features like the quick start Express mode installer, the new FAHViewer, and the new unified interface. V7 has all of these and more, making installation and configuration much simpler and faster for new users, while continuing to support advanced options.
Note: There are too many updated and new features to list in an Installation Guide, so this section only covers What’s New when installing V7 software. Please read the V7 Introduction page for basic information and explanations of the new client features.
Quick Start
This section describes how to get started folding quickly with the new V7 software and the default FAHClient slot(s).
- Download and run the installer.
- Click Yes, Next, I Agree, Next, Finish.
- Enter a name and/or team #, and Passkey. Always use a Passkey.
- Click Save.
- Done.
After the download, the new V7 software is installed and folding in under 1 minute. Very quick and easy. For a more guided installation, please see the Express Install or Custom Setup sections.
Express Installation – Recommended! (All Users)
This section describes the recommended method for installing the V7 FAH software for individual FAHClient slot(s) on Windows XP and newer. A first time installation is assumed. And unless otherwise noted, the default setting for each option is the recommended setting.
Download the V7 Installer from here (see figure 1). The installer includes the new Web Control (client manager) interface software, the new FAHClient (slot manager) software, and the new FAHViewer (viewer) software. The optional FAHClient (advanced client manager) is also included.
Double-click the Installer icon to start the software installation.
A security warning prompt may be displayed (see figure 2).
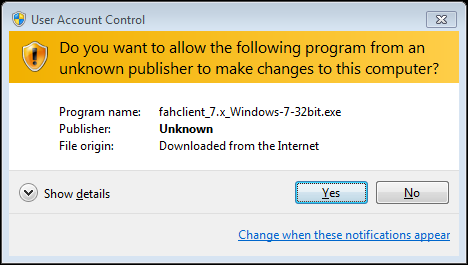
If prompted, click Run or click Yes to acknowledge the warning and continue the installation.
The welcome screen is displayed (see figure 3).

Click Next to continue the installation.
Read the License Agreement (see figure 4).
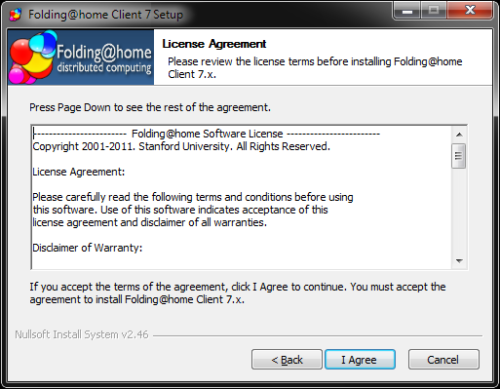
If agreeable, click I Agree to continue.
The Installer Mode option screen is displayed (see figure 5).
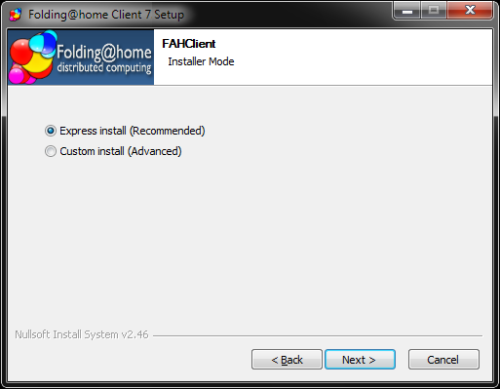
Click Next to continue the Express (Recommended) installation.
Note: Express Install will automatically install one or more FAHClient slots to match the computer hardware detected. If multiple CPU cores are detected, an multicore CPU slot is installed, otherwise a single core CPU slot is installed as the fall back option. If one or more GPUs are detected, one or more GPU slots are also installed automatically. If neither multicores or GPU are detected, a single core CPU slot is installed by default. The separate SMP and Uniprocessor slot types are now combined and known as a CPU slot, supporting one to many CPU cores.
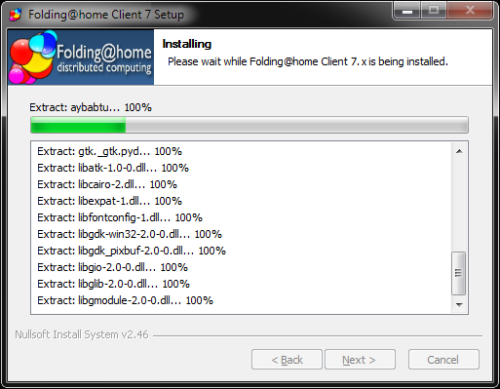
Please wait while the installation finishes (see figure 6).
V7 installation is almost complete (see figure 7).
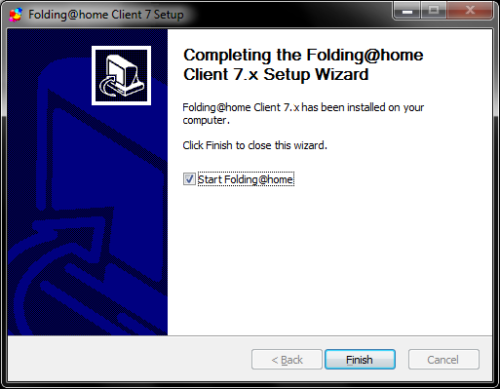
Note: Do not uncheck the box to Start Folding@home so the software will start automatically with Windows. If unchecked, FAHClient will need to be started manually each time.
A prompt from Windows Firewall or another security software may be displayed (see figure 8).
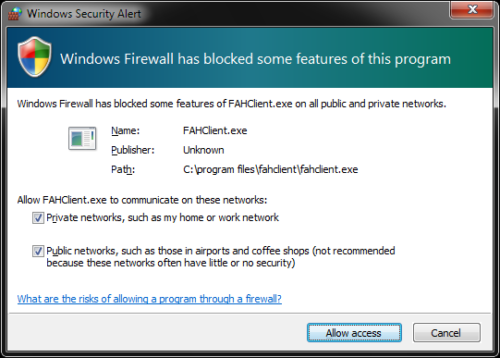
If prompted, select Unblock or Allow Access for V7 software to connect to the internet.
The Web Control (client manager) interface will start automatically after a few seconds. The Web Control page will prompt to configure a FAH user identity (see figure 9).
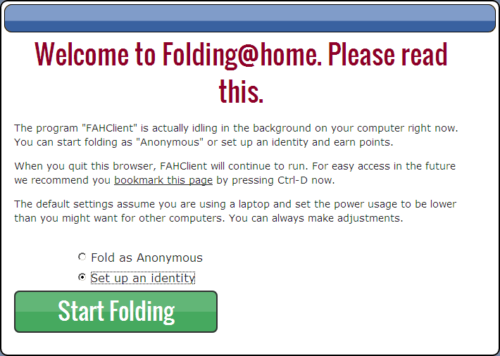
Click the Set up an Identity radio button unless choosing to fold Anonymously.
Click the Start Folding button after making a selection.
The Web Control Change Identity window is displayed (see figure 10).
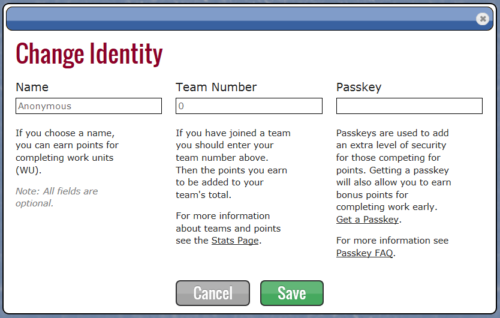
Enter a FAH user Name, Team #, and Passkey as needed. Always use a Passkey.
Note: Using a Passkey adds an extra level of security, and is also a requirement to receiveQuick Return Bonus points.
Click Save to continue.
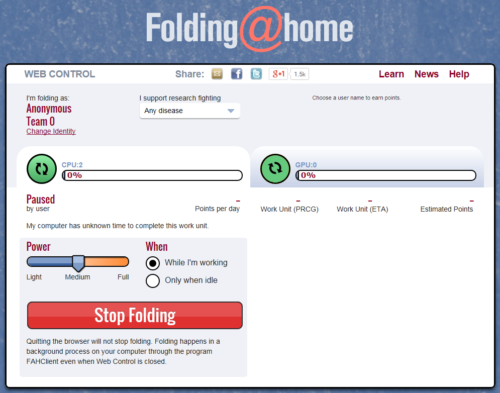
The Web Control Home tab is displayed (see figure 11).
V7 software is now installed and folding.
Note: Move the Power Slider to Full for maximum production.
Please read the V7 Introduction page for basic information and further explanations of the new client features.
See also the FAHControl (client manager), FAHClient (slot), and FAHViewer (viewer) documents for more information about setup and customization options.
While the default options are typically the recommended options, see the ConfigurationFAQ for additional setup options.
Почти полное руководство по клиенту Folding@Home v7. Часть 1.
Руководство по клиенту Folding@Home v7
Часть 1: установка и графический интерфейс пользователя
Важно!
Клиент Folding@Home версии 7 на данный момент находится в стадии БЕТА ТЕСТИРОВАНИЯ, поэтому при его установке, настройке и эксплуатации возможны проблемы. Будьте к этому готовы. Не стесняйтесь писать сообщения в эту тему, если возникли глюки затруднения. Не сможем помочь, так посочувствуем.
Это руководство по установке написано для клиента Folding@Home версии 7.1.33, для семейства операционных систем M$ Windows. Процесс установки для других операц.
8 октября 2011, суббота 23:11
DimBo [ ] для раздела Блоги
реклама
Руководство по клиенту Folding@Home v7
Часть 1: установка и графический интерфейс пользователя
Важно!
Клиент Folding@Home версии 7 на данный момент находится в стадии БЕТА ТЕСТИРОВАНИЯ , поэтому при его установке, настройке и эксплуатации возможны проблемы. Будьте к этому готовы. Не стесняйтесь писать сообщения в эту тему, если возникли глюки затруднения. Не сможем помочь, так посочувствуем.
Это руководство по установке написано для клиента Folding@Home версии 7.1.33, для семейства операционных систем M$ Windows. Процесс установки для других операционных систем будет отличаться от описанного.
Отличие клиента Folding@Home 7-й версии от предыдущих версий
Раньше каждому клиенту соответствовало своё счётное ядро, или несколько однотипных ядер. Таким образом существовали разные клиенты для видеокарт AMD, nVidia и вычислений на процессоре. Клиент v7 является универсальным — он может использовать любые типы ядер и предоставляет централизованное управление ими через удобный (ну. по идее удобный. ) графический интерфейс. Такой подход упрощает жизнь и пользователям и разработчикам, и это хорошо. Поэтому мы будем устанавливать именно его
Шаг 0
Для установки клиента F@H его нужно сначала скачать .
Последнюю версию клиента можно найти здесь: https://fah-web.stanford.edu/projects/FAHClient/wiki/BetaRelease
Шаг 1
Приступим к установке — запускаем инсталлятор. 
Шаг 2
Ознакомьтесь с лицензионным соглашением. Если вы с ним согласны — нажмите «I Agree», если не согласны — пожалуйста, передумайте и согласитесь .
Шаг 3
Выбираем «Custom install» — это позволит получить доступ к некоторым настройкам, которые нам пригодятся.
Шаг 4
Можно выбрать установку для текущего пользователя («Install just for me») или для всех пользователей («Install for anyone. «). В отличие от предыдущей версии (7.1.24) теперь здесь всё работает нормально.
Шаг 5
Здесь можно выбрать папку, в которую будет установлен клиент. 
Шаг 6
… а здесь — папку, в которой будут находиться задания (Work Unit’ы). Инсталлятор кладёт в эту папку конфигурационный файл клиента, лог-файл, папку для счётных ядер и папку для заданий.
Важно знать, что этот путь указывается в ярлыках fahcontrol.exe как «рабочая папка», если запустить fahcontrol.exe напрямую, то эта папка не будет найдена.
Шаг 7
Ответственный момент — можно выбрать как клиент будет запускаться. Доступны следующие варианты:
- Automatically start with FAHControl — автоматически запускать fahclient.exe при запуске FAHControl – графического интерфейса, предназначенного для управления клиентом.
- Automatically start as a console application at login time — запускать fahclient.exe как консольное приложение при входе пользователя в систему. При этом открывается окно консоли и сворачивается в закладку на панели задач. Аналогично поведению консольного клиента 6-й версии.
- Automatically start as a system service at boot time — запускать fahclient.exe как системную службу при загрузке ОС. ВНИМАНИЕ! Это работает только для SMP и BigAdv. Клиенты для видеокарт не могут запускаться как сервис.
- Start manually — запускать fahclient.exe вручную.
Чекбокс «Automatically start FAHControl at login time» добавляет FAHControl.еxе в автозапуск для текущего пользователя (или для всех, если выбрана установка «для всех»). Запуск происходит при входе пользователя в систему.
Шаг 8
В поле Donor — нужно указать свой ник в фолдинге. Придумайте что вам нравится, но проверьте, не используется ли этот ник кем-то ещё: http://folding.stanford.edu/English/Download#ntoc2.
В поле Team — 47191 .
Passkey – пасскей. Это уникальный идентификатор, необходимый для однозначной идентификации пользователя и начисления бонусных очков за SMP и BigAdv задания. Получить его можно здесь: http://fah-web.stanford.edu/cgi-bin/getpasskey.py.
Теперь нужно указать предпочтительный режим работы клиента (Preferred mode):
- «SMP» – будет автоматически сконфигурирован SMP-клиент на все ядра процессора (в т.ч. виртуальные у процессоров с HT).
- «GPU» — будут сконфигурированы клиенты для всех найденных видеокарт.
- «SMP+GPU» – комбинация двух предыдущих вариантов.
- «Uniprocessor» — будет автоматически сконфигурирован клиент для заданий, использующих одно процессорное ядро.
Шаг 9
После завершения установки клиент запустится автоматически в конфигурации, заданной на шаге №8. После этого откроется окно Windows Security Alert, запрашивающее разрешения для FAHClient.exe. 
Нужно разрешить работу и в Private networks, и в Public networks (отметить оба пункта) и кликнуть «Allow Access».
Установка завершена.
Теперь перед Вами предстало примерно такое окно. 
В разделе Work Queue можно увидеть, что клиент автоматически сконфигурировался для счёта и теперь качает из интернета расчётные ядра. Ниже есть довольно подробное описание задания, считающегося в выбранном слоте. Проблема в том, что больше ничего полезного в этом окошке нет — оно нас не устраивает, поскольку в нём слишком мало информации и элементов управления . Потянем окошко за правый край. 
И увидим выпадающее меню, в котором выбран пункт «Novice». Поменяем его на «Expert». 
Вот это другое дело! Теперь всего (более чем) достаточно.
Вверху окна расположена панель управления программой, рассмотрим находящиеся там важные элементы управления:
- «Fold» — запуск счёта.
- «Pause» — остановка счёта (именно остановка — сохранение результата и завершение соответствующего расчётного ядра).
- «Finish» — завершение работы над текущим заданием и остановка.
Кнопки расположенные вверху окна действуют на все слоты. Одноимённые пункты меню, выпадающего по щелчку правой кнопкой мыши — на тот слот, «на котором» щёлкнули мышкой.
К неважным элементам управления можно отнести «Viewer» — это бесполезная фигня, которая должна показывать молекулярную структуру белка, моделируемого в выбранном слоте. В настоящий момент показывает «тестовую» молекулу, никак не связанную с тем, что обрабатывается в действительности.
«Hide» «Quit» и «About» говорят сами за себя.
Особняком стоят «Configure» и «Preferences», их мы рассмотрим во второй части нашего руководства.
Справа, по центру, да и вообще по большей части окна располагается раздел «Client». Что в нём для чего, в принципе, понятно, останавливаться на этом не будем.
Снизу слева находится список «Clients», в него можно добавлять клиенты, установленные на других компьютерах и управлять ими удалённо.
Важно знать, что кнопка «Configure» вызывает окно конфигурации выбранного клиента.
Собственно, конфигурирование клиентов при помощи раздела Configure будет описано во второй части «Руководства»
Продолжение следует.
other_material_inline_bottom
При подготовке материала использовались источники:
https://overclockers.ru/blog/DimBo/show/16197/Pochti_polnoe_rukovodstvo_po_klientu_Folding_Home_v7_Chast_1