CompatTelRunner.exe Windows Process
CompatTelRunner.exe is currently the most talked about extension around the world among Windows users. This is because many Windows users have reported that they are seeing an unknown extension named Compattelrunner.exe running inside their task manager. Moreover, it is interesting to note that this extension is using even more Disk and CPU than Google Chrome which is known to use the most amount of CPU and Memory. Now, we should let you know that this is not a malware or Trojan that many of the Windows users believe it to be. Rather, it is an extension that has been bundled by Microsoft inside of Windows.
What is CompatTelRunner.exe?
CompatTelRunner.exe is a Windows extension which was introduced in Windows by Microsoft itself. This extension helps the users in order to upgrade to the latest version of Windows or Service Pack Upgrades as well. It also checks for issues in Windows related to compatibility and, if present, generates a report and sends it to Microsoft.
Now, many of the Windows users who like to opt for privacy instead of latest features are known to have disabled the CompatTelRunner.exe extension. However, we should tell you that disabling this extension is not as straight-forward as is the case with other extensions. This is because Microsoft has bundled this extension so it comes signed by TrustedInstaller. Therefore, you do not have the rights to modify this extension even if you are an admin and you will get an Access Denied error message.
However, CompattelRunner.exe high disk usage is a known issue and we have some solutions to disable or uninstall it. We have made a list of all the possible ways with which you can fix CompatTelRunner.exe disk usage problem below in Windows 10 and Windows 7.
1. Disable CompatTelRunner.exe from Task Scheduler
First and the most basic way to stop compattelrunner.exe from high disk usage is to disable it from the Task Scheduler. For this –
- Open the Run manager in Windows by pressing Windows Key + R. Inside the Run menu, type taskschd.msc and hit Enter.
- Now, you will see that the Task Scheduler has been opened. In the Task Scheduler, you will see a Task Scheduler Library on the left side which you need to expand. After expansion, go to Microsoft and then click on Windows and finally click on Application Experience.
- Now, you will see a list of Applications next to this window. Here, you will see one application named Microsoft Compatibility Appraiser. Right-Click on it and choose the Disable option from the list.
Once you disable the Microsoft Compatibility Appraiser or Compattelrunner.exe file, you will no longer get high disk usage problem on your Windows PC again. However, this is a temporary solution and this might not work for you. Therefore, we have also added a solution below where you can directly delete it instead of disabling it. So, if the above solution doesn’t work then you can try the one mentioned below.
2. Transfer Ownership of CompatTelRunner.exe and then Delete it
This is the second and possibly the best method for removing compattelrunner.exe high disk usage error from your PC. In this method, we have to delete the CompatTelRunner.exe application entirely from our PCs.
However, we have already mentioned that this extension has been bundled by Microsoft itself. This means that you cannot delete the extension directly as it is owned by TrustedInstaller. Therefore, you have to transfer the ownership to the PC’s administrator, first of all. Make sure that you are logged in as an Administrator as it plays the most important part in this method. Once you have checked that, proceed with the method.
- Press the Windows Key on your keyboard to open the Windows Start menu.
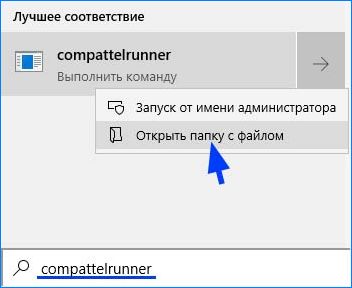
- Type compattelrunner.exe and you should see a program named CompattelRunner.exe at the top of the list under the Programs section. Right-Click on CompatTelRunner and click on Open File Location.
- Once you click on Open File Location, you will see a new window opening where the CompatTelRunner program has been installed. This will be inside the System32 folder of your Windows installation.
- Now, right-click on CompatTelRunner here as well and click on Properties to go to its Properties tab. In the Properties of CompatTelRunner, go to the Security tab. Here, you will notice that all the other users have Read and Execute access only whereas TrustedInstaller has access to every permission.
This needs to be changed as we want to delete the application from our PC which can only be done by TrustedInstaller right now. Therefore, we will now transfer the ownership of CompatTelRunner from TrustedInstaller to Administrator.
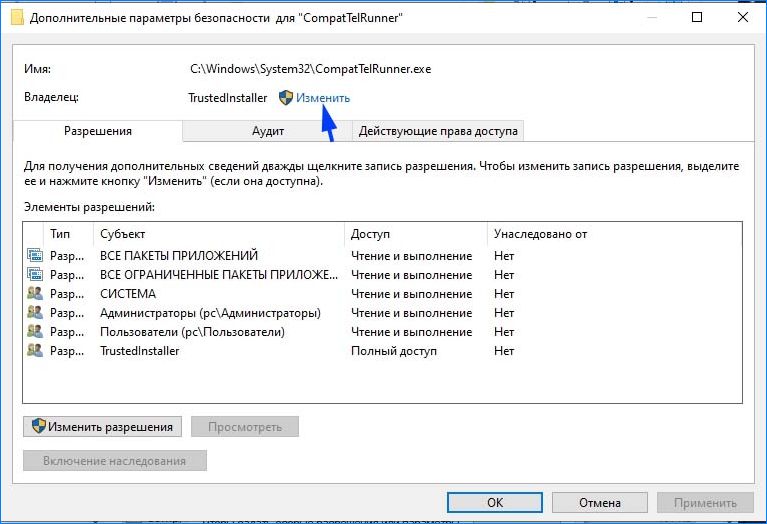
- For this, click on the Advanced button inside the Security tab. In the Advanced options window, you will see that the current owner is TrustedInstaller.
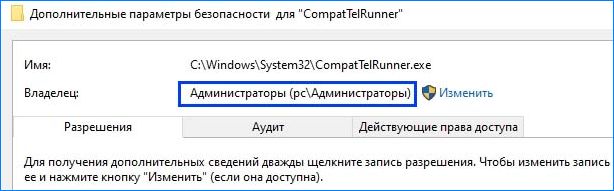
- Click on the Change button beside the owner name and type Administrators.
- Click on OK and the Administrator will now become the owner of CompatTelRunner. After this, click on Apply and you have successfully changed the ownership of this application.
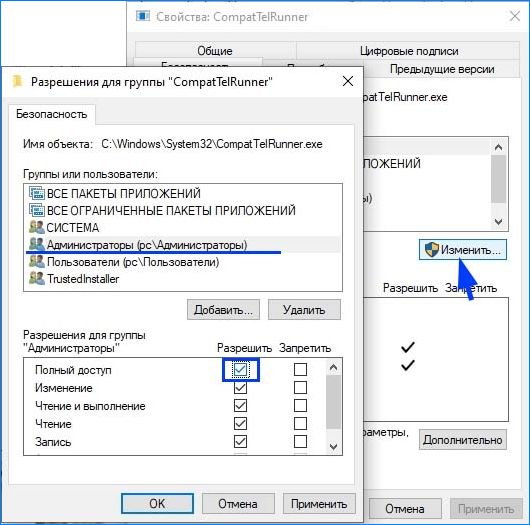
- Now that the ownership has been changed, the remaining process is very simple. You have to close the advanced tab of Security and you will see the Properties window of our application. In the Security tab, you need to change the Permissions of Administrators to whom we just transferred the ownership.
- Click on Advanced once again and click on Change Permissions button below which will give you Administrator access. Now, double-click on Administrators option from the list and give them Full control and press OK.
Now, we have changed the ownership of CompatTelRunner completely from TrustedInstaller to Administrator. Therefore, just right-click on the compattelrunner.exe application from the System32 folder and delete it. Although this is the best known-to-be-working method available to us, even this is known to not work on some users as per reports. Therefore, the final option is to entirely uninstall the KB2952664 update which is the root cause of installation of CompatTelRunner application on our PCs. But, the problem is that Windows will automatically install this update once again so this is just a temporary solution.
3. Uninstall KB2952664 Update from Windows 7
If you have decided that nothing else works for you and you just want to uninstall the KB2952664 update, you can follow this method mentioned below to uninstall this update. Moreover, it is interesting to note that this update is a compatibility update for Windows 7. This was released by Microsoft to make sure that your Windows 7 PC runs on the latest version.
- Open the Command Prompt window by clicking on the Windows key + R button and type cmd. Before opening Command Prompt, right-click on it and select Run as Administrator option.
- Now, open Command Prompt as Administrator and type the following command to uninstall the KB2952664 Windows update.
dism /online /get-packages | findstr KB2952664
- Press Enter after typing the command and this will give you a list of the update’s version which is installed on your PC. Once you see the list of the version which is installed on your PC, type the following command.
dism /online /remove-packages /PackageName:Package_for_KB2952664~31bf3856ad364e35~amd64~~6.1.1.3
- Finally, verify that the update has been uninstalled entirely from your computer by typing the following command in the same Command Prompt Window.
Get-HotFix –id KB2952664
Funnily enough, you can be sure that everything is uninstalled properly if you get an error. On entering the above command in Command Prompt, you should get an error saying “cannot find HotFix” which means that it has been uninstalled successfully.
Now, as we mentioned earlier, this is not a permanent solution as the compattelrunner.exe will be installed once again as soon as Windows is updated. But, if you are facing severe compattelrunner.exe disk usage problems than this is highly recommended for the time being.
Also, it is quite possible that you are not running KB2952664 update of Windows 7 but you are still facing the compattelrunner.exe high disk usage problem. Therefore, you can also uninstall the versions KB2977759 or KB2976978 update of Windows 7 which are reported to have this issue as well. To uninstall these versions, you just need to replace your version number with the above-mentioned KB2952664 in the Command Prompt.
Conclusion
Compattelrunner.exe is not a Trojan or a Malware as we have already mentioned in the article above. However, it is a known issue that this extension sometimes takes up to 70% of disk and CPU usage which is a major concern. Also, there is an issue of privacy as the extension tracks whether there is an issue on Windows or not. Thus, if you are someone who has compattelrunner.exe high disk usage problem or you are someone who likes privacy then you can delete/uninstall/disable this extension without any worries from the methods mentioned above.
CompatTelRunner.exe — что за процесс и как его отключить?

Пользователи Windows 10 и Windows 11 могут заметить высокую нагрузку на диск, а в редких случаях — процессор со стороны процесса CompatTelRunner.exe или Microsoft Compatibility Telemetry в диспетчере задач, что не всегда приятно сказывается на работе системы.
В этой короткой инструкции о том, что за процесс CompatTelRunner.exe и как его отключить при необходимости.
Назначение CompatTelRunner.exe
Процесс CompatTelRunner.exe — один из процессов, относящихся к функциям телеметрии Windows 10/11, периодически включающийся для отправки данных об использовании системы, связанные, судя по названию Microsoft Compatibility Telemetry, с теми или иными аспектами совместимости ПО (официальной информации на этот счёт мне найти не удалось).

При штатной работе вы можете наблюдать более одного процесса CompatTelRunner.exe в диспетчере задач, а нагрузка на диск и процессор обычно незначительна и кратковременна: после выполнения задачи процесс закрывается сам. Но при необходимости процесс можно и отключить.
Как отключить CompatTelRunner.exe (Microsoft Compatibility Telemetry)
В Интернете можно встретить множество советов на тему отключения службы «Функциональные возможности для подключенных пользователей и телеметрия», отключения функций телеметрии в Параметрах Windows и реестре или использования сторонних программ для отключения телеметрии, таких как ShutUp10. Вы можете это сделать, но процесс CompatTelRunner.exe, в свою очередь, может продолжить запускаться.
Чтобы действительно отключить его запуск, используйте один из следующих способов.
Планировщик заданий
Основное действие, чтобы отключить запуск CompatTelRunner.exe — использовать планировщик заданий:

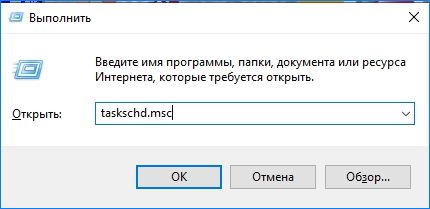
- Нажмите клавиши Win+R на клавиатуре или нажмите правой кнопкой мыши по кнопке «Пуск» и выберите пункт «Выполнить».
- Введите taskschd.msc в диалоговое окно «Выполнить» и нажмите Enter.
- В открывшемся планировщике заданий перейдите к разделу Библиотека планировщика заданий — Microsoft — Application Experience.
- Отключите три задания: Microsoft Compatibility Appraiser, ProgramDataUpdater и StartupAppTask, для этого можно нажать по ним правой кнопкой мыши и выбрать пункт «Отключить».
После этого CompatTelRunner.exe должен перестать запускаться. А если процесс уже запущен, можно снять задание в диспетчере задач.
Редактор реестра
Я не могу прямо рекомендовать этот метод, но он работает. Суть: не дать Windows найти параметры для запуска CompatTelRunner.exe, что предотвратит его запуск даже при запуске соответствующего задания. Необходимые шаги:
- Запустите редактор реестра: Win+R и ввести regedit в окно «Выполнить».
- Перейдите к разделу реестра
HKEY_LOCAL_MACHINE\SOFTWARE\Microsoft\Windows NT\CurrentVersion\AppCompatFlags\TelemetryController

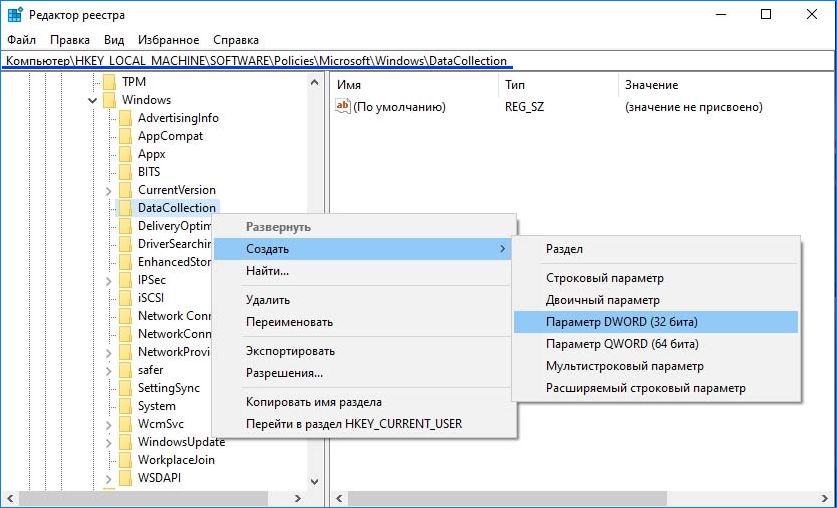
HKEY_LOCAL_MACHINE\SOFTWARE\Policies\Microsoft\Windows\DataCollection
В результате несмотря на то, что будет создан новый раздел TelemetryController, он будет пустым, а запуск Microsoft Compatibility Telemetry выполняться не будет.
А вдруг и это будет интересно:
- Лучшие бесплатные программы для Windows
- Случайные аппаратные адреса в Windows 11 и Windows 10 — что это, как включить или отключить
- Как включить Портал устройств в Windows 11 или Windows 10 и что это такое
- Нет пункта «Подключить» в контекстном меню и не монтируются ISO в Windows — как исправить?
- Неизвестный параметр Cleanup-Image при использовании DISM
- Как узнать DPI мыши
- Windows 11
- Windows 10
- Android
- Загрузочная флешка
- Лечение вирусов
- Восстановление данных
- Установка с флешки
- Настройка роутера
- Всё про Windows
- В контакте
- Одноклассники
- Живые обои на рабочий стол Windows 11 и Windows 10
- Лучшие бесплатные программы на каждый день
- Как скачать Windows 10 64-бит и 32-бит оригинальный ISO
- Как смотреть ТВ онлайн бесплатно
- Бесплатные программы для восстановления данных
- Лучшие бесплатные антивирусы
- Средства удаления вредоносных программ (которых не видит ваш антивирус)
- Встроенные системные утилиты Windows 10, 8 и 7, о которых многие не знают
- Бесплатные программы удаленного управления компьютером
- Запуск Windows 10 с флешки без установки
- Лучший антивирус для Windows 10
- Бесплатные программы для ремонта флешек
- Что делать, если сильно греется и выключается ноутбук
- Программы для очистки компьютера от ненужных файлов
- Лучший браузер для Windows
- Бесплатный офис для Windows
- Запуск Android игр и программ в Windows (Эмуляторы Android)
- Что делать, если компьютер не видит флешку
- Управление Android с компьютера
- Как изменить клавиши смены языка в Mac OS
- Случайные аппаратные адреса в Windows 11 и Windows 10 — что это, как включить или отключить
- Как включить Портал устройств в Windows 11 или Windows 10 и что это такое
- Нет пункта «Подключить» в контекстном меню и не монтируются ISO в Windows — как исправить?
- Неизвестный параметр Cleanup-Image при использовании DISM
- Как узнать DPI мыши
- Отправка конфиденциальных писем в Gmail
- Поиск файлов по дате создания и изменения в Windows
- Что за процесс Video.UI.exe в Windows 11 и Windows 10
- Компьютер запущен некорректно при загрузке Windows 11 — как исправить?
- Ошибка 0xc0000221 при запуске Windows — как исправить?
- Компьютер или ноутбук загружается со второго раза — как исправить?
- Как форматировать диск или флешку в ExFAT
- NanaZip — версия 7-Zip для современных Windows
- Как принудительно закрыть программу в Windows
- Windows
- Android
- iPhone, iPad и Mac
- Программы
- Загрузочная флешка
- Лечение вирусов
- Восстановление данных
- Ноутбуки
- Wi-Fi и настройка роутера
- Интернет и браузеры
- Для начинающих
- Безопасность
- Ремонт компьютеров
- Windows
- Android
- iPhone, iPad и Mac
- Программы
- Загрузочная флешка
- Лечение вирусов
- Восстановление данных
- Ноутбуки
- Wi-Fi и настройка роутера
- Интернет и браузеры
- Для начинающих
- Безопасность
- Ремонт компьютеров
CompatTelRunner.exe грузит процессор и диск: что делать?
Если наблюдаете снижение производительности OC и усиливается шум системы охлаждения проверьте, с чем это связано в Диспетчере задач. Этот инструмент позволяет указать процесс, который чрезмерно грузит процессор, диск и оперативную память. Довольно часто высокую нагрузку вызывает CompatTelRunner.exe (или Microsoft Compatibility Telemetry).
Не стоит обращать внимания, когда процесс нагружает систему на короткие промежутки времени. Другое дело, когда Microsoft Compatibility Telemetry сильно грузит процессор и диск в течение продолжительного периода и мешает комфортно работать с другими приложениями.

Что это за процесс?
CompatTelRunner.exe – это исполняемый файл службы Microsoft Compatibility Telemetry. Он используется для определения возможных проблем с совместимостью, собирает данные диагностики (телеметрию) и отправляет их на сервера Майкрософта для улучшения качества программного обеспечения.
CompatTelRunner.exe также используется для обновления системы до последней версии ОС и установки последних обновлений.
Но иногда процесс чрезмерно загружает ресурсы системы, что приводит к снижению производительности ПК. В Диспетчере задач видим, что CompatTelRunner.exe почти до 100% грузит процессор и диск. Если нагрузка, вызываемая этим процессом, не снижается на протяжении длительного периода и мешает комфортной работе на ПК, то попробуйте его отключить или полностью удалить..
Но удалить простыми способами не удастся. Столкнетесь с сообщением «Доступ запрещен», поскольку CompatTelRunner.exe расположен в папке C:\Windows\System32 и принадлежит TrustedInstaller, отвечающей за безопасность доступа к системным файлам и имеет атрибут «Только для чтения».
Смена владельца и установка полного доступа
Откройте строку системного поиска и наберите «CompatTelRunner». Кликните на найденный результат правой кнопкой мыши и выберите «Расположение файла».
Или откройте окно «Выполнить» клавишами Win + R, пропишите путь к папке C:\Windows\System32, затем наберите в строке поиска в правом верхнем углу «CompatTelRunner».
Кликните на исполняемый файл правой кнопкой мыши и выберите «Свойства».

Перейдите на вкладку «Безопасность» и нажмите на «Дополнительно».

На вкладке Дополнительные параметры безопасности кликните на «Изменить», чтобы назначить нового владельца файла.
В поле «Введите имена выбираемых объектов» наберите «администраторы» и щелкните на кнопку «Проверить имена».

Для сохранения изменений нажмите на «ОК», а в дополнительных параметрах безопасности «Применить».
После назначения нового владельца вернитесь на вкладку Безопасность и нажмите на «Изменить». В списке выберите нового владельца (в нашем случае, администраторы), в окне разрешений установите флажок «Полный доступ» и нажмите «Применить».
Теперь, когда являетесь полноценным владельцем файла, то можете его удалить, не сталкиваясь с сообщением «Доступ запрещен».
Отключение CompatTelRunner в Планировщике заданий
В планировщике заданий CompatTelRunner настроен системой на ежедневный запуск. В случае, когда он грузит диск и процессор, попробуйте отключить его запланированное задание.
Откройте окно «Выполнить» нажатием на Win + R, наберите команду taskschd.msc и подтвердите на Enter для вызова Планировщика заданий.
В левом боковом меню перейдите по пути:
Библиотека планировщика заданий — Microsoft — Windows — Application Experience.
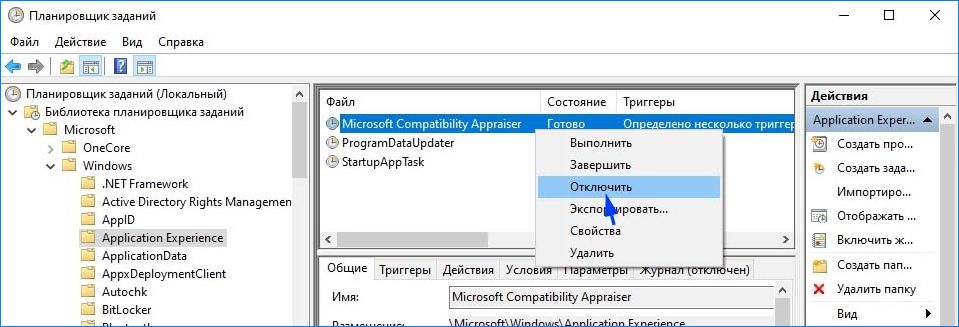
Кликните правой кнопкой мыши на Microsoft Compatibility Appraiser и выберите «Отключить».
Отключение в системном реестре
Если процесс телеметрии продолжает грузит ресурсы процессора, то попробуем исправить проблему с помощью Редактора реестра.
В окне «Выполнить» (Win + R) наберите команду regedit и подтвердите ее запуск на Enter. В левой части окна перейдите по пути:
HKEY_LOCAL_MACHINE – SOFTWARE – Policies — Microsoft — Windows — Data Collection
Щелкните правой кнопкой мыши на Data Collection, выберите Создать – параметр DWORD (32 бита).
Присвойте имя новому параметру Allow Telemetry, а затем дважды кликните на нем. Установите значение «0», сохраните изменения на «ОК».
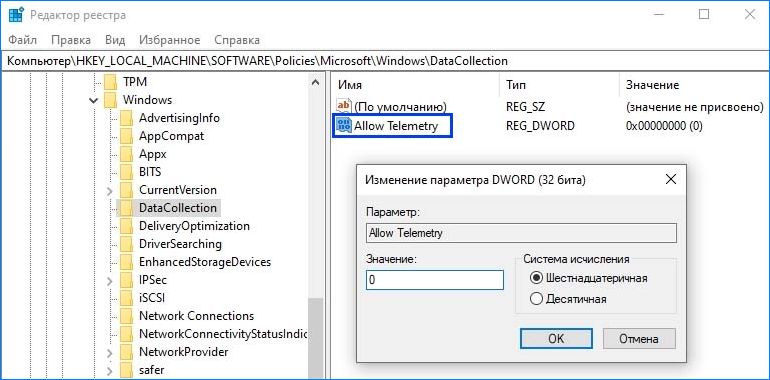
После перезагрузки компьютера CompatTelRunner не должен грузить процессор.
При подготовке материала использовались источники:
https://medium.com/@iammvd/https-www-techlila-com-compattelrunner-exe-e52f9fb8e42c
https://remontka.pro/compattelrunner-exe-windows/
https://compuals.ru/windows-10/compattelrunner-exe-gruzit-protsessor-i-disk