Подробный гайд по установке и настройке видеокарты RX 580: мастер-класс для начинающих
Видеокарта является одной из важнейших компонентов компьютера. Она отвечает за обработку и вывод графической информации. RX 580 — популярная видеокарта, которая обладает отличным соотношением цены и производительности. В этом подробном гайде мы рассмотрим процесс установки и настройки видеокарты RX 580 для начинающих пользователей.
Шаг 1: Проверка совместимости
Перед установкой RX 580, убедитесь, что ваш компьютер соответствует минимальным требованиям системы для использования этой видеокарты. RX 580 поддерживает PCI Express 3.0 x16 и требует подключения к блоку питания мощностью не менее 500 Вт. Убедитесь, что ваш блок питания поддерживает необходимую мощность и имеет соответствующие разъемы питания для видеокарты.
Шаг 2: Физическая установка
- Отключите компьютер от электрической сети и выньте его из розетки.
- Удалите боковую панель корпуса компьютера, чтобы получить доступ к слоту PCI Express x16.
- Найдите свободный слот PCI Express x16 на материнской плате и удалите заднюю планку.
- Осмотрите контактные площадки видеокарты RX 580 и наклейте на них съемные крышки для предотвращения загрязнения контактов.
- Осторожно, но решительно вставьте видеокарту RX 580 в слот PCI Express x16 на материнской плате. Убедитесь, что видеокарта тщательно установлена и не выходит за пределы слота.
- Верните на место заднюю панель корпуса и закрепите ее.
Шаг 3: Подключение питания
- Найдите разъемы питания на видеокарте RX 580. Обычно они имеют 6-пиновый или 8-пиновый разъем питания.
- Проверьте, есть ли на блоке питания свободные разъемы, соответствующие разъему видеокарты RX 580. Если такие разъемы отсутствуют, вам может потребоваться адаптер для подключения видеокарты.
- Подсоедините разъем питания от блока питания к разъему питания на видеокарте RX 580. Обратите внимание на правильное подсоединение и надежное фиксирование разъемов.
Шаг 4: Установка драйверов
- Включите компьютер и подождите, пока операционная система загрузится.
- Скачайте последнюю версию драйверов для видеокарты RX 580 с официального сайта производителя.
- Запустите загруженный файл драйверов и следуйте инструкциям мастера установки.
- После завершения установки драйвера перезагрузите компьютер.
Шаг 5: Настройка видеокарты
- После перезагрузки компьютера откройте панель управления драйверами видеокарты. Обычно ее можно найти в системных настройках.
- В панели управления настройте разрешение экрана, частоту обновления и другие параметры графики в соответствии с вашими предпочтениями и характеристиками вашего монитора.
- Рассмотрите возможности настройки параметров производительности для повышения графической производительности в различных играх и приложениях. Это может включать в себя установку оптимальных параметров антиалиасинга, анизотропной фильтрации и других функций, поддерживаемых видеокартой RX 580.
- После настройки параметров сохраните изменения и перезапустите компьютер.
Заключение
В этом гайде мы детально рассмотрели процесс установки и настройки видеокарты RX 580 для начинающих пользователей. Установка и настройка видеокарты является важной частью создания мощной игровой или графической системы. Следуя этим шагам, вы сможете максимально эффективно использовать свою видеокарту RX 580 и наслаждаться высококачественной графикой в ваших любимых приложениях и играх.
How To Install Radeon RX 580 on your PC (with Pictures)

When it comes to upgrading your computer, installing a Radeon RX 580 is one of the most exciting changes you can make. Installing a Radeon RX 580 isn’t complicated, but it does require attention to detail.
It’s important to follow the correct installation process to avoid damaging your motherboard or the Radeon RX 580 itself. In this guide, we will provide step-by-step instructions on how to install a new Radeon RX 580 graphics card on your computer.

What You’ll Need
Before getting started, you’ll need the following items:
– A Radeon RX 580 graphics card.
– Screwdriver or screwdriver set.
Safety Tips
It’s important to take necessary safety precautions when installing a GPU.
Here are some important tips:
- Keep all power sources off and unplugged before starting the installation process.
- Handle Radeon RX 580 carefully – don’t bend pins or other connectors, as this can damage your GPU.
- Do not touch the metal contacts on the motherboard. This can cause static electricity that can damage the components.
Step 1 – Prepare your PC
Before installing your Radeon RX 580, it’s important to make sure that your computer is properly prepared.
First, turn off your computer and unplug the power supply from the wall. Preferably, give it 5 minutes before proceeding to the next step.
Once five minutes have passed, ground yourself by touching a metal object, like the case of your computer, to discharge any static electricity that might be present in your body or use an anti-static wristband.
Remove the old GPU, if there is one, by carefully removing the power connectors and then releasing any retention mechanisms and gently pulling it out of the slot.
If this is your first GPU, then you will have to remove the expansion slot plates.

To do this, you will need a screwdriver to remove any screws that are securing the plate in place(Most of the time you can even do this by hand).

Step 2 – Open Your PCIe Slot Clips
The Radeon RX 580 uses PCIe slots to connect to your motherboard. These slots have a clip that you should open before you install the Radeon RX 580, similar to how you install RAM.
In the picture below, you can check what an open PCIe slot clip looks like.

Step 3 – Install the Graphics Card
Once the PCIe slot has been opened and prepared, it’s time to install your Radeon RX 580 graphics card.
The PCIe slot will only let you install the GPU if you have it facing the right way. The metal plate with the display connectors should face the back of the case, and the fans on the GPU will usually face downwards.
To start, align your graphics card’s main connector with the PCIe slot, making sure the grooves match. It might be tricky as the GPU’s I/O plate has to fit into a small space next to the motherboard.
Once aligned, the graphics card will easily slide into place. Push down on the card until you hear a slight click, indicating that the clip on your PCIe slot has closed.
Finally, use the screws that were holding your expansion slot plates in place to secure the graphics card.

Step 4 – Connect the Radeon RX 580 to the PSU
Now that your GPU is successfully installed in the expansion slot, it’s time to connect it to the power supply.
For this purpose, you will typically need one(Double) or two PCIe power cables. Plug them into the ports on your graphics card and then plug them into a power supply.
For information about how many cables you should connect please refer to the specific manufacturer’s website. Different Radeon RX 580 models might have different requirements.

On each cable, it’s written on the head which side should go to the power supply and which one should go to the GPU.

Make sure they are firmly connected and let’s move on to the next step.
Step 5 – Connect your Monitors to Radeon RX 580
After everything is installed, it’s time to connect your monitors to the graphics card and turn on your PC to check if you did everything correctly.
It’s important to connect your monitors to the graphics card and not the motherboard, or you will see a blank screen and even if you can boot because of your integrated GPU, you will have issues with performance and refresh rates.
So please, connect your monitors to the GPU. In case you have more monitors than your GPU can receive, connect the ones that you don’t use for gaming or work on the motherboard and connect the rest to the GPU.

Once you do that, plug the power supply back into the wall and turn on your PC. Once you get into the operating system environment follow the next steps to finish installing your Radeon RX 580.
Step 6 – Uninstall Old drivers with DDU
Before installing the latest drivers for your Radeon RX 580, it’s important to ensure your system is clean from any driver remains. To do this, you can use a program called DDU (Display Driver Uninstaller) which will altogether remove any leftover files from previous drivers and help you avoid potential instability or performance issues.
Step 7 – Install the BEST drivers for your Radeon RX 580
If you are a gamer, then below you can find a comprehensive list with the best drivers depending on your favorite game:
- Best NVidia Drivers for Any Game
- Best AMD Drivers for Any Game
Once you find the best driver depending on your preferred game, go to the official website and download it, double-click on it, and proceed with the installation instructions.
Another way to do so is to download software like DriverBooster and install it on your PC. It will always install the latest drivers for you automatically.
Step 8 – Optimize & Overclock your Radeon RX 580
Now that everything is running just fine, it’s time to take your Radeon RX 580 to the next level. Applying the best settings for your GPU as well as overclocking it will give you some free extra performance.
- Optimize NVidia GPUs
- Optimize AMD GPUs
For basic overclocking, you can check out some videos on Youtube to understand the fundamentals. If you are looking for a complete optimization of your system to ensure it’s performing at its best of capabilities, check out my PC Optimization service.
Как завести видеокарту Sapphire Radeon RX 580 2048sp?
Может нужно какой кекст добавить?
А может быть причиной то, что устанавливал я систему с картой NVidia, а потом поставил. Sapphire Radeon RX 580?
Сейчас выдает разрешение только по умолчанию и нет возможности выставить другое.
В общем, прошу помощи у специалистов.
Спасибо
- Вопрос задан 23 июн.
- 197 просмотров
Комментировать
Решения вопроса 0
Ответы на вопрос 1

На чем сборка? OpenCore? Clover?
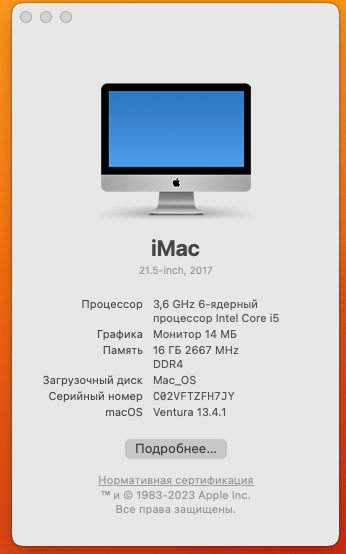
Надеюсь OC. RX 580 это Polaris 10 and 20 series:
Highest Supported OS: Current/Ventura (13)
Initial Supported OS: Sierra (10.12)
Для работы нужны классические: Lilu.kext, WhateverGreen.kext
Все это есть в GPU Buyers Guide
Если юзаешь OC — просто пройдись по гайду от начала до конца и собери новый конфиг, там есть куча нюансов с чипсетом, материнками, BIOS и прочее.
Обрати внимание на ремарку:
Regarding Polaris, basically every model of card is supported as long as it’s running either a Polaris or Baffin core. Lower end cards like the RX 550 may run a Lexa core, meaning no support in macOS.
The only brands you should avoid with the Polaris series would be XFX (460/560 models), PowerColor, HIS and VisionTek as many users have had bootloader and macOS boot issues. Other users have found fixes/workarounds, though nothing consistent. This seems to be caused by having an odd VBIOS that doesn’t communicate well with macOS and the only real solution is flashing another VBIOS, which is not ideal for most users.