PowerShell: системное администрирование и программирование
Всё о PowerShell в Windows и на Linux. Системное администрирование Windows
Как пользоваться PackageManagement в PowerShell в Windows 10
Разработчики включили в PowerShell новый модуль PackageManagement в Windows 10. PackageManagement (ранее называвшийся OneGet) позволяет устанавливать, управлять и удалять приложения и программы из внешнего (или локального) репозитория, а также управлять списком подключённых репозиториев из консоли PoSh. Другими словами, теперь вы можете устанавливать программы из командной строки в Windows 10/Windows Server 2016, как это делается в Linux, с помощью известной команды apt-get install.
Модуль PackageManagement упрощает установку нового программного обеспечения. Установка сводится к запуску одной команды PowerShell, и пользователю не нужно искать и загружать установочные файлы программного обеспечения в Интернете, что снижает риск загрузки устаревших или заражённых программ. Программное обеспечение устанавливается из надёжного источника. Когда программное обеспечение обновляется в репозитории, оно может автоматически обновляться на клиентах.
Модуль PackageManagement
Модуль PackageManagement уже интегрирован в Windows 10, и для него требуется PowerShell 5 и выше. Чтобы PackageManagement работал под Windows 8.1, сначала необходимо установить Windows Management Framework 5.0. Microsoft также выпустила отдельный модуль PackageManagement для работы в PowerShell v.3 и 4.
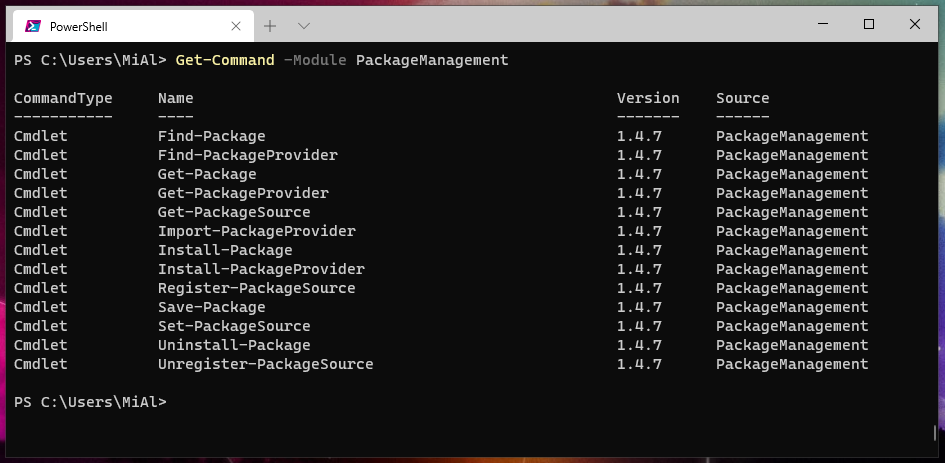
Посмотрим список доступных командлетов PowerShell в модуле PackageManagement:
Get-Command -Module PackageManagement
В текущей версии модуля (v 1.4.7) доступны следующие команды:
- Find-Package — поиск пакета (программы) в доступных репозиториях
- Find-PackageProvider — поиск провайдеров распространения пакетов
- Get-Package — показывает список установленных пакетов
- Get-PackageProvider — выводит список поставщиков пакетов, доступных на компьютере
- Get-PackageSource — выводит список доступных источников пакетов
- Import-PackageProvider — добавляет поставщиков пакетов управления пакетами в текущий сеанс
- Install-Package — устанавливает пакет (программу) на компьютер
- Install-PackageProvider — устанавливает одного или нескольких поставщиков пакетов управления пакетами.
- Register-PackageSource — добавляет источник пакета для поставщика
- Save-Package — сохраняет пакет локально, не устанавливая его
- Set-PackageSource — устанавливает поставщика в качестве источника пакета
- Uninstall-Package — удаляет программу (пакет)
- Unregister-PackageSource — удаляет провайдера из списка источников пакетов
Поставщики пакетов
Пакеты обслуживаются разными поставщиками, которые могут получать пакеты из разных источников. Чтобы отобразить список доступных поставщиков, выполните эту команду:
Find-PackageProvider

По умолчанию в системе установлено два источника пакетов: NuGet (nuget.org) и PowerShellGet (официальная онлайн-галерея скриптов PowerShell от MSFT). В первую очередь они рассчитаны на программистов и системных администраторов.
Примечание. В Nano Server есть специальный провайдер NanoServerPackage, о котором пойдёт речь в следующей статье.
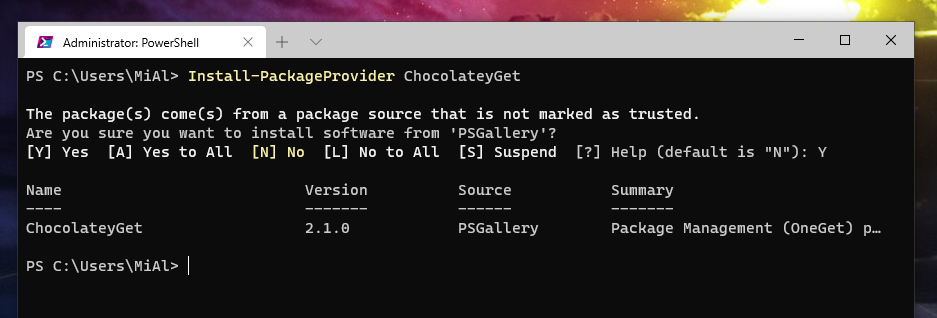
Чтобы получить доступ к репозиторию прикладного программного обеспечения, давайте подключим популярный репозиторий программного обеспечения — Chocolatey, содержащий более 4500 различных программ.
Установите нового провайдера, Chocolatey:
Install-PackageProvider ChocolateyGet
Обратите внимание, что PowerShell (или Windows Terminal) нужно запускать с правами администратора. Как это сделать смотрите в статье «Как запустить PowerShell с правами администратора».
Если вы получили следующее сообщение об ошибке, то это означает, что PowerShell запущен без прав администратора:
Install-PackageProvider: Administrator rights are required to install packages in ''. Log on to the computer with an account that has Administrator rights, and then try again, or install in 'C:\Users\MiAl\AppData\Local\PackageManagement\ProviderAssemblies' by adding "-Scope CurrentUser" to your command. You can also try running the Windows PowerShell session with elevated rights (Run as Administrator).
Подтвердите установку провайдера, нажав Y.
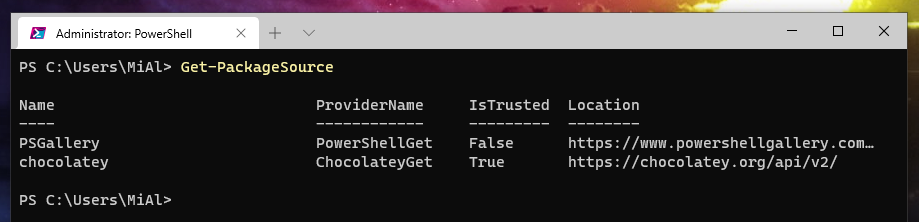
Сделайте Chocolatey надёжным источником пакетов, чтобы каждый раз не подтверждать установку пакета из этого репозитория.
Set-PackageSource -Name chocolatey -Trusted

Убедитесь, что Chocolatey теперь доступен среди репозиториев приложений:
Get-PackageSource
Установка приложений из репозитория Chocolatey
Давайте посмотрим, как установить приложение (пакет) от Chocolatey.
Список доступных приложений можно получить прямо на официальном сайте Chocolatey (https://chocolatey.org/packages).
Вы также можете найти и установить приложения прямо из консоли PowerShell. Например, для просмотра файлов PDF необходимо установить Adobe Acrobat Reader. Поскольку мы не знаем полного имени приложения, нам нужно было получить имя пакета в каталоге для его установки. Выполните поиск в репозитории по ключевому слову «adobe»:
Find-Package -Name *adobe* -Source Chocolatey
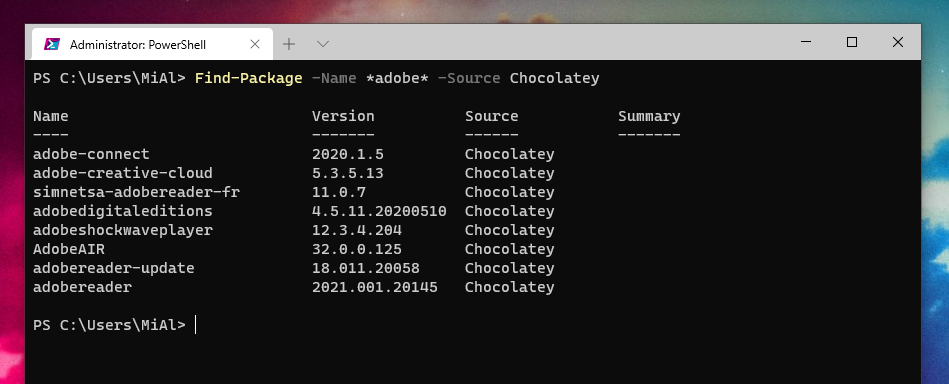
Список всех пакетов, содержащих это ключевое слово, появится в консоли. Нам нужен adobereader (это имя пакета из столбца Name, которое нам нужно использовать).
Запустите установку пакета Adobe Reader:
Install-Package -Name adobereader -ProviderName ChocolateyGet
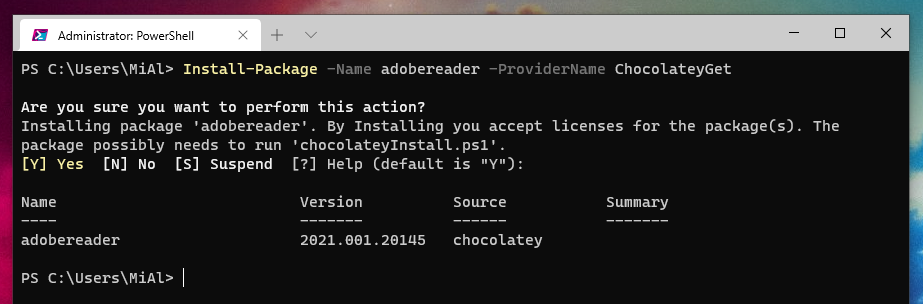
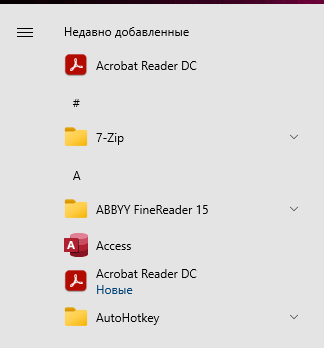
В верхней части окна PowerShell появится ползунок, указывающий, что пакет Adobe Reader загружается. Сразу после завершения загрузки приложение устанавливается в системе.
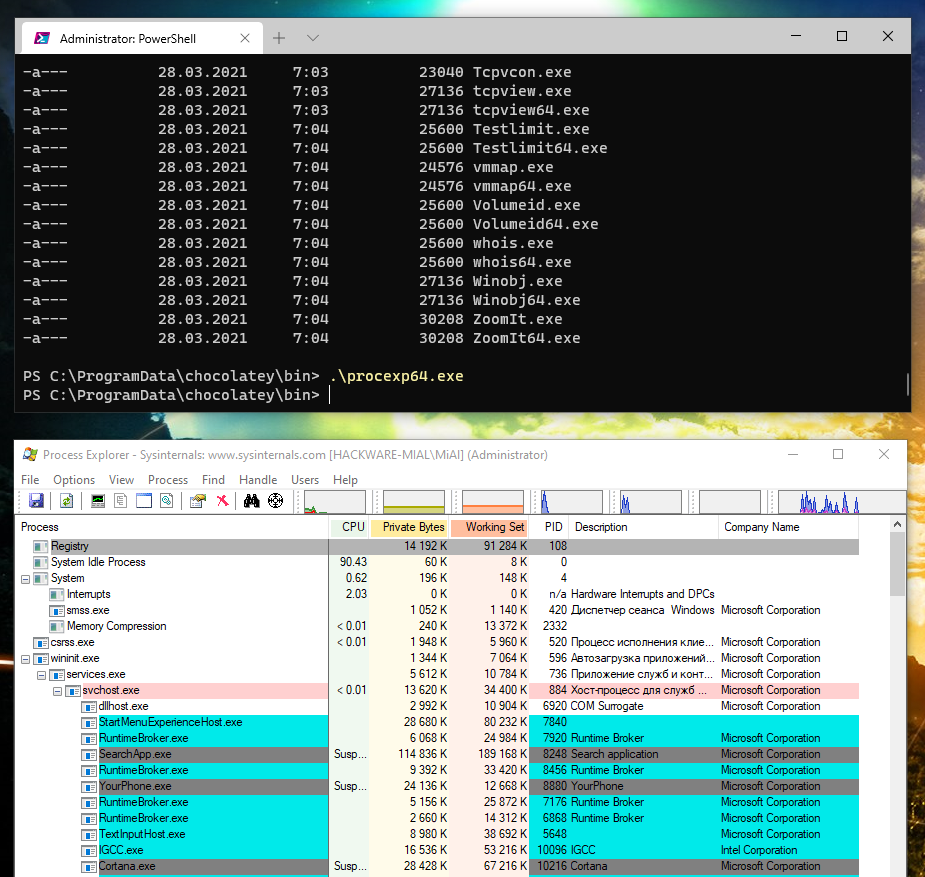
Другой пример. Допустим, вам нужен набор инструментов SysInternals. Чтобы не загружать его вручную, найдите в Chocolatey пакет SysInternals и установите его.
Find-Package -Name Sysinternals | Install-Package
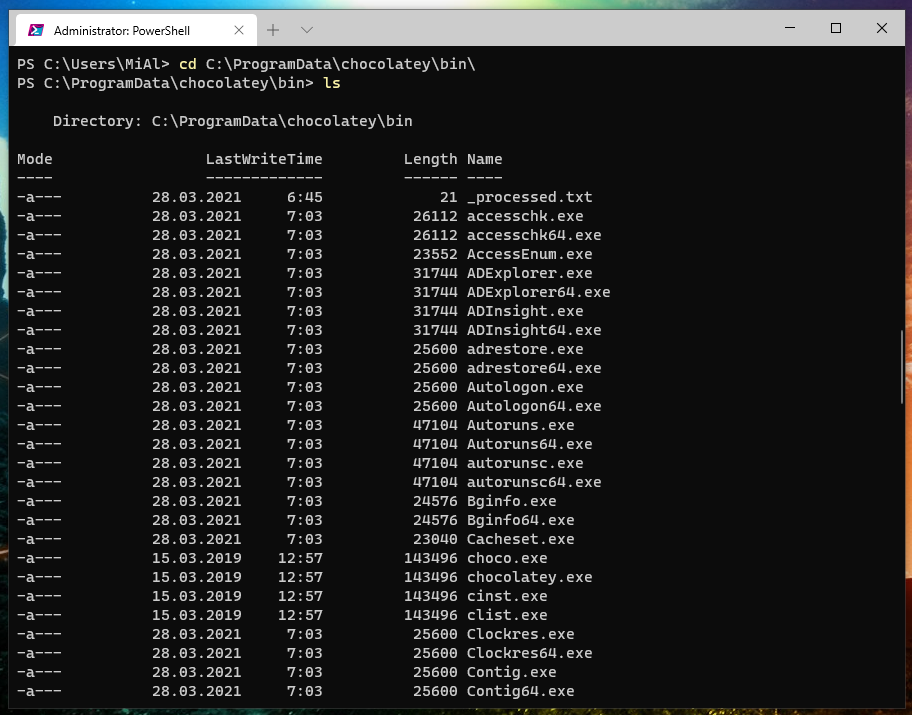
Поскольку пакет не требует установки, он сохраняется на вашем компьютере и хранится в папке C:\ProgramData\chocolatey\bin\.
Вы можете установить несколько приложений одновременно, используя одну команду:
Find-Package -Name firefox, 7zip, notepadplusplus, putty, dropbox | Install-Package
Как удалить пакет
Вы также можете удалить пакет, используя всего одну команду. Например, чтобы удалить Adobe Reader, выполните эту команду:
Uninstall-Package adobereader
Итак, мы рассмотрели новые способы установки приложений Windows из командной строки PowerShell. В ближайшее время могут появиться графические надстройки для PackageManagement, которые позволят легко управлять установкой/удалением программного обеспечения для обычных пользователей без навыков работы с интерфейсом командной строки.
- Уникальная статья
Working with software installations
Applications installed with the Windows Installer can be found through WMI’s queries, but not all applications use the Windows Installer. The specific techniques for find applications installed with other tools depends on the installer software.
For example, applications installed by copying the files to a folder on the computer usually can’t be managed using techniques discussed here. You can manage these applications as files and folders using the techniques discussed in Working With Files and Folders.
For software installed using an installer package, the Windows Installer can be found using the Win32Reg_AddRemovePrograms or the Win32_Product classes. However, both of these have problems. The Win32Reg_AddRemovePrograms is only available if you are using System Center Configuration Manager (SCCM). And the Win32_Product class can be slow and has side effects.
The Win32_Product class isn’t query optimized. Queries that use wildcard filters cause WMI to use the MSI provider to enumerate all installed products then parse the full list sequentially to handle the filter. This also initiates a consistency check of packages installed, verifying and repairing the install. The validation is a slow process and may result in errors in the event logs. For more information seek KB article 974524.
This article provides an alternative method for finding installed software.
Querying the Uninstall registry key to find installed software
Because most standard applications register an uninstaller with Windows, we can work with those locally by finding them in the Windows registry. There is no guaranteed way to find every application on a system. However, it’s possible to find all programs with listings displayed in Add or Remove Programs in the following registry key:
We can find the number of installed applications by counting the number of registry keys:
$UninstallPath = 'HKLM:\Software\Microsoft\Windows\CurrentVersion\Uninstall' (Get-ChildItem -Path $UninstallPath).Count We can search this list of applications further using a variety of techniques. To display the values of the registry values in the registry keys under Uninstall , use the GetValue() method of the registry keys. The value of the method is the name of the registry entry. For example, to find the display names of applications in the Uninstall key, use the following command:
Get-ChildItem -Path $UninstallPath | ForEach-Object -Process < $_.GetValue('DisplayName') >| Sort-Object There is no guarantee that the DisplayName values are unique.
The following example produces output similar to the Win32Reg_AddRemovePrograms class:
Get-ChildItem $UninstallPath | ForEach-Object < $ProdID = ($_.Name -split '\\')[-1] Get-ItemProperty -Path "$UninstallPath\$ProdID" -ea SilentlyContinue | Select-Object -Property DisplayName, InstallDate, @>, Publisher, DisplayVersion > | Select-Object -First 3 For the sake of brevity, this example uses Select-Object to limit the number of items returned to three.
DisplayName : 7-Zip 22.01 (x64) InstallDate : ProdID : 7-Zip Publisher : Igor Pavlov DisplayVersion : 22.01 DisplayName : AutoHotkey 1.1.33.10 InstallDate : ProdID : AutoHotkey Publisher : Lexikos DisplayVersion : 1.1.33.10 DisplayName : Beyond Compare 4.4.6 InstallDate : 20230310 ProdID : BeyondCompare4_is1 Publisher : Scooter Software DisplayVersion : 4.4.6.27483 Feedback
Submit and view feedback for
Install Software in PowerShell

- Install Software in PowerShell
- Install Software Using the Start-Process Cmdlet in PowerShell
- Install Software Silently in PowerShell
PowerShell scripting language automates multiple Windows operating system tasks and processes. For example, PowerShell can execute various files like installation files with format MSI or .exe.
This article will demonstrate several methods and approaches to installing Windows PowerShell software.
Failed to obtain result from Server.
Please enable JavaScript
Install Software in PowerShell
The following are the steps to install software using PowerShell:
Open your Windows PowerShell terminal.
Find the location of the .exe file and change the working directory to this.
Then, use the change directory or cd command to change the current working directory of the console.
Once we have adjusted our working directory, we may run our executable file by calling it to the command line.
.\installer_setup.exe; However, this method’s caveat would be that it will not suffice if we want to pass specific arguments when installing. Before, we had a legacy command called msiexec executed in the command prompt.
The following section will teach us the similar counterpart to msiexec in Windows PowerShell.
Install Software Using the Start-Process Cmdlet in PowerShell
The Start-Process command can run executable files in Windows PowerShell. The PowerShell cmdlet stated above and the -FilePath parameter takes the complete path of the .exe installation file.
Moreover, the -ArgumentList parameter provides the internal parameters used by the executable file when the installation process starts in Windows PowerShell. Lastly, the -PassThru parameter is used to verify that the command worked as we intended.
Suppose we want to open an executable file named installer_setup.exe .
Start-Process -Wait -FilePath '.\installer_setup.exe' -ArgumentList '/s' -PassThru Once the above script is executed, Windows PowerShell will run the defined executable file.
Install Software Silently in PowerShell
Running installation software in Windows PowerShell takes advantage of the msiexec legacy command that we usually use to run installation software in the command prompt.
To execute the installation software silently, we must use specific msiexec command parameters and pass them to the -ArgumentList parameter in Windows PowerShell.
- /s : runs the installation in silent mode.
- /v : passes command-line values and public properties options through the Msiexec.exe facility.
- /q : sets user interface level.
- n : interface level of the /q parameter; will run the installation with no graphical user interface.
Combining all of the parameters above in one command is how the PowerShell script should look.
Start-Process -Wait -FilePath '.\setup.exe' -ArgumentList '/s /v/qn' -PassThru The installation should run in silent mode with no window or wizard prompts by executing the code snippet above.
It is worth noting that both the /v and /qn parameters are executed with no spaces between them because the /qn parameter is executed as a subfunction of the /v parameter.
The above parameters are not the only existing parameters under the msiexec command. You may run the msiexec command in PowerShell for more info.
Marion specializes in anything Microsoft-related and always tries to work and apply code in an IT infrastructure.

report this ad
При подготовке материала использовались источники:
Как пользоваться PackageManagement в PowerShell в Windows 10
https://learn.microsoft.com/en-us/powershell/scripting/samples/working-with-software-installations?view=powershell-7.3
https://www.delftstack.com/howto/powershell/install-software-using-powershell/