Getting Started with C# in VS Code
This getting started guide introduces you to C# and .NET for Visual Studio Code through the following tasks:
- Installing and setting up your VS Code environment for C#.
- Writing and running a simple «Hello World» application using C#.
- Introduce you to other learning resources for C# in VS Code.
Keep in mind, that this guide won’t teach you C#. Instead, it teaches you how to get set up for C# development in VS Code. If you’re looking for resources to learn C#, check out our C# curriculum.
Necessary tools
- Visual Studio Code
- C# Dev Kit extension
- For .NET Development, the .NET SDK
Install
Installing VS Code and extensions
- If you haven’t already done so, install VS Code.
- Next, install C# Dev Kit from the Visual Studio Marketplace. For additional details on installing extensions, read Extension Marketplace. The C# extension is called C# Dev Kit and it’s published by Microsoft.
Note: C# Dev Kit supports cloud native development. To do cross-platform mobile and desktop development, you can use C# Dev Kit with the .NET MAUI extension. Learn how to get set up with .NET MAUI in VS Code.
Upon installation, C# Dev Kit launches an extension walkthrough. You can follow the steps of this walkthrough to learn more about the features of the C# extension. Reopen the walkthrough at any time by opening the Command Palette ( ⇧⌘P (Windows, Linux Ctrl+Shift+P ) ) and selecting Welcome: Open Walkthrough. Here, select Get Started with C# Dev Kit.
Note: You are required to sign in to a Visual Studio subscription to use C# Dev Kit. Check out the Signing in to C# Dev Kit documentation to learn more.
Installing the .NET Coding Pack for students
If you’re a student, we recommend installing the .NET Coding Pack for an easier setup experience. The Coding Pack includes VS Code, the .NET SDK, and essential .NET extensions. The Coding Pack can be used as a clean installation, or to update or repair an existing development environment.
Note: The .NET Coding Pack is only available for Windows and macOS. For other operating systems, you need to manually install the .NET SDK, VS Code, and .NET extensions.
Open folder
By starting VS Code in a folder, that folder becomes your «workspace». VS Code stores settings that are specific to that workspace in .vscode/settings.json , which are separate from user settings that are stored globally.
Using a terminal, create an empty folder called «hello», navigate into it, and open VS Code (code) in that folder (.) by entering the following commands:
mkdir hello cd hello code . Alternatively, you can run VS Code through the operating system UI, then use File > Open Folder to open the project folder.
Create a Hello World app
First, ensure you are within the new folder (workspace) that you created. From here, you can create the project in two ways.
Use the Command Palette
- Bring up the Command Palette using ⇧⌘P (Windows, Linux Ctrl+Shift+P ) and then type «.NET».
- Find and select the .NET: New Project command.
- After selecting the command, you’ll need to choose the project template. Choose Console app.
- To run your app, select Run > Start Debugging in the upper menu, or use the F5 keyboard shortcut. To learn more about debugging your C# project, read the debugging documentation.
Use the terminal
- Open a terminal/command prompt and navigate to the folder in which you’d like to create the app. Enter the following command in the command shell:
dotnet new console dotnet run Learn more
Explore all the features the C# extension has to offer by looking for .NET in the Command Palette. For more information on these features, refer to the other documentation pages.
For learning materials on C# and .NET, check out the following resources:
- Learn to program using C#
- Learn to build with .NET in VS Code
- Learn to build web applications
Join the community
Find community resources and connect with user groups.
.NET developer community — Meet with like-minded developers
Как запустить проект на C# в Visual studio code?
Вкратце, я ещё не опытный и я не знаю как запустить свой код в Visual studio code.
Да, я знаю, что эта программа предназначена для опытных, но мне она очень понравилась своим оформлением) К сожалению, я только изучаю программирование, т.е. базовую часть. И хотелось бы понять, как компилировать свой код и запускать.
- Вопрос задан более двух лет назад
- 21758 просмотров
Комментировать
Решения вопроса 1

Василий Банников @vabka Куратор тега C#
Токсичный шарпист
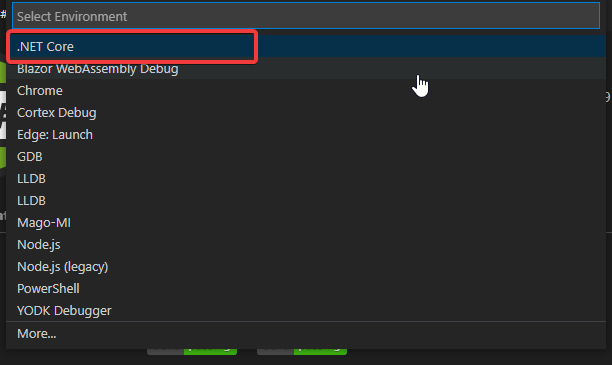
(при первом запуске он может напомнить, что в отладчике есть декомпилятор, который нелегально использовать на чужих приложениях — соглашаемся с этим)

Если что — выбираем .net Core
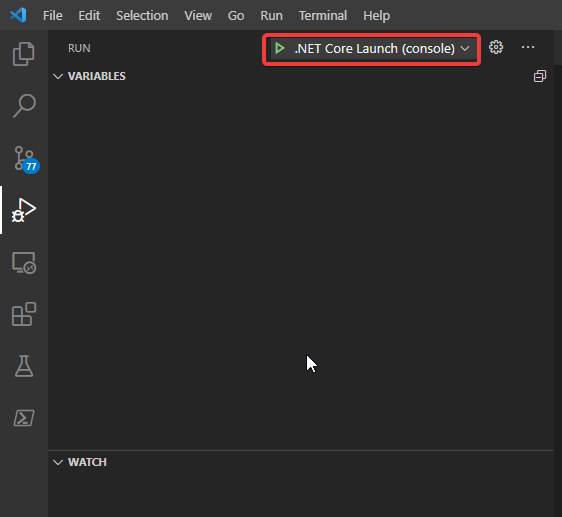
В итоге появится нужная кнопка
PS: Вообще, советую пользоваться полноценной студией — может она на первый взгляд и пугает, но она сильно удобнее, чем vs code. (ну и в ней всё работает из коробки, что важно для новичков)
PPS: А ещё существует Rider — для профессионального разработчика он стоит копеечные 15$ в месяц, а для школьника или студента вообще бесплатен. При этом он даёт целую кучу полезных инструментов, особенно для геймдева, если он вам интересен.
При подготовке материала использовались источники:
https://code.visualstudio.com/docs/csharp/get-started
https://qna.habr.com/q/947675