CUPS/Printer sharing
This article contains instruction on sharing printers from a GNU/Linux system.
| Protocol | Linux | Windows | macOS |
|---|---|---|---|
| Discovery (DNS-SD/mDNS) | CUPS with Avahi | Native support since Windows 10 | Bonjour |
| Internet Printing Protocol | CUPS | Control Panel > Programs > Turn Windows features on or off > Print and Document Services > Internet Printing Client | Native support |
| SMB shared printer | Samba with CUPS | Native support | Native support |
| Line Printer Daemon protocol | CUPS | Control Panel > Programs > Turn Windows features on or off > Print services > LPD Print Service and LPR Port Monitor |
Native support |
Creating class for multiple printers
In CUPS, a class is a group of printers which appears to clients as a single printer. When a client selects to print to the class, CUPS selects any printer in the group to accept the print job. This may be especially useful when one printer from the class must be removed. If it is excluded from the class, end users will not notice any change because the print job will be queued to another printer in the class. Creating and managing classes can be done from CUPS Web GUI.
Printer sharing
This article or section needs expansion.
Reason: List ports which need to be opened in the firewall.[1] (Discuss in Talk:CUPS/Printer sharing)
DNS-SD advertisement
To announce the printer to the network over DNS-SD/mDNS (Bonjour in Apple world), Avahi must be installed and running on the server.
To enable it, either select Share printers connected to this system in the web interface, or manually set Browsing Yes in /etc/cups/cupsd.conf :
/etc/cups/cupsd.conf
. Browsing Yes .
Note that «browsing» at the print server is a different thing from «browsing» at a remote networked host. On the print server, cupsd provides the DNS-SD protocol support which the avahi-daemon broadcasts. The cups-browsed service is unnecessary on the print server, unless also broadcasting the old CUPS protocol, or the print server is also «browsing» for other networked printers. On the remote networked host, the cups-browsed service is required to «browse» for network broadcasts of print services, and running cups-browsed will also automatically start cupsd .
The cups.service service will be automatically started when a USB printer is plugged in, however this may not be the case for other connection types. If cups.service is not running, avahi-daemon does not broadcast the print services, so in that case the systemd unit service file must be modified to start on boot, and then the service must again be «enabled/installed» with the new dependency. To do this, edit the service file [Install] section to add a WantedBy=default.target dependency, and then enable and start the cups.service service.
Sharing via Internet Printing Protocol
The server can be configured using either the web interface or by manually editing /etc/cups/cupsd.conf .
Open up the web interface to the server, select the Administration tab, look under the Server heading, and enable the «Share printers connected to this system» option. Save your change by clicking on the Change Settings button. The server will automatically restart.
On the server computer (the one directly connected to the printer), allow access to the server by modifying the location directive. For instance:
/etc/cups/cupsd.conf
Order allow,deny Allow localhost Allow 192.168.0.* .
Also make sure the server is listening on the IP address the client will use:
/etc/cups/cupsd.conf
. Listen :631 .
There are more configuration possibilities, including automatic methods, which are described in detail in Using Network Printers and cupsd.conf(5) .
After making any modifications, restart cups.service .
If CUPS is started using socket activation, create a drop-in snippet for cups.socket so that socket activation also works for remote connections:
/etc/systemd/system/cups.socket.d/override.conf
[Socket] ListenStream=631
Sharing via Samba
Samba is an implementation of the Windows file and printer sharing protocols, even the most vintage ones.
To configure Samba on the Linux server, edit /etc/samba/smb.conf file to allow access to printers. File smb.conf can look something like this:
/etc/samba/smb.conf
[global] . printing = CUPS . [printers] comment = All Printers path = /var/spool/samba browseable = yes # to allow user 'guest account' to print. guest ok = no writable = no printable = yes create mode = 0700 write list = root @adm @wheel yourusername
That should be enough to share the printer, yet adding an individual printer entry may be desirable:
/etc/samba/smb.conf
[ML1250] comment = Samsung ML-1250 Laser Printer printer = ml1250 path = /var/spool/samba printing = cups printable = yes user client driver = yes # to allow user 'guest account' to print. guest ok = no writable = no write list = root @adm @wheel yourusername valid users = root @adm @wheel yourusername
Please note that this assumes configuration was made so that users must have a valid account to access the printer. To have a public printer, set guest ok to yes , and remove the valid users line. To add accounts, set up a regular GNU/Linux account and then set up a Samba password on the server. See Samba#User management.
After this, restart smb.service and nmb.service .
See Samba’s documentation Setting up Samba as a Print Server for more details.
Sharing via Line Printer Daemon protocol
Warning: cups-lpd does not perform any access control based on the settings in /etc/cups/cupsd.conf . Therefore, running cups-lpd on your server will allow any computer on your network (and perhaps the entire Internet) to print to your server.
Remote administration
Once the server is set up as described in #Printer sharing, it can also be configured so that it can be remotely administered. Add the allowed hosts to the block in /etc/cups/cupsd.conf , using the same syntax as described in #Sharing via Internet Printing Protocol. Note that three levels of access can be granted:
#access to the server #access to the admin pages #access to configuration files
To give remote hosts access to one of these levels, add an Allow statement to that level’s section. An Allow statement can take one or more of the forms listed below:
Allow from all Allow from host.domain.com Allow from *.domain.com Allow from ip-address Allow from ip-address/netmask Allow from @LOCAL
Deny statements can also be used. For example, to give full access to all hosts on your local network interfaces, edit /etc/cups/cupsd.conf to include this:
# Restrict access to the server. # By default only localhost connections are possibleOrder allow,deny Allow from @LOCAL # Restrict access to the admin pages. Order allow,deny Allow from @LOCAL # Restrict access to configuration files.AuthType Basic Require user @SYSTEM Order allow,deny Allow from @LOCAL
You might also need to disable the HTTPS requirement, when using the default self-signed certificate generated by CUPS:
DefaultEncryption IfRequested
This should avoid the error: 426 — Upgrade Required when using the CUPS web interface from a remote machine.
Kerberos
Kerberos can be used to authenticate users accessing a remote CUPS server. This assumes that your machine has a keytab and it will need a ticket for «HTTP». Instead of using http://localhost:631 you must use https://host.example.co.uk:631 — encryption is required for auth (hence https) and the full hostname is needed so that Kerberos/Negotiate can work. In addition, the server must be configured in /etc/cups/cupsd.conf to use a DefaultAuthType of Negotiate .
If you are using Samba’s winbind NSS support, you can add an AD group name to /etc/cups/cups-files.conf — in the following example sysadmin might be an AD group:
SystemGroup sys root sysadmin
Troubleshooting
See CUPS/Troubleshooting for general troubleshooting tips.
Cannot print with GTK applications
If you get a getting printer information failed message when you try to print from GTK applications, add this line to your /etc/hosts :
serverip some.name.org ServersHostname
Permission errors on Windows
Some users fixed NT_STATUS_ACCESS_DENIED (Windows clients) errors by using a slightly different syntax:
smb://workgroup/username:password@hostname/printer_name
Local Printing is fine, but no printing via Network
Depending on the printer (Especially for unidirectional label-printers) one side must be configured with the raw -driver to be able to print
Other operating systems
More information on interfacing CUPS with other printing systems can be found in the CUPS manual, e.g. on http://localhost:631/help/network.html.
Retrieved from «https://wiki.archlinux.org/index.php?title=CUPS/Printer_sharing&oldid=779505»
Установка и настройка принт-сервера CUPS
Принт-сервер – это программно-аппаратный комплекс, позволяющий осуществлять общий доступ к принтеру по локальной сети.
Принт-сервер можно сделать при помощи Raspberry Pi и сервера печати CUPS (Common UNIX Printing System).
Установка и настройка принт-сервера CUPS
Пакет CUPS включен в стандартные репозитории Debian, поэтому для установки нужно просто выполнить консольную команду:
sudo apt — get install cups
В дополнение к CUPS установим еще Foomatic. Foomatic – это такая база драйверов для принтеров, существенно расширяющая стандартную базу драйверов CUPS. Без foomatic шансы на то, что вы найдёте нужный драйвер ничтожны:
sudo apt — get install foomatic — db
sudo adduser pi lpadmin
Далее необходимо отредактировать файл конфигурации:
sudo nano / etc / cups / cupsd . conf
# Only listen for connections from local machine.
#Listen localhost:631
Далее нужно добавить еще несколько новых строк в этом же файле, чтобы открыть доступ к админ-панели по локальной сети.
# Restrict access to the server.
Order allow , deny
Allow @ Local ///эту строку добавляем
# Restrict access to the admin pages.
Order allow , deny
Allow @ Local ///эту строку добавляем
# Restrict access to configuration files.
AuthType Default
Require user @ SYSTEM
Order allow , deny
Allow @ Local ///эту строку добавляем
Перезапустим CUPS для применения сделанных изменений:
sudo service cups restart
Если все сделано правильно, то веб-интерфейс CUPS станет доступен по адресу http://ip-адрес-raspberry-pi:631 из браузера. Переходим на вкладку “Администрирование”: 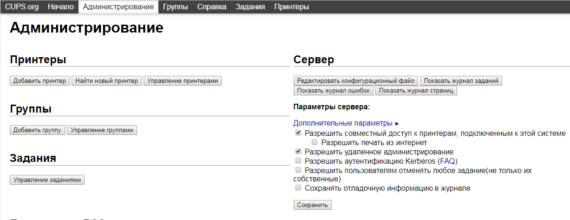 Убеждаемся, что стоит галочка на “Разрешить совместный доступ к принтерам, подключенным к этой системе” и жмем на “Добавить принтер”
 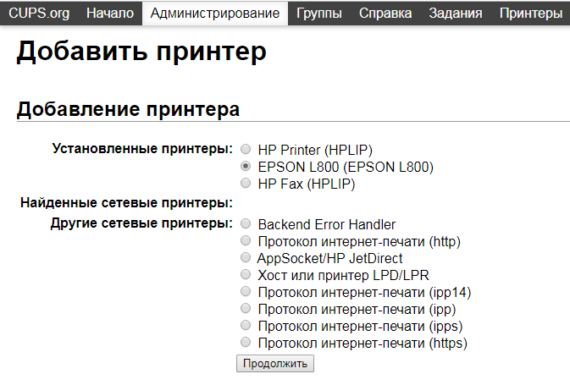 В нем выбираем свой принтер из списка обнаруженных системой. В моем примере это будет EPSON L800 Нажимаем “Применить” и выбираем подходящий драйвер:
 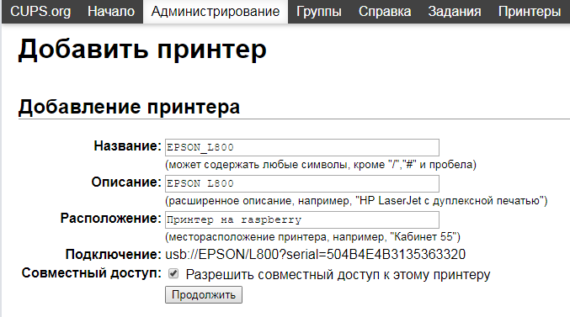 Нужно выбрать из списка драйвер для своей модели принтера, но если таковых нет – скорее всего подойдет драйвер от соседней модели того же модельного ряда. В этом примере я устанавливаю драйвер от модели EPSON STYLUS T50 на принтер EPSON L800.
 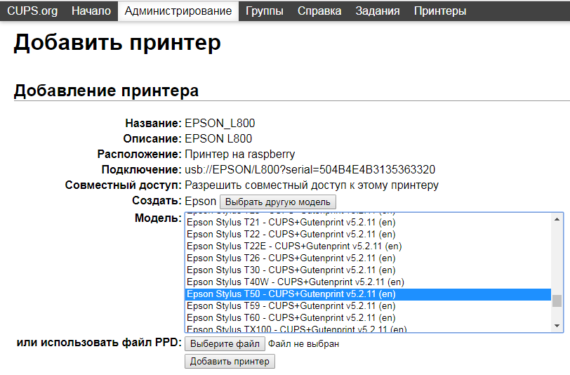 Успешная печать пробной страницы – признак того, что драйвер для принтера подобран верно. Если с пробной страницей возникают проблемы, если принтер не печатает ее вообще или выдает пустые листы без текста – значит проблема в подборе драйвера. Нужно удалять установленный принтер и устанавливать его заново, указывая при этом другие драйвера.
Подключение сетевого принтера к Windows-устройству
Предположим, что установка драйвера для подключенного к принт-серверу CUPS принтера прошла успешно. Теперь нужно подружить с этим принтером компьютер, работающий под управлением Windows. Для этого выбираем сетевой принтер в “установке принтера” и далее по предложениям мастера установки.
Доступ к сетевому принтеру с устройств под управлением iOS
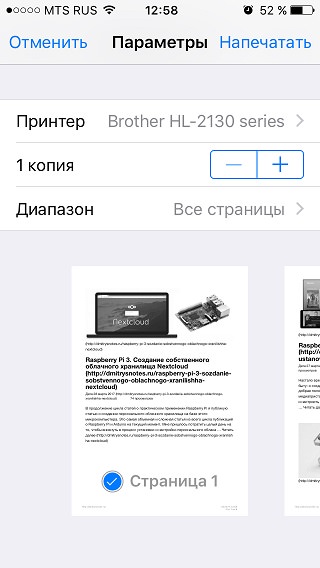
Любым принтером, расшаренным через принт-сервер CUPS, можно пользоваться с любого iOS-устройства, а также с компьютеров Mac вообще без установки драйверов. Это обусловлено тем, что CUPS поддерживает созданную корпорацией Apple технологию беспроводной печати AirPrint:
Добавляем в систему PDF-принтер
Отдельно напишу о том, как подключить к принт-серверу CUPS виртуальный PDF-принтер. Что есть PDF-принтер? Это виртуальное устройство, которое добавляется в систему как обычный принтер и при отправке документа на печать генерирует из него pdf-файл. Использовать PDF-принтер удобно для сохранения статей из интернета или отдельных страниц многостраничного документа в виде отдельного файла. Для установки PDF-принтера нужно установить отдельный пакет:
При подготовке материала использовались источники:
https://wiki.archlinux.org/title/CUPS/Printer_sharing