Shipin7 что это за программа
Tap More -> Video&Image to enter the interface; you can check the picture captured and record files recorded when live viewing.
Mobile Data Traffic Statistics
Tap More-> Traffic Data Statistics to enter the mobile data traffic statistics interface.
You can check the current traffic, traffic today, traffic of this month and total traffic. And you can also clear the data.
Wi-Fi Configuration Tool
Tap More-> Wi-Fi Configuration Tool to enter the configuration interface. You can generate a QR code for the Wi-Fi network you just connected, and put the code against the camera lens, and the device can be connected after you scan the QR code.
Function Configuration
2G/3G Traffic Prompt
Tap More-> Function Configuration to enter the function configuration interface. Slide the bar to enable the 2G/3G traffic prompt and choose the quota for the traffic which triggers the prompt.
Alarm Push Notices
Tap More-> Function Configuration
Slide the bar to enable the alarm push notice. When enabled the camera can push alarm message when armed.
Enlarge the Captured Picture
Tap More-> Function Configuration
Slide the bar to enable the enlarged captured picture. After setting, the captured picture will show as a large picture which enables a convenient view and sending.
Download New Version Automatically
Tap More-> Function Configuration
Slide the bar to enable the automatically download of the new version. When enabled, the device will be updated with the detected new version when the mobile phone is connected to Wi-Fi.
Save Device Parameters
Tap More-> Function Configuration
Slide the bar to enable the saving of the device parameters.
After enabled, the device parameters such as password are saved, so you can check the video and picture without entering the password.
Receive Alarm Automatically when The Mobile Phone Starts
Tap More-> Function Configuration
Slide the bar to enable the mobile phone to receive the alarm message once it starts.
Account Management
Change Account Parameters
Tap More-> Function Configuration-> Account Management
You can change the user information, phone number, nickname, email address and other information.
Change Password
Tap More -> Function Configuration -> Account Management -> Change Password
Retrieve Password
On the login interface, tap Forget Password? to enter the password retrieving interface.
Help
Tap More -> Help to enter the help interface to check the operation of the app.
Feedback
Tap More -> Feedback, to enter the feedback interface. You can enter your comments and feedback and tap Submit.
About Us
Tap More -> About Us
You can view the service introduction, version detection and service agreement here.
Logout
Tap More -> Logout
Note: When you log out the client, the alarm message will not be received.
Shipin7 что это за программа
Before you start:
• Ensure that your mobile phone client as well as the devices need to be added has been connected to the network.
• The QR Code can be found in the Quick Operation Guide or on the label of the device. Follow the steps below to add a device.
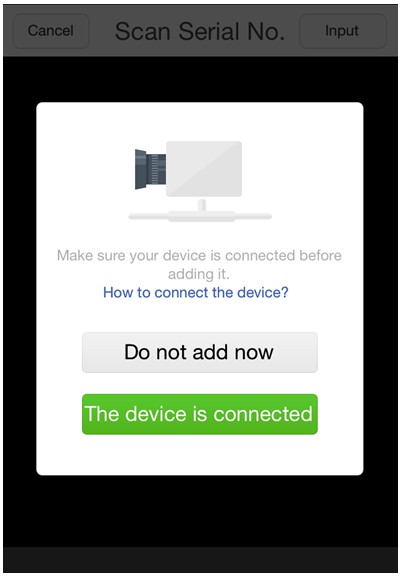
1. In My Camera page, Click Device on the tool bar to enter the device management page.

2. Click on the icon to enter the connection preparing page.
3. Click on The Device is connected to enter the Add Device page. You can add a evice by scanning or manually entering the verification code of the device.
Scan the Verification Code

Align the QR Code or verification code with the scanning frame. The system will then automatically identify the device by scanning the code. Click on the icon to add the device.
Manually Enter the Verification Code

Click on the Enter Code button on the upper-right side of the Scan Serial No page. Enter the 9-characters verification code into the textbox. Click Search to search for the corresponding device online. Click on the icon to add the device.
Delete a Device

In the Device Management page, click on the icon to enter the device details page. Click Delete Device on the lower side of the page to delete the device.
Edit Device Name

In the Device Management page, click on the icon to enter the device details page. Click on the device name to enter the edit page. Rename the camera in the textbox. Click OK to save the settings.
Security Protection Prompt
Enable/Disable the Security Protection Prompt

In the Device Management page, click on the icon to enter the device details page. Slide the Security Protection Prompt button to set the mode as ON or OFF.
Security Protection Arming Time
1. In the device Details page, slide the Security Protection Alarm button to set the mode as ON.

2. Click on the icon on the Arming Time bar to enter the schedule settings page.
3. Slide the Arming Time button to set the schedule mode as ON.
4. Set the start/end time of the arming Period. Tick the repeat date for the schedule.
5. Click Save to save the settings.
• The security protection prompt can only work on the camera which supports the security protection function.
• The camera will enable the security protection function in accordance with the record schedule.
• If the security protection function is enabled, the system will send the alarm messages of the camera to your mobile phone on the first time of any abnormal events happens. You can view these messages in Message page.
Storage Initialization
Click the Device>Device Details>Device status>Storage to enter the Storage Initialization page. If the storage status is indicated as Uninitialized or Exception, Click the Initialization button on the right side of the page to initialize the storage.
Notification Sound Mode
Click the Device>Device Details>Sound Mode. You can set the voice mode as Warning, Reminder and Silence.
Shipin7 что это за программа

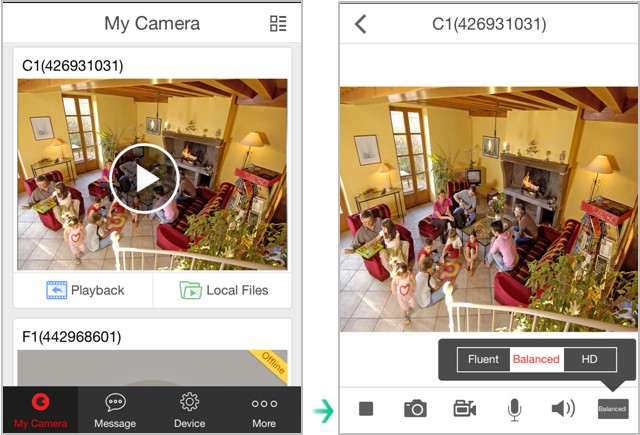
In My Camera page, click the icon on the thumbnail of the device to view real-time video of the required scene. Click the icon Balanced and you can set image quality as Fluent, Balanced, and HD.
• The device and the computer should be in the same subnet.
• During the upgrading, please do not close the web browser, and the device should be online properly.
Manual Record
Manual record is supported in My Camera page. Follow the steps below to start the remote record.

1. Click the icon on the thumbnail of the device to view real-time video of the required scene.

2. Click the icon on the tool bar to start recording. The record file will then be stored in the SD card of your mobile phone. You can search and view the video in the Local Video page.
Voice Talk-back Function
Note: The system can implement the function only if the device is produced with voice talk-back subassembly.

1. In My Camera page, click the icon on the thumbnail of the device to view real-time video of the required scene.

2. Click the icon to enter the Talk-back mode. Long press the Press to talk button to talk to your family or friends.
3. Release the Press to talk button to stop talking and listen to the reply.
4. Click the icon OK on the upper-right side of the page to exit the talkback mode.

Playback
In My Camera page, click Playback to enter the remote playback page. The software will then search for the intraday remote record file automatically. You can click and drag the cursor on the progress bar to view videos at different time periods. You can also click on the calendar button on the upper side of the page to select a date for the playback.
In My Camera page, click Local Files to enter the instant playback page. The software will then search for the intraday local record file automatically. You can also click on the calendar button on the upper side of the page and to select a date for the playback.
При подготовке материала использовались источники:
http://ezvizportal-1414028875.us-east-1.elb.amazonaws.com/help/mobile/more.html
http://ezvizportal-1414028875.us-east-1.elb.amazonaws.com/help/mobile/management.html
http://ezvizportal-1414028875.us-east-1.elb.amazonaws.com/help/mobile/mycamera.html