Smart Deblur
Let SmartDeblur fix them.
Open a photo and get the sharpened, more detailed version of it in a minute!
Works like the «Enhance» tool from CSI series at home.
Fix Blurry and Defocused photos with SmartDeblur
Not all photos are ideal. Images taken with a shaking camera, artificially blurred pictures, wrong autofocus — all of these cause objects on a photo become indistinct and fuzzy. But when you start thinking everything is lost, SmartDeblur saves the day restoring details of blurred and defocused images in one go.
Powered by Blind Deconvolution algorithm, the program works extremely efficiently and doesn’t require any specific skills.
Features
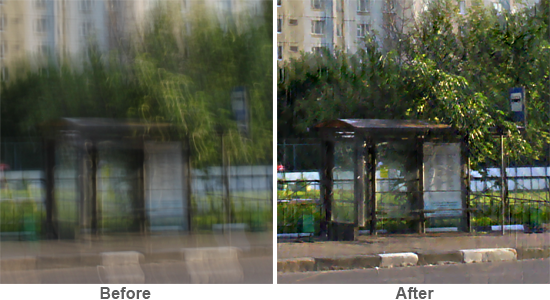
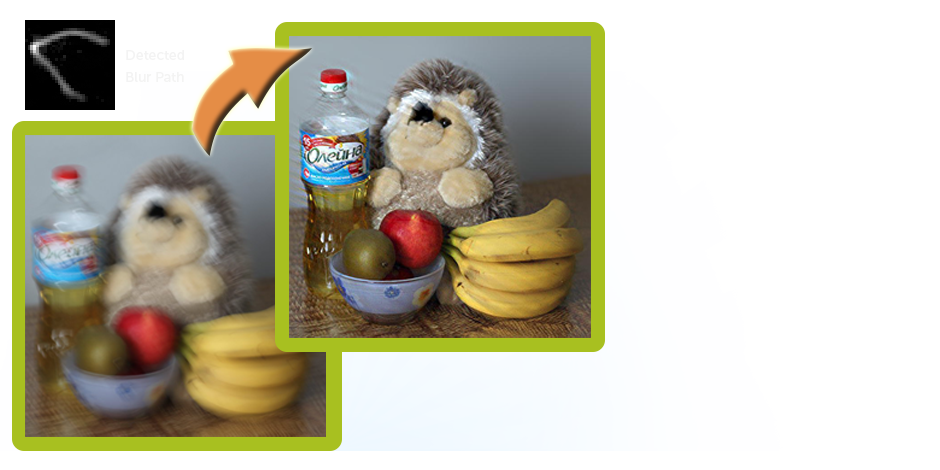
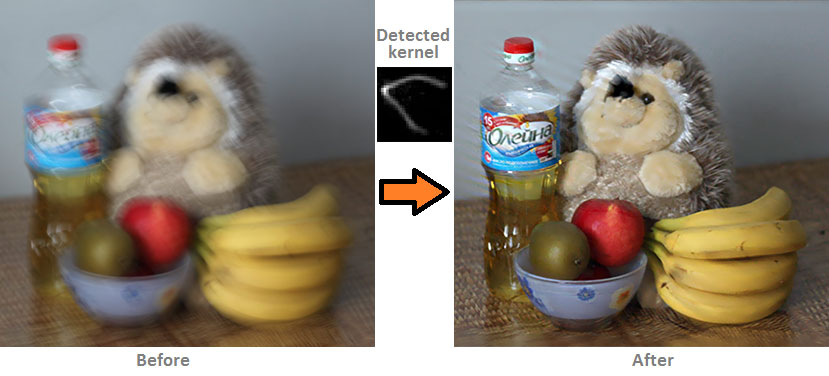
Restore Motion Blur
Even cams with optical stabilizer sometimes produce blurry images. Thanks to automatic shake pattern analysis you can restore lost details of the picture literally in one click.
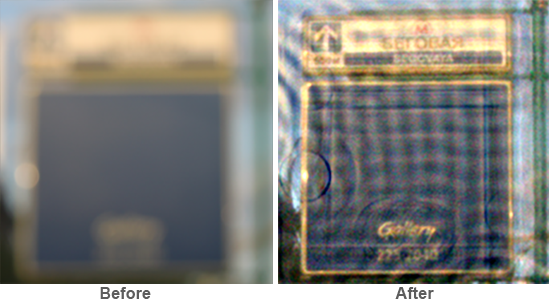
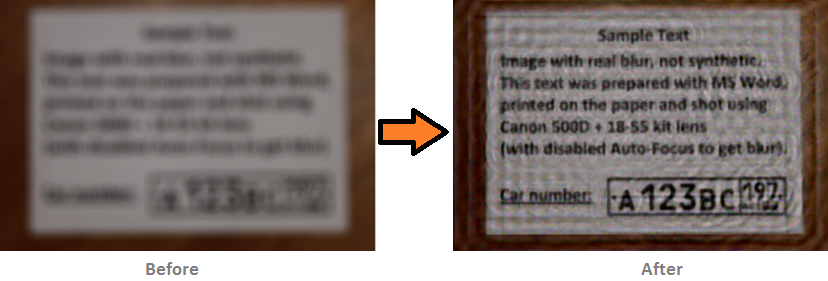
Make Defocused Images Readable Again
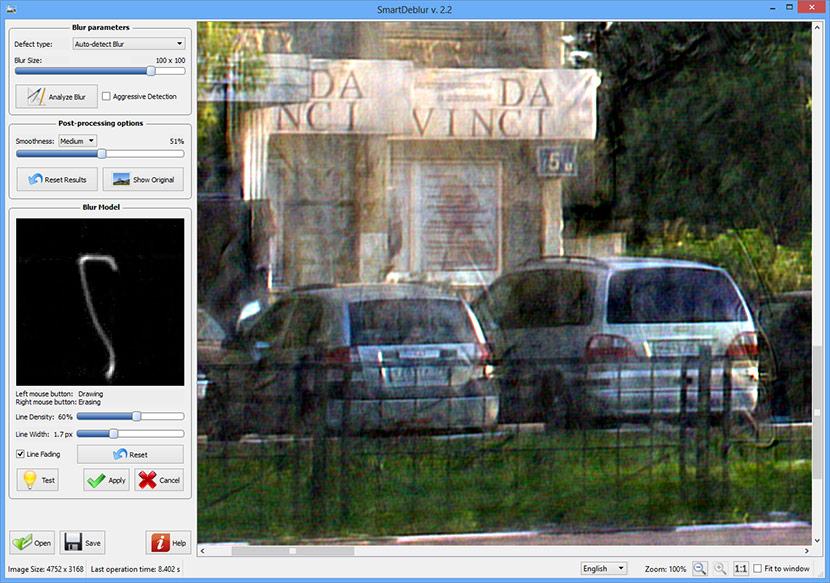
Out-of-focus images are harder to restore, but with SmartDeblur even serious defocus becomes revertible. Take a look at the example: from virtually unreadable picture we were able to restore most of the text.
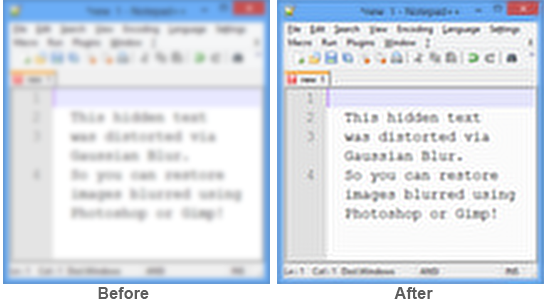
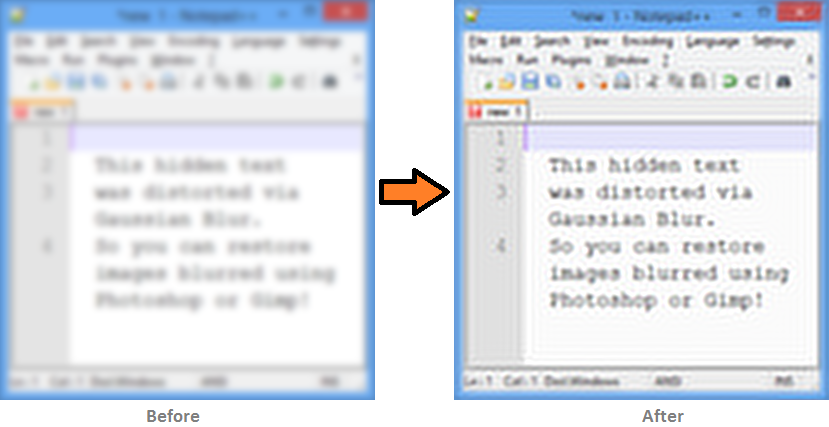
Easily Undo Gaussian Blur
Artificial blurs produced by Photoshop, Gimp and other editors are not a problem for you anymore too!
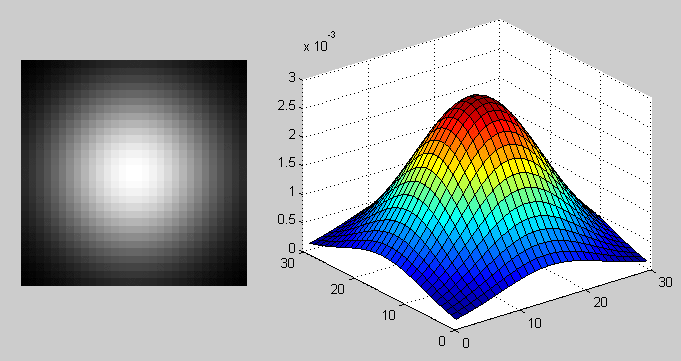
SmartDeblur detects Gaussian pattern and restore images to better details.
Fine-tuning for Even Better Results
How it works
Also you can take a look at sources for the previous version (1.27) of SmartDeblur on the GitHub:
https://github.com/Y-Vladimir/SmartDeblur
All source files are under the GPL v3 license.
Tutorial
First of all download SmartDeblur installer and install it (you need to have admin rights).
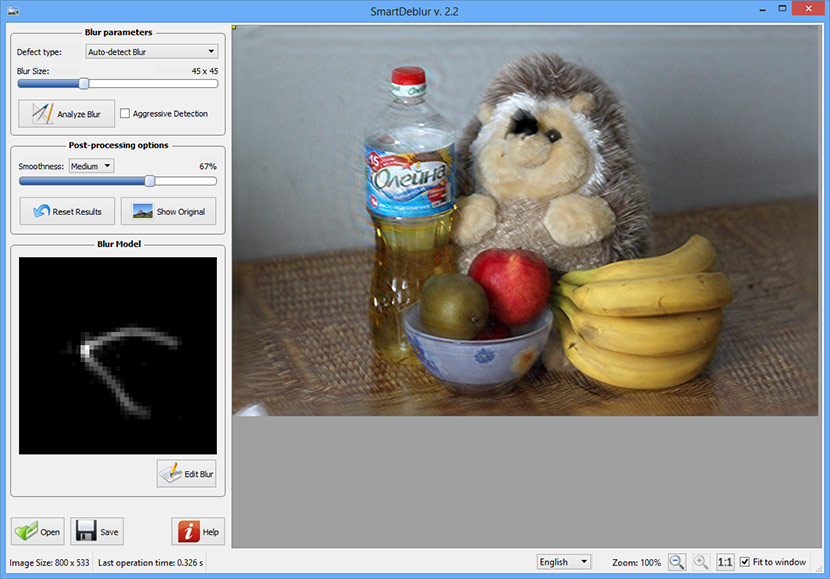
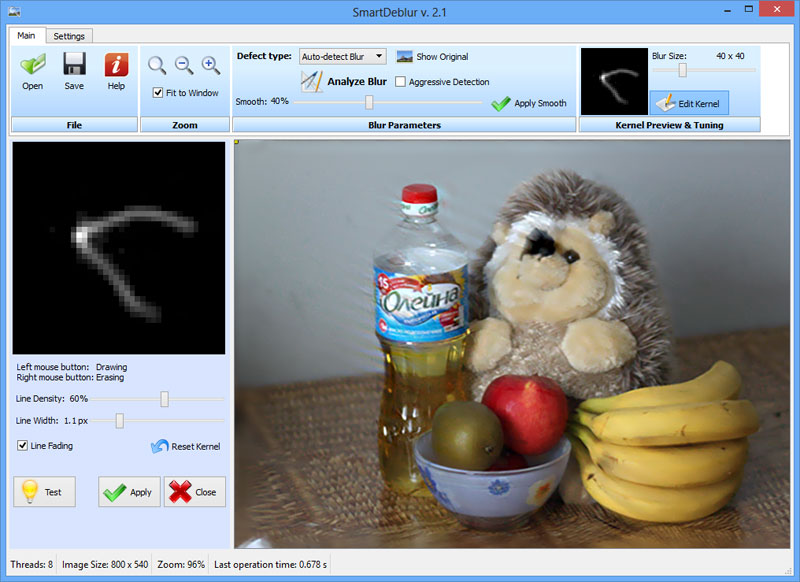
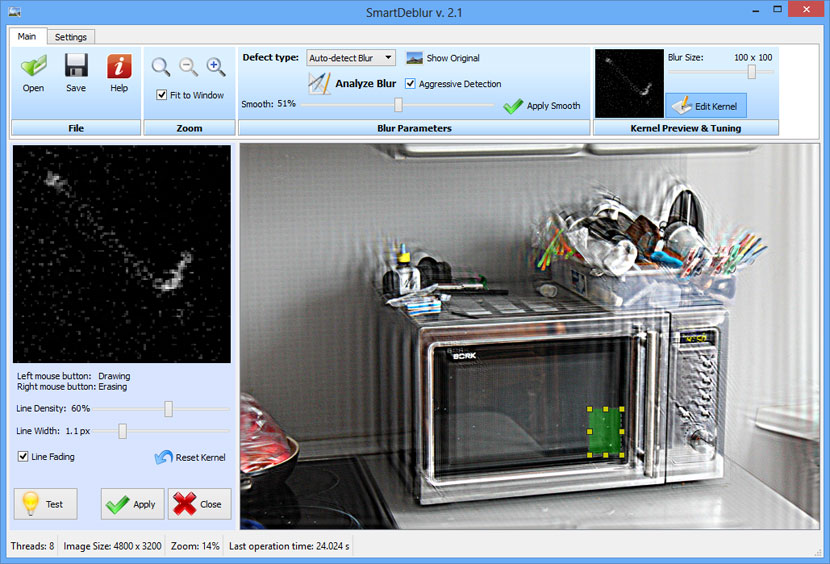
When the installation is complete go to the Start menu and run SmartDeblur — the main window will appear:
- File (left-bottom) — open/save images, see help
- Zoom (status bar) — manage image scale/zoom
- Blur Parameters — allows selecting a blur type and performing the basic image deblurring operations
- Blur Model — contains blur path preview and controls for changing the blur parameters
How to deblur an image

1. Click on the «Open» button to select your image (or use drag & drop).
The currently supported formats are JPEG, PNG, TIFF and BMP
The image will be loaded and shown in the main center area.
Then go to the «Blur Parameters» panel:
- Auto-detect Blur — automatically determine camera shake blur
- Out-of-Focus blur — blur due to incorrect focus
- Gaussian Blur — typically it’s a blur made by photo editors like Photoshop, Gimp, etc
Auto-detect Blur
In this mode, SmartDeblur will automatically analyze the image and determine the blur path. It is suitable for the common motion blur defects (like camera shake) and for small/medium defocus. If you need to restore images with large defocus — use «Out-of-Focus» or «Gaussian Blur» modes.
Then for a quick start you can just click on the «Analyze Blur» button and wait for a while (about 1-2 minutes). When the process is completed, the restored image will be shown in the main area. If the results looks good you just need to choose desired smooth level by moving the slider and clicking the «Apply Smooth» button.
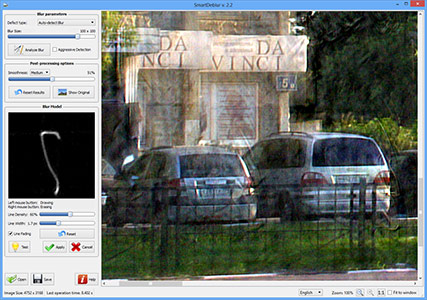
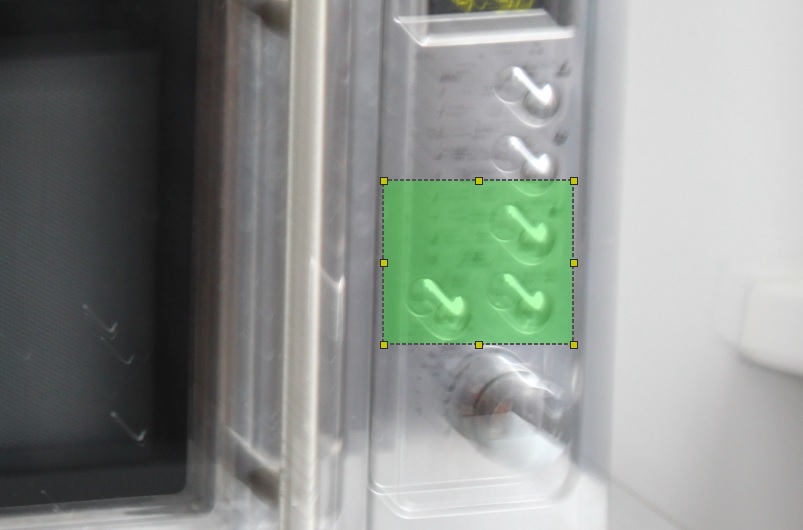
In case of bad results you can increase/decrease the «Blur Size» using the slider and manually select a region for blur estimation by clicking and dragging on the image. Region shall not be too small and shall contain salient structures. See example:
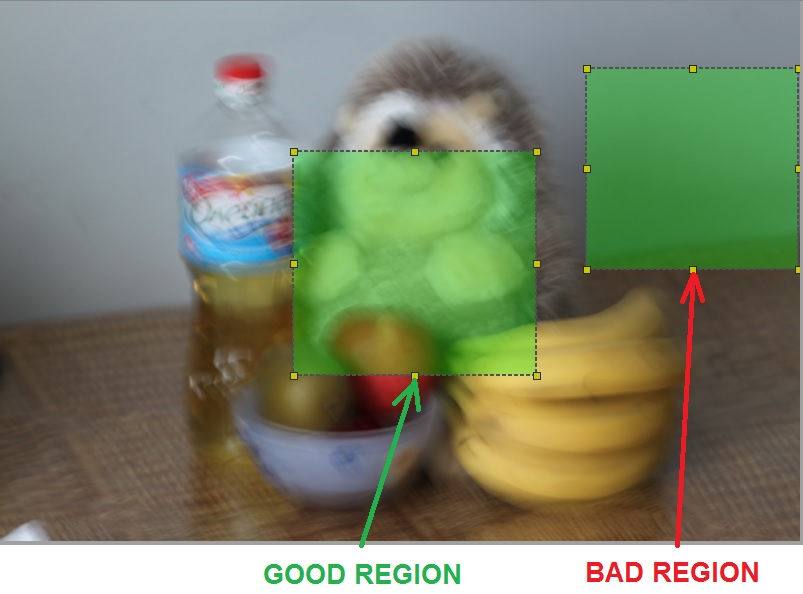
Another option is to use the «Aggressive Detection» checkbox. In this mode SmartDeblur will use some more aggressive strategies to find significant structures on the blurred image. Use this if the image contains clearly visible blur paths (from glares or another point light sources). In this case you need to select a small region containing that light sources:
And the last option to tune the blur analysis results is the «Kernel Editor». Click on this button to open the editor panel (will be shown on the left side).
Use left mouse button to fill in any discontinuous parts of a path, and right mouse button to remove unnecessary parts (like noise, wrongly detected curves, etc).
You can modify the painting pen parameters via the «Line Density» and «Line Width» sliders:
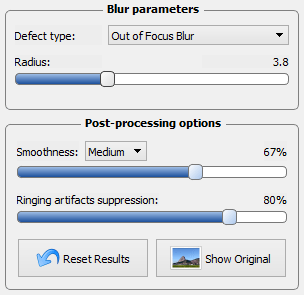
Out-of-Focus and Gaussian Blur
Use these modes to remove a blur caused by mis-focus or Gaussian/defocus blur created by image processing software. They work in manual mode, so you need to select the right blur radius.
To start deblurring just load an image and select the appropriate defect type.
Then move the «Radius» slider carefully, a preview result will be displayed (in grayscale to reach high speed). After you tune to the right radius value, release the slider and wait for the full processing (about 5-10 seconds). Finally choose Smooth level with the corresponding slider and release it button.
Command-Line Interface
Available in the PRO version only!
Using command-line interface you can easily integrate SmartDeblur with other software, or process images in batch mode. Syntax:
Usage: SmartDeblur [options] Examples: 1. Start GUI with specified image: SmartDeblur «Path\MyImage.jpg» 2. Simple processing w/o GUI: SmartDeblur -i «Path\MyImage.jpg» -o «Path\Result.jpg» 3. Advanced processing w/o GUI: SmartDeblur -i «Path\MyImage.jpg» -o «Path\Result.jpg» -r 10:30:500:400 -t auto -s 50 -a -e -m 65 -y medium Options: -?, -h, —help Displays this help. -i, —input
Input file path -o, —output
Output file path -r, —region Analyzing region x:y:width:height -t, —type Defect type: auto, focus, gaussian -s, —size Blur size or radius depending on blur type -a, —aggressive Use Aggressive Detection for ‘auto’ defect type -m, —smooth Smoothness value -y, —smoothType Smoothness type -p, —suppress Suppress ringing artifacts value (for ‘focus’ defect type only) -e, —report Save report that tracks all params, hashes, etc -k, —saveKernel Save kernel — don’t change original kernel name -u, —useKernel
Use kernel — don’t change original kernel name -d, —thread Threads count for processing
Reporting
Available in the PRO version only!
Detailed report on image processing (parameters used, blur assessment, image hashes, etc.), which is saved in a separate text file alongside the output image.
Report example:
======================================== ———- SmartDeblur REPORT ———- ======================================== —————- COMMON —————- Version: 2.3 PRO Date/Time: 21 Mar 2015 10:26:40 -0800 User Name: John —————— FILE —————— Input File Path: C:\Images\IMG_3442.jpg Input File SHA-1 Hash: 832d0bbb0b8b96ed7e2ebbdd01673ac2ebd73058 Output File Path: C:\Images\IMG_3442_res.jpg Output File SHA-1 Hash: 2a1307d3f172fe3ff95696ffb6878aad8ecd6958 —————- KERNEL —————- Kernel Size: 78 x 78 px Kernel Metric: 31 % (indicates how sharp the input image. 100% — sharp, 0% — blurry) ———— BLUR PARAMETERS ———— Defect Type: Auto-detect Blur Blur Size: 78 px Aggressive Detection: No Analyzing Region: x: 10, y: 50, width: 700, height: 400 ———— POST PROCESSING ———— Smoothness: 69 % (Medium)
SmartDeblur 2.1 — восстановление смазанных и расфокусированных изображений
Многие из вас уже читали серию моих постов про восстановление расфокусированных и смазанных изображений, а также пробовали бесплатные версии программы SmartDeblur, к одной из которых доступны исходники на GitHub
Программа и статьи вызвали большой интерес как в рунете, так и в других странах, поэтому мы рады представить коммерческую версию SmartDeblur.
Основные изменения:
— Поддержка больших изображений (до 36MP на 64-битной ОС и до 15MP на 32-битной)
— Возможность редактирования полученного kernel (траектории смаза)
— Увеличение скорости за счет оптимизаций и использования Intel IPP в качестве FFT
— Улучшение интерфейса
Адрес проекта: smartdeblur.net
Под катом много картинок!
Теория
Примеры работы
Устранение смаза
Это пример реального изображения, снятого камерой Canon 500D с объективом EF 85mm/1.8.
Траектория смаза была определена полностью автоматически. Результат кажется невероятным, но это действительно реальное изображение 🙂
Устранение синтетического размытия — Gaussian Blur
SmartDeblur также может улучшать изображения, которые были размыты такими фоторедакторами, как Photoshop или Gimp.
Несмотря на то, что смаз синтетический — 100% восстановления не получается из-за особенностей гауссиана при деконволюции, тем не менее, можно существенно улучшить читабельность текста:
Устранение расфокусировки
Ну и последний пример показывает работу восстановления изображений с неправильным фокусом.
Основное отличие от бесплатной версии — высокая скорость предпросмотра даже для 36MP изображений.
Остальные примеры обработки можно посмотреть на странице Examples
Подробная инструкция есть на странице Tutorial
Тонкая настройка
Если результат автоматического определения искажения не дал приемлемого результата, то вы можете открыть Kernel Editor и вручную отредактировать полученную траекторию смаза.
Выглядит это следующим образом:
Кроме того, на странице настроек можно поменять метод финальной обработки на более качественный. По умолчанию стоит «Medium-Quality (Wiener)» для большей скорости работы и меньшего потребления памяти.
По традиции за конструктивный фидбек раздаю ключики.
При подготовке материала использовались источники:
http://smartdeblur.net/
http://smartdeblur.net/tutorial.html
https://habr.com/ru/articles/180393/